

When to Use Multisig
Use multisig ownership when no single person on your team should be able to push a compose update on their own. Typical triggers:- Production apps where an unauthorized code change has material impact on users or funds.
- Compliance programs that require separation of duties for production changes.
- DAO-governed apps where token holders vote on what code runs.
- Insurance or audit requirements that ask for m-of-n approval on sensitive deployments.
owner() of your DstackApp contract must be able to authorize addComposeHash(bytes32) calls. Whatever contract shape makes that happen is up to you.
Ownership Model Recap
Your DstackApp contract stores:owner— the address allowed to calladdComposeHash,addDevice,removeDevice,setAllowAnyDevice, andtransferOwnership.allowedComposeHashes— the set of compose hashes approved to boot under this app identity.allowedDeviceIds— the set of nodes allowed to host this app (see Device Management).
owner is the deployer EOA that created the app. The CLI phala deploy --cvm-id ... --private-key ... path works as long as that EOA still holds ownership. To move to multisig, you transfer ownership to a contract address, after which direct EOA updates fail and all future updates go through the prepare and commit flow.
owner on DstackApp governs your application identity only. It does not control the KmsContract that Phala operates, and it cannot mint or rotate keys by itself. Keys are still derived inside the TEE after KMS verifies attestation against whatever compose hashes owner has approved.Transferring Ownership to a Safe
The transfer itself is a plaintransferOwnership(address) call on the DstackApp contract. You do it from the current owner EOA using any Ethereum or Base tool you prefer.
- Deploy your Safe first, or have its address handy. On Base, use safe.global with the network set to Base. Record the Safe address (for example
0x1234...abcd) and the signer threshold (for example 3-of-5). - Open your DstackApp contract on Basescan or Etherscan. The address is the same as your app ID with a
0xprefix. You can also find it on the Phala Cloud dashboard under the app overview. - DstackApp is deployed as a proxy contract, so its write methods live on the proxy page, not the implementation. Go to the Contract tab and choose Write as Proxy (not Write Contract). If the Write as Proxy tab is missing or shows no functions, click the Verify link on the proxy first — Basescan/Etherscan needs the implementation address resolved before it can expose the proxy’s write methods.
- Click Connect to Web3 and connect the EOA that currently owns the app.
- Find
transferOwnershipin the write methods. Enter the Safe address. Submit and wait for confirmation. - Verify on-chain. Switch to Read as Proxy and call
owner(). It should return the Safe address.
phala deploy --cvm-id <id> --private-key <eoa-key> will fail with an owner-mismatch error on the addComposeHash step. Do not panic — this is expected. All future compose updates go through the prepare and commit flow described below.
If your governance contract is a Timelock, DAO voting contract, or any other shape, the steps are the same. You are simply calling transferOwnership(address) from the EOA that currently holds the role. Use whichever UI you prefer — Basescan, Etherscan, Safe Transaction Builder, cast send, Foundry scripts — the on-chain effect is identical.
The Prepare, Approve, Commit Model
With EOA ownership, the CLI does everything in one shot: it reads your compose file, computes the hash, sendsaddComposeHash to the chain, and tells Phala Cloud to roll the update forward. With multisig ownership, that one step splits into three phases across two different actors.
The CVM does not restart until Phase 3 completes. Prepare and approve are both no-ops from the running CVM’s point of view — the live workload keeps serving traffic under the old compose hash throughout. Only when commit succeeds does Phala Cloud save the new compose, re-encrypt env vars, and trigger the restart. If you abandon a flow halfway, there is nothing to roll back.
phala deploy --cvm-id ... --prepare-only -c new-compose.yml. Phala Cloud computes the compose hash, checks current on-chain state, and mints a one-time commit token (a UUID) valid for 14 days. The CLI prints the compose hash, the exact on-chain action required, and the commit URLs. Nothing on-chain has changed yet, and the CVM keeps running its existing compose hash.
Phase 2 — Approve. A human (or a governance contract) takes the compose hash from Phase 1 and submits addComposeHash(bytes32) to the DstackApp contract through the Safe, Timelock, or DAO. This is where signatures are collected and the transaction is mined. Phala Cloud is not involved in Phase 2 at all — the approvers only need the compose hash and the DstackApp contract address. The CVM is still running the old compose during this phase.
Phase 3 — Commit. Once the on-chain transaction is mined, someone (the original operator, a CI job, or an automation bot) tells Phala Cloud the transaction landed. The backend verifies that the compose hash is now registered on-chain and that the provided transaction hash contains the expected state change, then rolls the CVM update forward — this is the point where the CVM actually restarts onto the new compose.
A few properties of this design worth internalizing:
- Commit tokens expire after 14 days. If approval takes longer, re-run prepare. The expiry is enforced by the Phala Cloud backend. For a simple Safe with a few signers this is rarely a problem, but see the Timelock note below.
- Re-preparing invalidates the previous token. If you run
--prepare-onlytwice for the same CVM, only the second token works. This is intentional: it prevents stale updates from racing with newer ones. If two people are preparing in parallel, coordinate offline first. - Prepare is idempotent with respect to the compose file. If the compose file has not changed, re-running prepare gives you a fresh token pointing at the same compose hash.
- Prepare does not touch the CVM. The CVM keeps running the old compose hash until Phase 3 completes. If you cancel mid-flow, nothing rolls back — just discard the token.
Long-delay Timelocks and the 14-day window
If your governance contract is a Timelock with a delay approaching or exceeding 14 days, the straightforward “prepare, propose, wait, execute, commit” sequence can fail at commit time: by the time the Timelock delay elapses, the commit token has already expired. The fix is to decouple the Phase 2 on-chain action from the Phase 1 token’s lifetime. Phases 2 and 3 only need to agree on the compose hash, not the token, because the backend verifies the chain state by hash. Concretely:- Run
phala deploy --cvm-id ... --prepare-onlyonce to discover the compose hash. Record it and discard the token — you will not use it. - Encode
addComposeHash(bytes32)with that hash and queue it through your Timelock immediately. - Wait for the Timelock delay to elapse and execute the transaction on-chain. Record the resulting transaction hash.
- Run
phala deploy --cvm-id ... --prepare-onlyagain with the same compose file. This produces a fresh 14-day token pointing at the same compose hash. - Immediately commit with the fresh token and the real transaction hash.
CLI: Prepare Phase
Compose updates
For a normal compose file update:-e .env is optional; include it if you are changing environment variables alongside the compose file. Environment variables are encrypted with the app’s public key and bound to the commit token — they land atomically when Phase 3 runs.
Human-readable output (exactly what the CLI prints with --no-json or when running interactively):
- Compose Hash — the 32-byte keccak256 hash of your compose document, prefixed with
0x. This is the exactbytes32argument to pass toaddComposeHashon-chain. It also serves as the idempotency key for the update. - App ID — the DstackApp contract address (same as the app ID with
0xprefix). This is thetoaddress for the on-chain transaction. - Device ID — the device identifier for the node currently hosting this CVM. It is shown so you can confirm whether the device is already allowed. If you see
Device ID: NOT registered, you also need to calladdDevice(bytes32)as part of the multisig flow (see section below). - Chain — human-readable chain name and EIP-155 chain ID. Double-check that your Safe and your CLI are pointed at the same chain.
- Contract — a block explorer link to the DstackApp contract. Use this to verify
owner()before approving, and to review the on-chain state after. - Commit Token — the UUID that unlocks Phase 3. It expires 14 days from prepare time. Treat it like a one-time API key.
- Commit URL — the dashboard Confirm Update page. Share this with approvers who want a guided UI for Phase 3.
- API Commit URL — the raw
POSTendpoint for Phase 3. Use this from CI or scripts. - On-chain Status — a live snapshot read from the chain at prepare time. It tells you whether
addComposeHashandaddDeviceare strictly required, or whether the state is already good (for example, if the compose hash is already registered from a previous aborted flow).
Replicating to a new node
Replication to an additional node (for HA or migration) uses the same prepare mechanism:device_id is not already on the allowlist, the on-chain status will show Device ID: NOT registered — in that case you need to run two separate on-chain actions as part of Phase 2: addDevice(bytes32) for the new device, then addComposeHash(bytes32) if the compose hash is also missing. Both can be batched into a single Safe transaction (see the Transaction Builder section below).
See Device Management for how to look up device_id for a given node.
What is on-chain Status telling me?
onchain_status reflects the actual DstackApp state at prepare time. There are three useful combinations:
compose_hash_allowed: falseanddevice_id_allowed: true— standard case for a compose file change on an existing node. ApproveaddComposeHashonly.compose_hash_allowed: falseanddevice_id_allowed: false— new node and new compose hash. ApproveaddDeviceandaddComposeHash, ideally in a single Safe batch.compose_hash_allowed: true— the compose hash was already registered, perhaps by a previous aborted prepare. You can skip Phase 2 entirely and go straight to Phase 3 with--transaction-hash already-registered.
Approve Phase — Three Paths
The approve phase is off the Phala Cloud backend. Whoever holds signing power on the owner contract runs an on-chain transaction that callsaddComposeHash(bytes32) (and possibly addDevice(bytes32)) on the DstackApp contract. How they do it depends on your governance setup.
Path A: Dashboard Confirm Update page
The simplest path is for a single human approver who personally holds a signing wallet. Open theCommit URL from the prepare output. It takes you to the Confirm Update page, which shows:
- Workspace name and slug
- CVM name and App ID
- The compose hash to register (with a copy button)
- Who initiated the prepare and when
- An input for the transaction hash
- A large Commit Update button
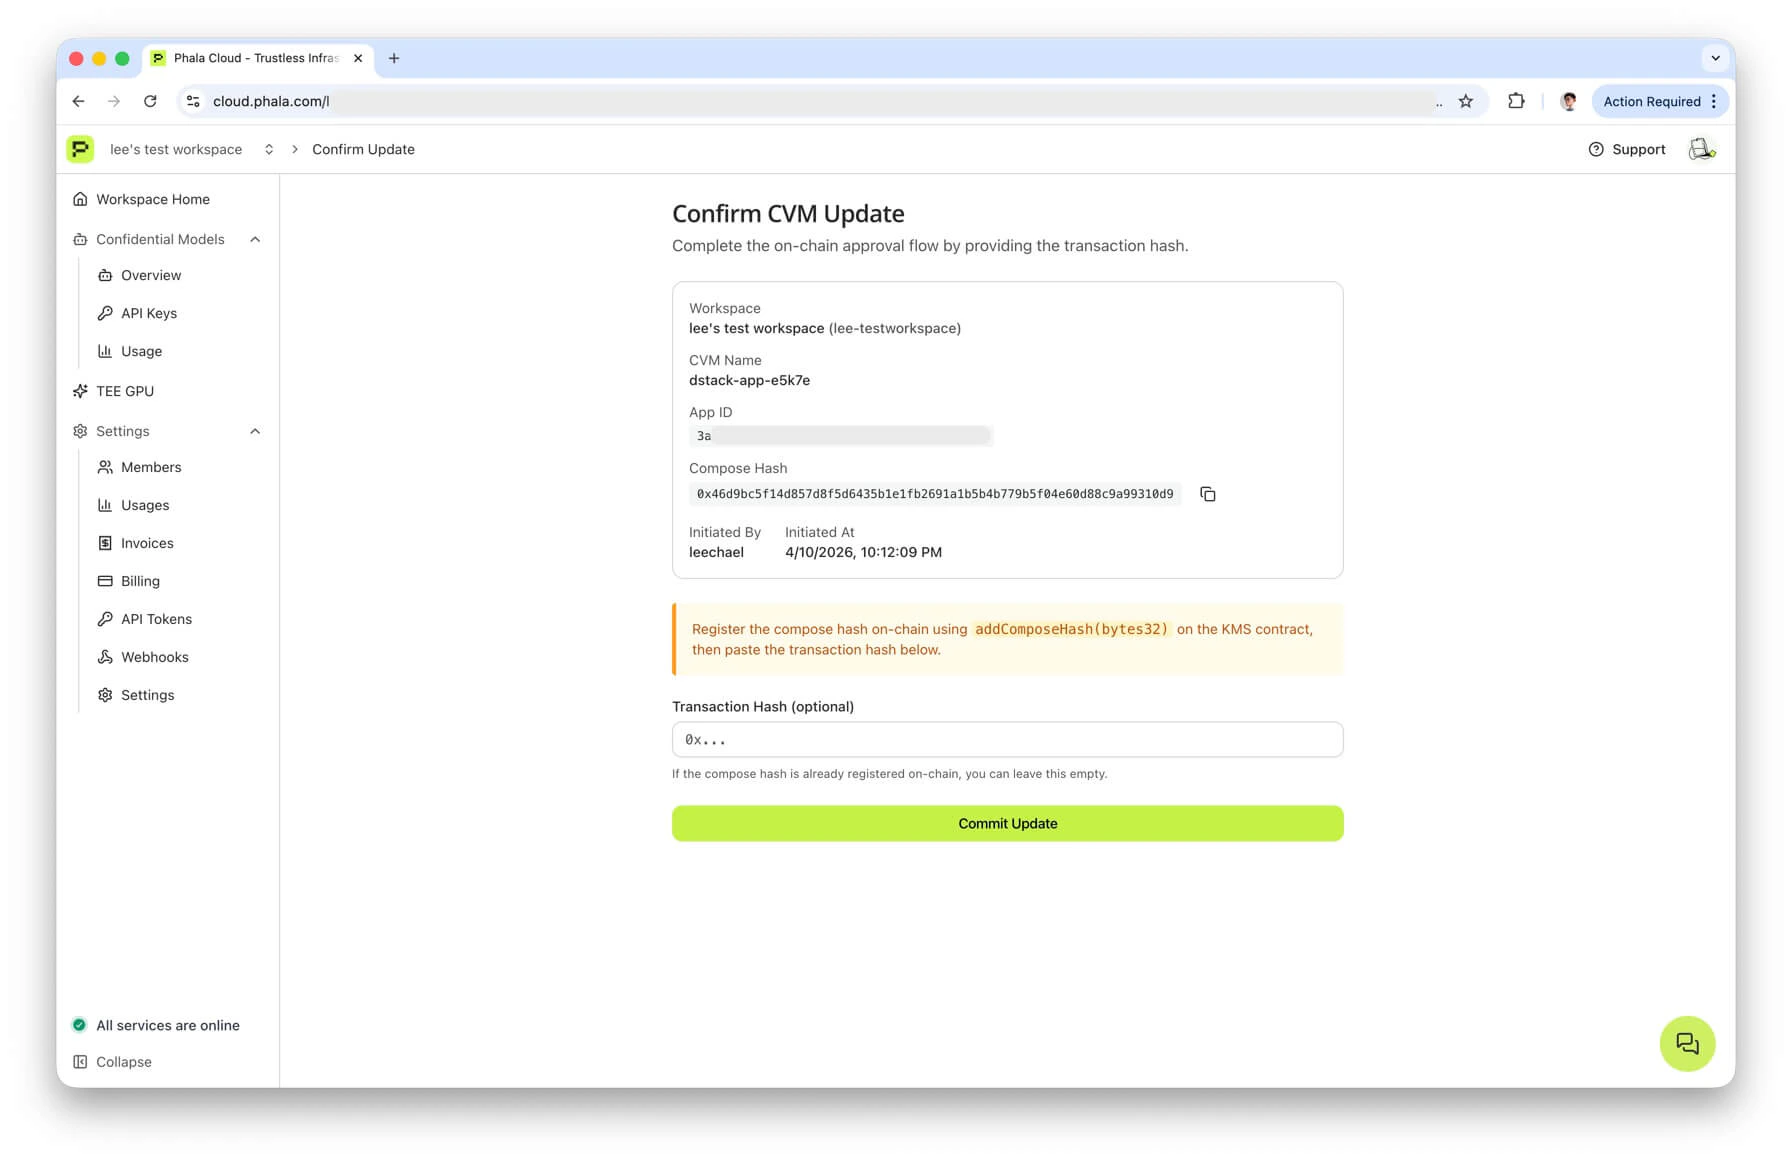
addComposeHash from your wallet (via Basescan, Etherscan, Safe, or any other tool), then paste the resulting transaction hash into the form. Once you click Commit Update, the dashboard calls the same POST /cvms/{id}/commit-update endpoint that the CLI calls in Phase 3, and the backend verifies the transaction receipt before rolling the update forward.
If the compose hash is already registered on-chain (see onchain_status.compose_hash_allowed: true), leave the transaction hash field empty. The backend will accept already-registered as a sentinel and only re-verify state.
Path B: Gnosis Safe Transaction Builder
For a Safe-owned app, most teams use the official Transaction Builder app.- Open your Safe at app.safe.global. Make sure the network matches the chain from the prepare output (Base or Ethereum).
- Go to Apps and open Transaction Builder.
- Paste the DstackApp contract address (the App ID field from prepare output) into the address field. The Transaction Builder will fetch the ABI from Basescan/Etherscan if the contract is verified. If auto-fetch fails, paste the ABI for
addComposeHash(bytes32)manually — you can copy it from any existing DstackApp contract page on the explorer. - Select
addComposeHashfrom the method dropdown. - Enter the compose hash from the prepare output as the
bytes32parameter. Triple-check the value — it is the single most important field and it is irreversible once executed. A mistyped hash means you authorized the wrong code to run. - Click Add Transaction. If you also need to allow a new device, click Add Transaction again, select
addDevice, and enter thedevice_idfrom the prepare output. Both actions end up in the same Safe batch. - Click Create Batch, then Send Batch. This creates a Safe transaction pending signatures.
- Have the other signers approve through Safe’s Transactions tab until the threshold is met.
- Execute the transaction. Copy the resulting transaction hash — you will need it for Phase 3.
Path C: Custom governance contract (Timelock, DAO)
If your owner is a Timelock or a DAO voting contract, you typically need to encode a generic proposal targeting the DstackApp contract. Two pieces of information are required:- Target — the DstackApp contract address (the
app_idfield from prepare output, with0xprefix). - Calldata — the ABI-encoded call to
addComposeHash(bytes32)with the compose hash as the argument.
cast (Foundry):
viem:
CLI: Commit Phase
Once the on-chain transaction is mined, tell Phala Cloud to roll the CVM update forward.api_commit_url:
- Looks up the token and checks that it has not expired or been superseded.
- Verifies that the compose hash in the request matches the compose hash bound to the token at prepare time. If they differ, it rejects with
HASH_INVALID_OR_EXPIRED— usually because the compose file was edited between prepare and commit. - Reads
allowedComposeHashesfrom the DstackApp contract. If the compose hash is not present on-chain, it rejects withHASH_REGISTRATION_REQUIRED. - If a transaction hash other than
already-registeredwas provided, it fetches the receipt and checks that the transaction interacted with the DstackApp contract and produced the expected state change. Mismatches surface asTX_VERIFICATION_FAILED. - On success, proceeds with the regular update workflow: saves the new compose file, re-encrypts environment variables, and triggers the CVM restart.
correlation_id lets you trace the update in the workspace audit log. status reflects the CVM state machine at the moment of response — follow up with phala cvms get <cvm-uuid> or the dashboard to watch the actual update complete.
Automating Approvals with Webhooks
The whole flow above assumes a human notices when a prepare happens. For production teams, that is too fragile. Phala Cloud emits acvm.update.pending_approval webhook every time a prepare-only update is created, which lets you wire prepare into Slack bots, approval dashboards, or automated Safe proposers.
Subscribing
In the dashboard, go to Workspace → Webhooks and click Add Webhook. Enter:- Endpoint URL — an HTTPS URL you control. Plain
http://is rejected, and private IPs, cloud metadata endpoints,localhost, and.localhostnames are all blocked at delivery time by the URL validator. - Events — check Update Pending Approval (event type
cvm.update.pending_approval). - Name (optional) — a label for your own bookkeeping.
whsec_ followed by 32 base64url bytes. Copy it into your secrets manager right away. If you lose it, you can reveal it again or rotate it, but both actions require a second-factor challenge — the reveal and rotate endpoints are gated by 2FA step-up verification.

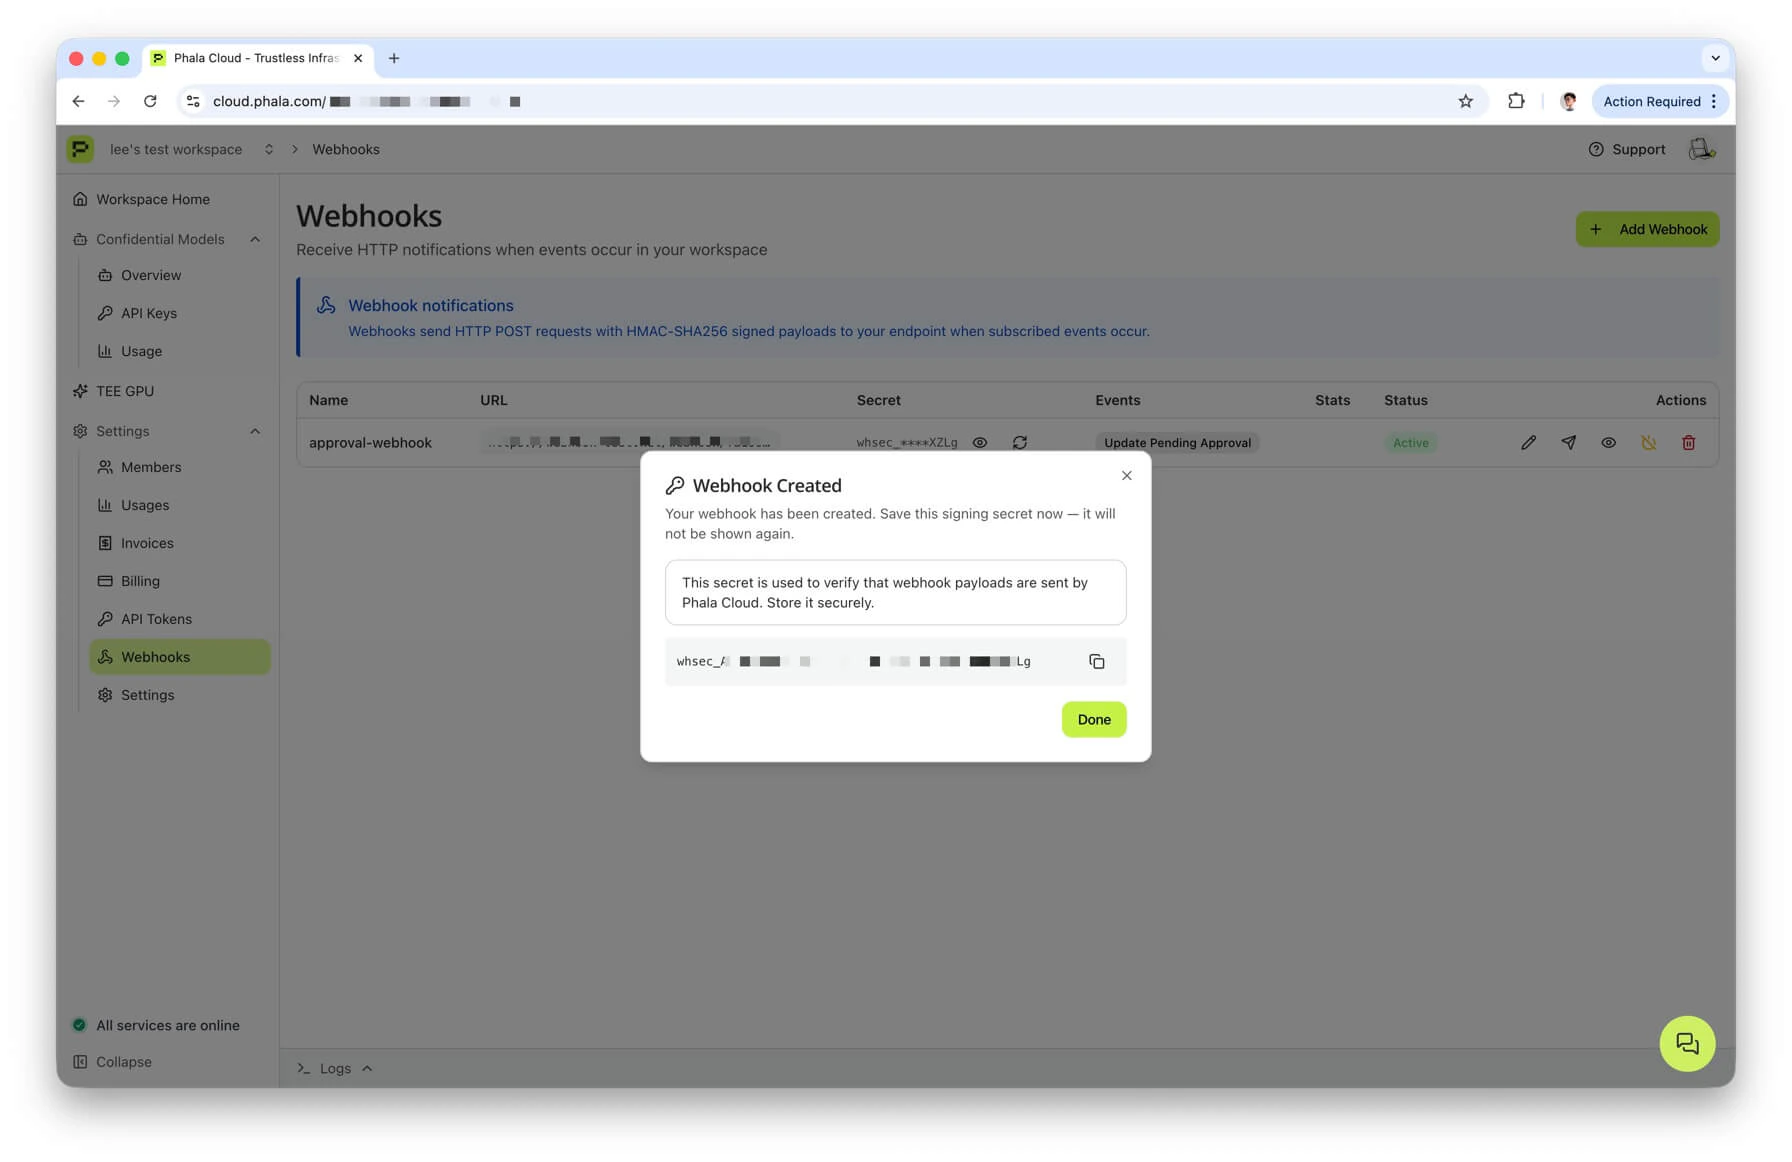
secret on create. Subsequent GET /workspace/webhooks and GET /workspace/webhooks/{id} responses return a masked version — you have to hit POST /workspace/webhooks/{id}/reveal-secret (2FA required) to see the full value again, or POST /workspace/webhooks/{id}/rotate-secret (also 2FA required) to generate a new one.
Payload
When a prepare-only update happens, Phala Cloud sends a JSON POST to your endpoint:id— unique event ID in the formevt_<16 hex chars>. Use this as an idempotency key on your side.event— the event type. For this flow it is alwayscvm.update.pending_approval.version— schema version, currently"1".created_at— ISO 8601 UTC timestamp of dispatch.workspace.id— the workspace slug (not the numeric team ID).workspace.name— human-readable workspace name.
data fields:
cvm_id— the CVM UUID that is being updated.cvm_name— user-provided CVM name.compose_hash— the 32-byte compose hash with0xprefix. This is the argument toaddComposeHash.app_id— the DstackApp contract address. Same value asonchain_action.to.device_id— the node device ID currently hosting the CVM.kms.chain_id— EIP-155 chain ID (1 for Ethereum, 8453 for Base).kms.contract_address— the KmsContract address (the Phala-operated KMS root, not your DstackApp).onchain_action.to— target address for the on-chain transaction (your DstackApp address).onchain_action.method— the method signature, currently alwaysaddComposeHash(bytes32).onchain_action.calldata— the raw compose hash. Note again: this is not ABI-encoded calldata. Encode it yourself if your governance contract needs a full function call payload.commit_token— the commit token. Combined withapi_commit_url, enough to complete Phase 3.commit_url— the dashboard Confirm Update page.api_commit_url— the rawPOSTendpoint.expires_at— ISO 8601 timestamp, exactly 14 days after dispatch. Your automation should refuse to act on expired tokens.initiated_by.user_id— hashed user ID of the person who ran--prepare-only.initiated_by.username— their username.
Headers
Every webhook delivery carries these HTTP headers:Content-Type: application/jsonUser-Agent: PhalaCloud-Webhook/1.0X-Webhook-Id— same aspayload.id.X-Webhook-Event— same aspayload.event.X-Webhook-Timestamp— Unix epoch seconds as a decimal string. This is the timestamp used in the HMAC message.X-Webhook-Signature— the HMAC-SHA256 signature, in the formsha256=<64 hex chars>.
HMAC verification
The signature is computed from the raw request body (as sent on the wire) and the timestamp header. The exact formula:- The body must be the raw POST body, not a re-serialized version. If your framework parses JSON and then re-encodes it, key order or whitespace may differ and the HMAC will not match. Grab the raw bytes before parsing.
- Use a constant-time comparison when matching the signature. A naive
==on strings leaks timing information.
Python (FastAPI)
Node.js (Express)
Delivery semantics
- Success — any HTTP 2xx response is treated as success. The delivery is recorded and no further attempts are made.
- Failure — any non-2xx response, connection error, or timeout is treated as a failure and retried.
- Timeout — 10 seconds per delivery attempt. Design your handler to return quickly (queue the work, return 200 immediately).
- Retries — up to 3 additional attempts on failure, with delays of 1 minute, 10 minutes, and 1 hour. After the final attempt the delivery is logged as
failedand no further retries happen. - Idempotency — retries reuse the same
event_id. Use it as a dedup key on your side so retried deliveries do not double-approve. - URL validation at delivery time — every attempt re-validates the URL. HTTPS is mandatory; private IPs, link-local addresses, loopback,
169.254.169.254(cloud metadata),localhost, and.localhostnames are all rejected. This guards against DNS rebinding attacks — a hostname that passes validation at save time but later resolves to an internal IP will be blocked on delivery.
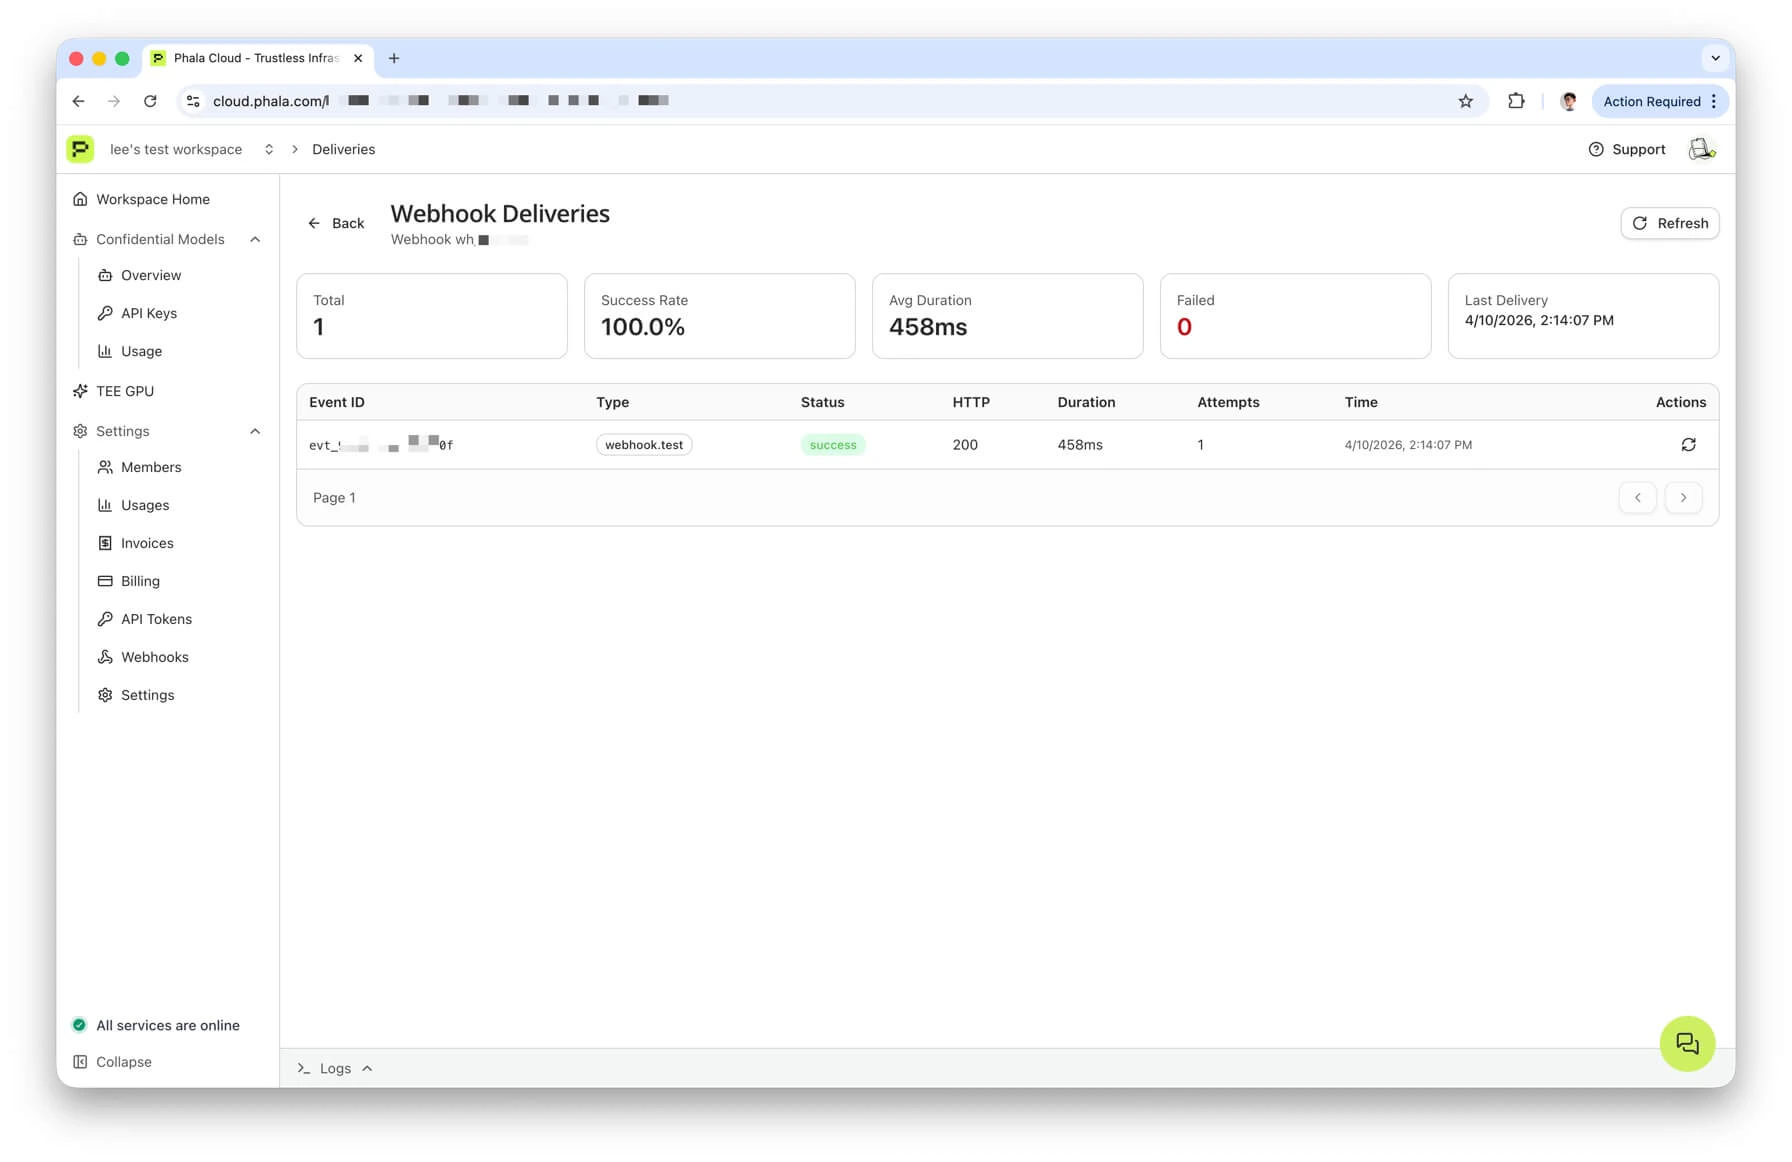
Viewing deliveries
The dashboard has a per-webhook deliveries page at Workspace → Webhooks → (view icon) that shows the last 50 attempts: status, attempt count, response code, latency, and any error message. From the same page you can resend a failed delivery — this generates a newevent_id linked to the original via original_event_id, so your handler can dedupe either way.
Automation patterns
Once you have a verified receiver, the question is what to do with the event. A few common shapes:- Slack bot approval — post a message to a private channel with the CVM name, compose hash, and a link to the Confirm Update page. Require a specific reviewer to click an approval button, then call
api_commit_urlfrom the bot after the on-chain transaction is mined. - Auto-propose to Safe — use the Safe API Kit to create a pending Safe transaction calling
addComposeHash(bytes32)the moment a webhook fires. Signers approve in the Safe UI. A second script watches the Safe for executed transactions and calls the commit endpoint when the transaction lands. - CI/CD approval queue — store the webhook payload in a queue table (Postgres, Redis, S3). Your release pipeline reads the queue, assigns a reviewer, and eventually commits through a service account.
expires_atgates the queue: drop entries after 14 days. - Timelock relay — decode the webhook into a Timelock proposal, submit, wait for the delay to elapse, execute, and commit. This is the fully on-chain DAO shape.
Error Modes and Troubleshooting
Compose hash drift between prepare and commit
Symptom: Phase 3 fails withHASH_INVALID_OR_EXPIRED even though the on-chain transaction was accepted.
Cause: someone edited the compose file between prepare and commit, so the hash you registered on-chain no longer matches the compose currently saved for this CVM. The backend re-hashes the compose document at commit time and refuses to roll forward if the hashes disagree.
Fix: rerun phala deploy --cvm-id ... --prepare-only -c new-compose.yml with the final compose file, repeat Phase 2 with the new hash, and commit again. The old on-chain addComposeHash is harmless — it stays in the allowlist but is never used.
Expired commit token
Symptom: Phase 3 fails withFailed to commit CVM update: ... expired ... and the CLI suggests running --prepare-only again.
Cause: either the 14-day TTL elapsed, or a newer prepare for the same CVM invalidated this token.
Fix: rerun prepare. If your team is hitting the 14-day window regularly, shorten your review cycle or switch to webhook-driven automation. If a second operator also ran prepare, coordinate and pick which token to use — only the latest one is valid.
Owner mismatch (direct EOA update after transferring to Safe)
Symptom:phala deploy --cvm-id ... --private-key ... -c new-compose.yml fails inside the addComposeHash or addDevice step with an EVM revert about ownership.
Cause: you transferred ownership to a Safe (or any other contract) and then tried to update using an EOA. The EOA no longer holds the owner role, so the on-chain write reverts.
Fix: check owner() on Basescan or Etherscan. If it returns a Safe address, use the prepare and commit flow. If it returns an EOA different from the one you signed with, you transferred to the wrong account — recover by signing with the correct EOA and calling transferOwnership back, or by using the current owner to push the update.
Transaction reverted on-chain
Symptom: Your Safe or governance contract executes the proposal but theaddComposeHash call reverts.
Common causes:
- The Safe is on a different chain than the DstackApp contract. Double-check the network selector before signing.
- The calldata was hand-built with the wrong function selector or the wrong argument type. Use
cast calldata-decodeto sanity-check before proposing. - The
owner()of the DstackApp contract is still the EOA, not the Safe. Verify ownership was transferred before preparing. - Gas ran out on a Timelock relay. Resubmit with a higher gas limit.
Error code reference
The four error codes you will see most often in this flow all live under Module 01 in the Error Codes reference:ERR-01-005 (hash registration required), ERR-01-006 (hash invalid or expired), ERR-01-007 (transaction verification failed), and ERR-01-008 (hash not allowed). The reference page has the full list with HTTP status codes and exception class names; use it as the source of truth.
A quick map of which phase you most commonly hit each one in:
- Phase 3 commit fails with
ERR-01-005— Phase 2 has not actually landed on-chain yet, or it landed on a different contract. CheckallowedComposeHasheson the DstackApp you prepared against. - Phase 3 commit fails with
ERR-01-006— the commit token is expired or superseded, or the compose file on the backend no longer matches what the token was bound to. Re-prepare. - Phase 3 commit fails with
ERR-01-007— the transaction hash you passed does not verify against the expected state change. Double-check you pasted the correct hash and that the transaction is mined. - Phase 3 commit fails with
ERR-01-008— the compose hash is simply not on the allowlist. Same remediation asERR-01-005; most often it means the Safe batch executed but targeted the wrong address or wrong method selector.
ERR-01-006, it explicitly hints at re-running --prepare-only to get a new token. When it hits ERR-01-007, it prints the transaction hash so you can look it up on the explorer.
Device Operations Without CLI Prepare/Commit
The workaround is straightforward: use the same Safe Transaction Builder or governance proposal path from the approve phase, just targeting a different method on the same DstackApp contract.- Look up the
device_idyou want to add or remove. For a new node, this is thedevice_idshown in the node picker when provisioning, and also in the prepare output when you runphala cvms replicate ... --prepare-only. See Device Management for the lookup paths. - Open your DstackApp contract on Basescan or Etherscan, or open Safe Transaction Builder and paste the contract address.
- Call the relevant method:
addDevice(bytes32 deviceId)— allow a specific device to host the app.removeDevice(bytes32 deviceId)— revoke a previously allowed device.setAllowAnyDevice(bool allow)— toggle the global bypass. Whentrue, any node in the workspace can boot the CVM without the per-device check.
- Collect Safe signatures and execute, or push through the Timelock delay / DAO vote.
- There is no commit phase for device operations. The next time the CVM is provisioned on a new node, KMS reads the allowlist straight from the contract.
device_id is derived from TDX PPID, the one-node-to-one-device rule, and HA recommendations for allowAnyDevice.
Next Steps
- Deploying with Onchain KMS — the first-time deployment walkthrough.
- Updating with Onchain KMS — the direct EOA update path when ownership has not been transferred to a multisig yet.
- Understanding Onchain KMS — the conceptual model (contracts, boot-time flow, compose hash).
- Device Management — device allowlisting, PPID, HA, and the
allow-devicesCLI reference. - Cloud vs Onchain KMS — conceptual comparison and governance trade-offs.