> ## Documentation Index
> Fetch the complete documentation index at: https://docs.phala.com/llms.txt
> Use this file to discover all available pages before exploring further.
# Deploying with Onchain KMS
> Deploy a dstack CVM whose authorization is governed by a smart contract on Ethereum or Base, using either the Phala Cloud dashboard or the phala CLI.
This page walks through the **first deployment** of an Onchain KMS CVM end to end, in the dashboard and from the CLI, then shows how to verify the result on-chain and in Phala Cloud.
Before you start, skim [Understanding Onchain KMS](/phala-cloud/key-management/understanding-onchain-kms) for the mental model — which contracts exist, who signs what, and how the KMS verifies your CVM at boot time. If you are weighing Cloud KMS versus Onchain KMS, see [Cloud vs Onchain KMS](/phala-cloud/key-management/cloud-vs-onchain-kms) first.
Once your CVM is running, the follow-up guides are:
* [Updating with Onchain KMS](/phala-cloud/key-management/updating-with-onchain-kms) — roll a new compose file when you hold the DstackApp owner key.
* [Multisig and Governance](/phala-cloud/key-management/multisig-governance) — the same flow when the DstackApp owner is a Safe, timelock, or DAO contract.
* [Device Management](/phala-cloud/key-management/device-management) — allowlist the nodes your app is allowed to run on.
## Prerequisites
You need the following before starting:
* **The phala CLI** if you plan to deploy from the command line. Install it globally with npm, or run it on demand without installing:
```bash theme={"system"}
npm install -g phala
```
After installing, authenticate with `phala login` (device flow) or `phala login --manual` (API key).
* **A wallet and its private key.** The first deployment signs one transaction (`deployAndRegisterApp` on KmsAuth). Subsequent compose updates sign one more (`addComposeHash` on your DstackApp), plus possibly `addDevice` if the node changes. For production, you will typically transfer ownership to a Safe after the first deploy — see [Multisig and Governance](/phala-cloud/key-management/multisig-governance).
* **A little gas.** The CLI enforces a minimum balance of 0.001 ETH by default before it will attempt to deploy. For first-time users, **Base is the recommended chain** because the same transactions cost a fraction of a cent. Ethereum mainnet is supported if you want maximum decentralization and are willing to pay L1 gas.
* **An RPC URL for the chain you pick** (optional). The CLI and SDK use viem internally, which ships with a default public RPC endpoint for each supported chain, so you can often skip this. For production or anything that does more than a handful of calls, buy an RPC from a reliable provider (Alchemy, QuickNode, Infura, or equivalent) and pass it via `--rpc-url` or the `ETH_RPC_URL` environment variable (the foundry/cast convention). The dashboard uses a bundled RPC by default and also lets you override it per deployment.
* **A `docker-compose.yml`** for the workload you want to run. This gets embedded into the `app-compose.json` manifest described above.
* **Environment variables** (optional). Your workload may not need any beyond what the image already defaults to. If it does, pass them with a `.env` file (`-e .env`) or inline (`-e KEY=VALUE`). Env vars are **end-to-end encrypted** before they leave the CLI — the CLI fetches the CVM's per-application `app_env_encrypt_pubkey` (a public key derived inside the KMS), encrypts each value locally, and submits only the ciphertext to the backend. Neither Phala Cloud nor any node operator can read plaintext env vars; only the CVM can, after the KMS releases the matching private key.
The KmsAuth contract addresses for Ethereum and Base are listed in [Cloud vs Onchain KMS](/phala-cloud/key-management/cloud-vs-onchain-kms#ethereum-vs-base). Do not hard-code them anywhere — the CLI and dashboard read them from the Phala Cloud backend.
You do not need to install anything dstack- or solidity-related. The CLI bundles the KmsAuth and DstackApp ABIs and handles the transaction construction for you.
### Checklist
Before running the CLI or opening the dashboard, make sure you can answer yes to all of the following:
* I have an API key or an active `phala login` session for the workspace I want to deploy into.
* I have a `docker-compose.yml` that runs my workload end to end locally.
* I have a wallet and I know its private key (or I have a browser wallet extension ready).
* My wallet holds at least a little native token on the chain I am targeting — 0.001 ETH on Base is plenty for the first deploy and the first few updates; on Ethereum mainnet you will want more depending on current gas.
* I know which chain I want to govern this application: Base for fast and cheap, Ethereum for maximum decentralization.
### A note on private key hygiene
The CLI accepts the deploy private key via `--private-key` or the `PRIVATE_KEY` environment variable. Both leave a trail somewhere (shell history, environment export) and are fine for a dev wallet or a CI secret, but they are not a long-term production posture. After your first successful deploy, the recommended path is:
1. Keep the deploy wallet as the initial DstackApp owner only long enough to verify the CVM is running.
2. Transfer `owner` to a Safe or timelock that you actually use for production governance.
3. From that point on, updates go through [Multisig and Governance](/phala-cloud/key-management/multisig-governance), not through `--private-key`.
Do not put a mainnet hot wallet private key into a shared CI environment. If you need CI to update your CVM regularly, use a dedicated wallet that only holds enough gas for transactions and scope its permissions via a multisig or a restricted-update contract.
## A Concrete Example Before We Start
To make the rest of this page easier to follow, imagine you want to deploy the [Phala Cloud Gin starter](https://github.com/Phala-Network/phala-cloud-gin-starter) as a CVM on Base, with the DstackApp owned by your personal wallet for now. You will upgrade to a Safe after the first deploy is working.
The Gin starter is only one of several ready-to-run templates maintained by Phala Network. If Go is not your thing, you can swap it for any of the following — the compose file layout and deployment flow are the same, only the image changes:
* [phala-cloud-python-starter](https://github.com/Phala-Network/phala-cloud-python-starter) — FastAPI × dstack
* [phala-cloud-nextjs-starter](https://github.com/Phala-Network/phala-cloud-nextjs-starter) — Next.js
* [phala-cloud-bun-starter](https://github.com/Phala-Network/phala-cloud-bun-starter) — Bun
Your `docker-compose.yml`:
```yaml theme={"system"}
services:
app:
image: ghcr.io/phala-network/phala-cloud-gin-starter:v0.1.5-full
restart: unless-stopped
ports:
- "80:8080"
volumes:
- /var/run/dstack.sock:/var/run/dstack.sock
environment:
- FAILURE_THRESHOLD=10
healthcheck:
test: ["CMD-SHELL", "wget -qO- http://127.0.0.1:8080/healthz >/dev/null 2>&1 || exit 1"]
interval: 10s
timeout: 5s
retries: 3
start_period: 10s
```
No `.env` file is needed for this example. If you later add env vars they will be end-to-end encrypted before leaving the CLI, as described in the prerequisites.
In your shell, export the private key of the wallet you will deploy from:
```bash theme={"system"}
export PRIVATE_KEY=0x...
```
You do not need to set `ETH_RPC_URL` for a first deploy — the CLI will fall back to viem's default public RPC for Base. If you hit rate limits, set `ETH_RPC_URL` to a paid RPC from Alchemy, QuickNode, or any other provider.
After this page you will have:
* A DstackApp contract on Base, owned by your wallet, with the initial compose hash in its allowlist and the scheduled node's device ID in its allowlist.
* A running CVM serving the Gin starter on port 80, whose keys the KMS released after verifying the TDX quote and reading the DstackApp.
* A clear command you can run any time you want to update the compose file.
With that in mind:
## Deploying via the Dashboard
The dashboard flow is a single wizard at `https://cloud.phala.com//deploy`. It provisions the CVM first, then pops open a drawer asking your wallet to deploy the DstackApp contract, then commits the CVM to the backend.
### Step 1: Start a new deployment
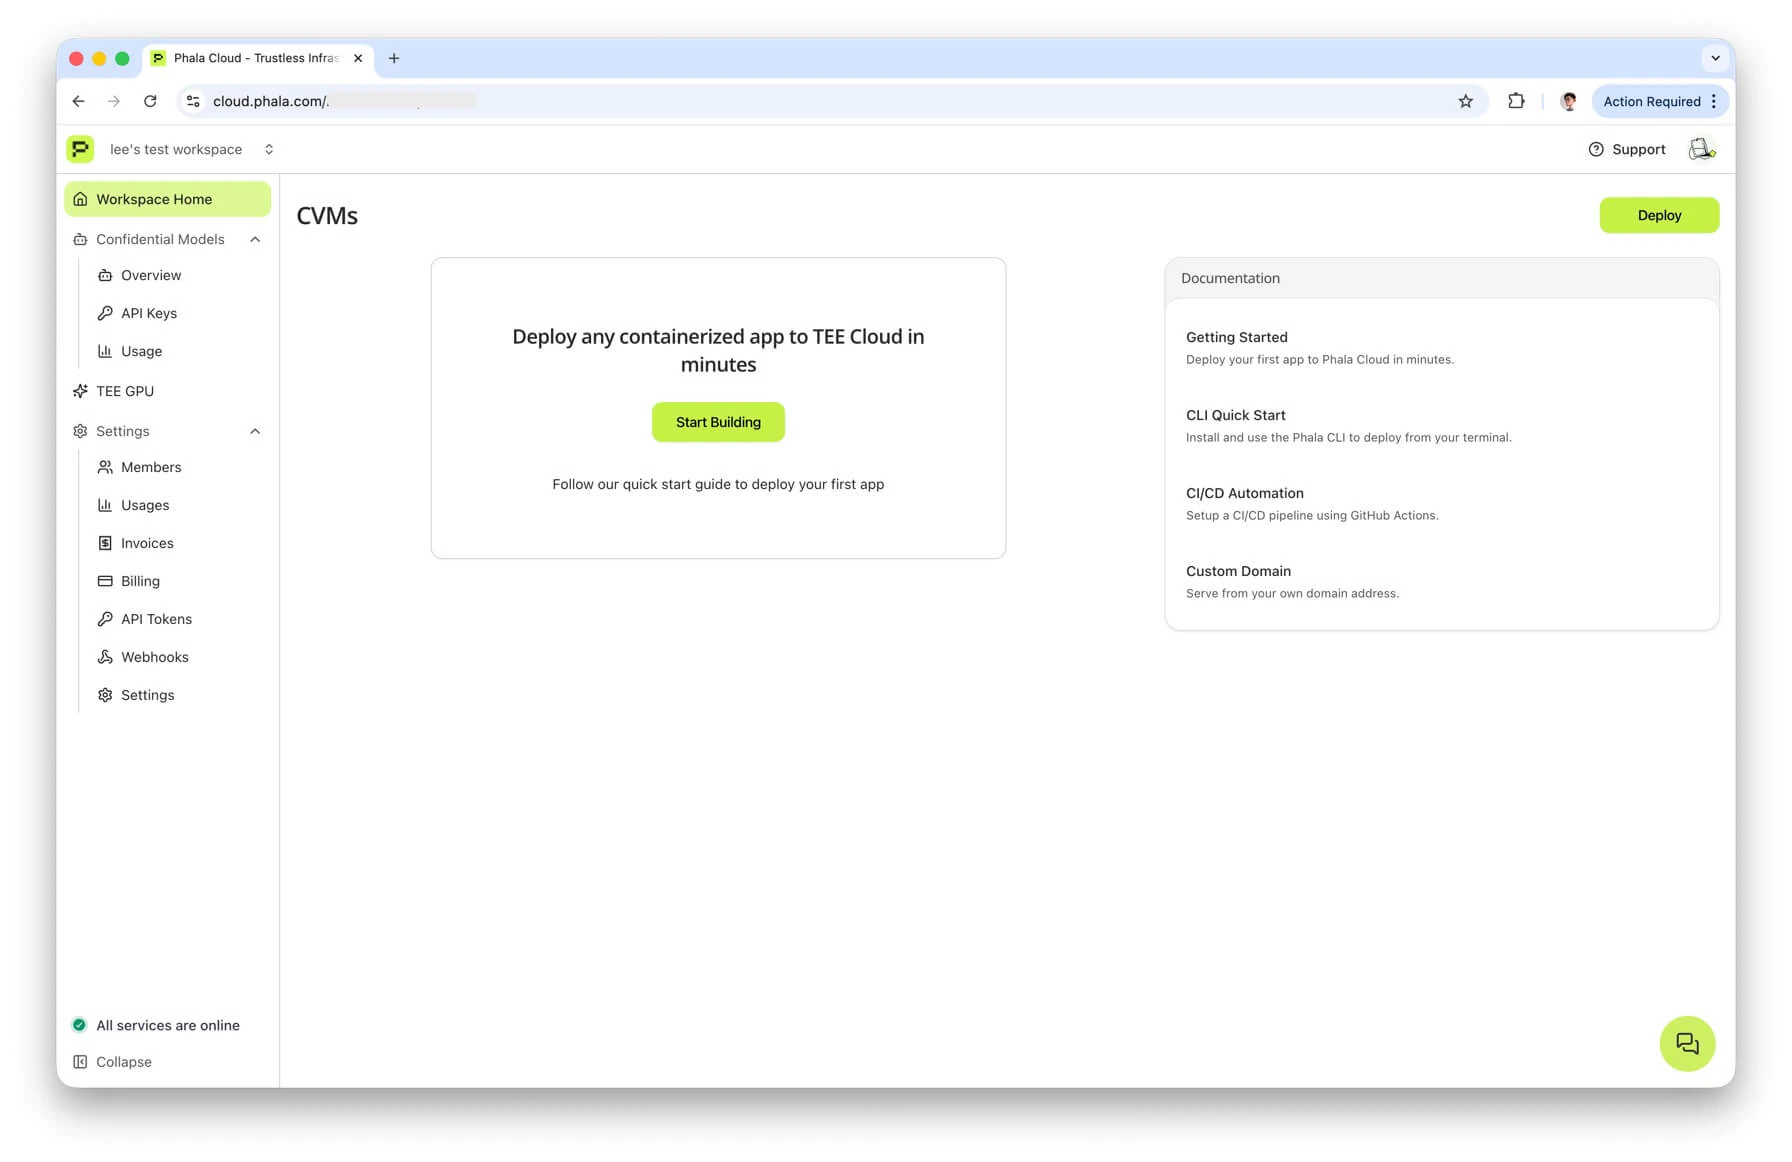
From your workspace home, click **Deploy** (or pick a template from the template gallery, which pre-fills the compose file). The wizard opens with sections for Basic Info, Resources, Environment, SSH Access, Advanced Features, and a Deployment Summary.
 ### Step 2: Pick your compose file and resources
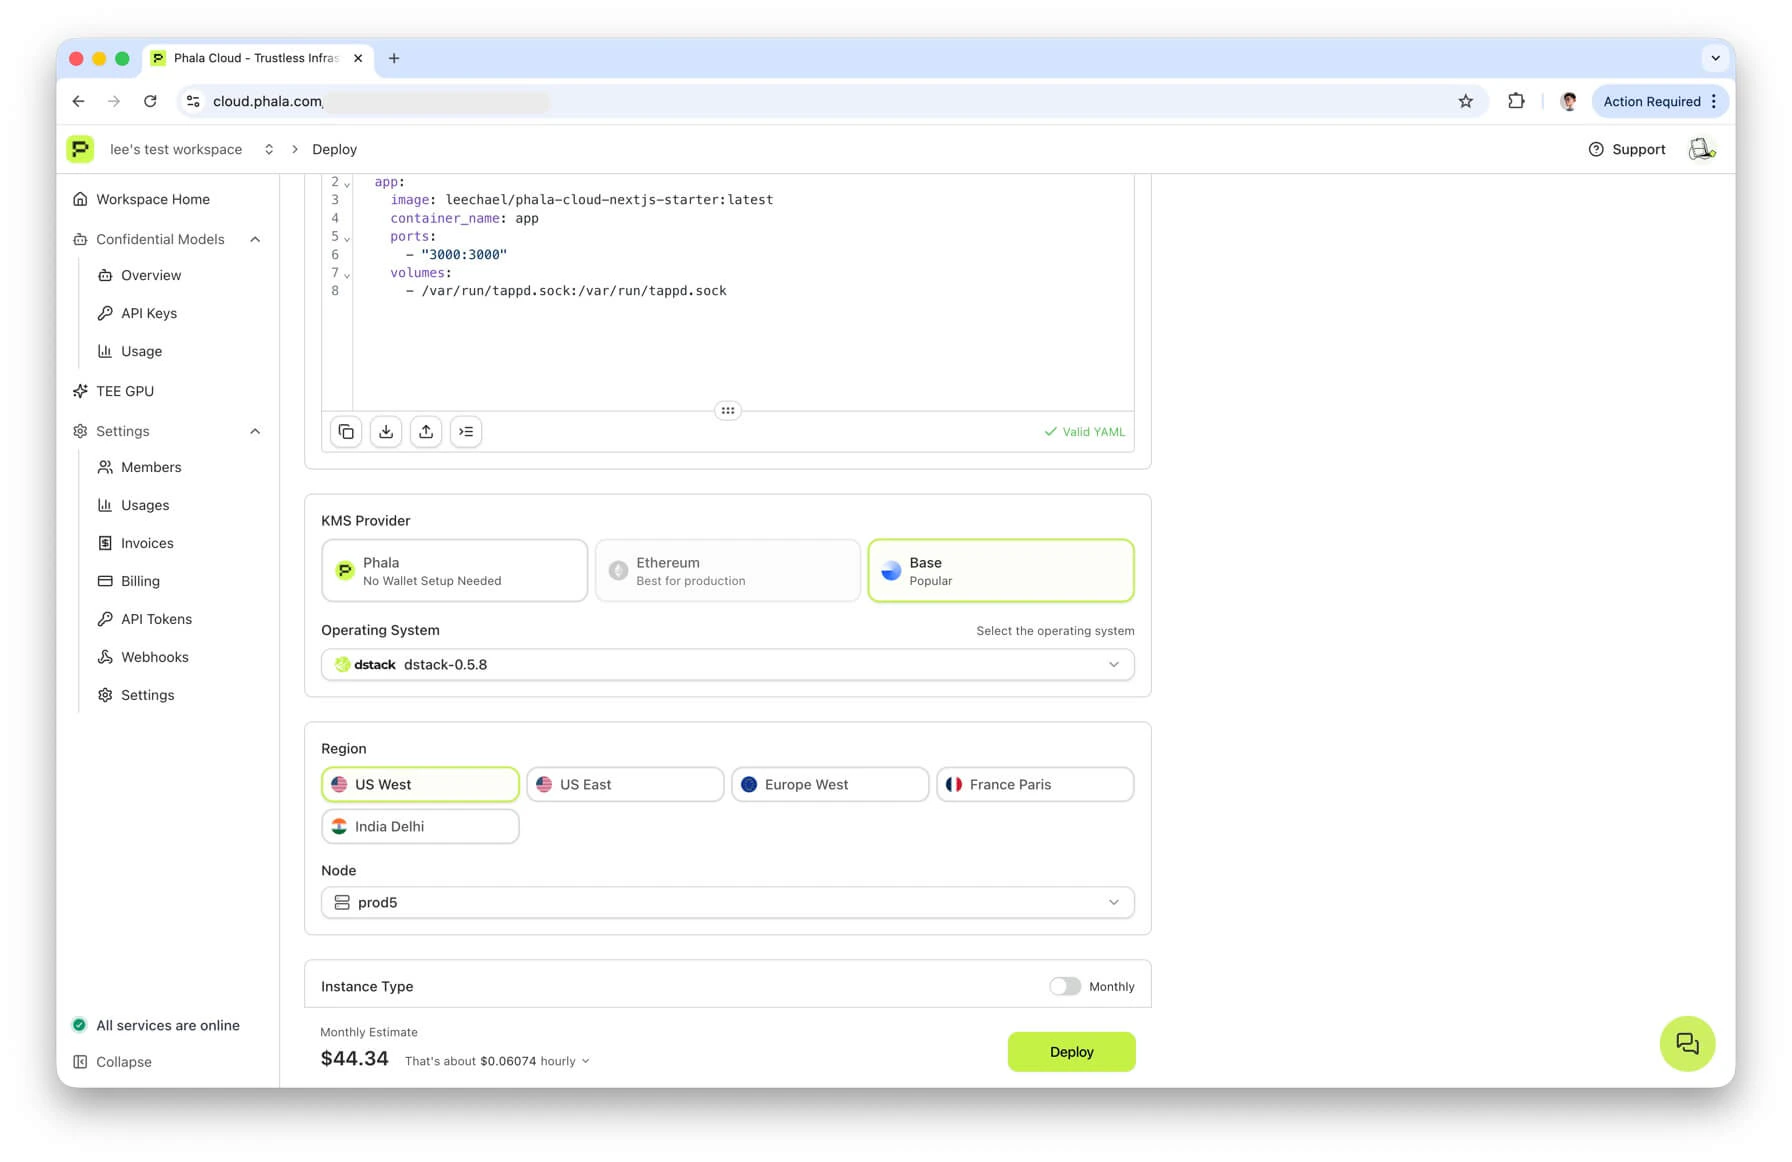
Enter a name, paste your `docker-compose.yml` (or keep the template's default), and choose an instance type. The wizard queries the backend for available nodes and surfaces three things that matter for onchain KMS:
* **Node selection.** Only nodes that support onchain KMS will expose a `device_id` that the DstackApp can allowlist. The wizard filters the list for you.
* **KMS Provider cards.** Below the resource section you will see a row of cards labeled "KMS Provider," one per available KMS. Pick the card for **Base** or **Ethereum** depending on which chain you want to govern this application. The default, if you do not pick one, is Phala Cloud's centralized KMS — which is the other page's topic.
* **OS Image.** Only dstack OS images that the KmsAuth contract has allowlisted will show up once you select a chain-backed KMS. (This is the dstack operating system image that boots the CVM, not the Docker image your app runs as.)
### Step 2: Pick your compose file and resources
Enter a name, paste your `docker-compose.yml` (or keep the template's default), and choose an instance type. The wizard queries the backend for available nodes and surfaces three things that matter for onchain KMS:
* **Node selection.** Only nodes that support onchain KMS will expose a `device_id` that the DstackApp can allowlist. The wizard filters the list for you.
* **KMS Provider cards.** Below the resource section you will see a row of cards labeled "KMS Provider," one per available KMS. Pick the card for **Base** or **Ethereum** depending on which chain you want to govern this application. The default, if you do not pick one, is Phala Cloud's centralized KMS — which is the other page's topic.
* **OS Image.** Only dstack OS images that the KmsAuth contract has allowlisted will show up once you select a chain-backed KMS. (This is the dstack operating system image that boots the CVM, not the Docker image your app runs as.)
 ### Step 3: Fill in environment variables
Any required variables from a template will be flagged. The wizard will refuse to submit until they are filled. These values never leave your browser in plaintext — they are encrypted to the CVM's per-app env-encryption key before being sent to the backend.
### Step 4: Click "Deploy"
When you submit the form, the dashboard calls the `/cvms/preflight` and provisioning endpoints. The backend computes the `compose_hash` and `device_id`, and returns them along with the selected KMS's `chain_id`, `kms_contract_address`, and RPC URL. At this point the CVM is **provisioned but not committed** — nothing is running yet, and no on-chain state exists.
### Step 5: Configure the DstackApp contract
The wizard opens a drawer titled **Configure DstackApp Contract** with two options:
* **Deploy New DstackApp Contract (recommended).** This is the common case. The drawer shows you the selected KMS URL, the chain ID, and the KmsAuth contract address (truncated). Expand **Customize RPC Endpoint** if you want to use your own RPC provider; the dashboard ships with defaults you can test with the **Test RPC** button.
* **Use Existing DstackApp Contract.** If you already have a DstackApp you want to reuse (for example, replicating an app to a new CVM), paste its address here and the wizard will skip the deployment transaction.
### Step 3: Fill in environment variables
Any required variables from a template will be flagged. The wizard will refuse to submit until they are filled. These values never leave your browser in plaintext — they are encrypted to the CVM's per-app env-encryption key before being sent to the backend.
### Step 4: Click "Deploy"
When you submit the form, the dashboard calls the `/cvms/preflight` and provisioning endpoints. The backend computes the `compose_hash` and `device_id`, and returns them along with the selected KMS's `chain_id`, `kms_contract_address`, and RPC URL. At this point the CVM is **provisioned but not committed** — nothing is running yet, and no on-chain state exists.
### Step 5: Configure the DstackApp contract
The wizard opens a drawer titled **Configure DstackApp Contract** with two options:
* **Deploy New DstackApp Contract (recommended).** This is the common case. The drawer shows you the selected KMS URL, the chain ID, and the KmsAuth contract address (truncated). Expand **Customize RPC Endpoint** if you want to use your own RPC provider; the dashboard ships with defaults you can test with the **Test RPC** button.
* **Use Existing DstackApp Contract.** If you already have a DstackApp you want to reuse (for example, replicating an app to a new CVM), paste its address here and the wizard will skip the deployment transaction.
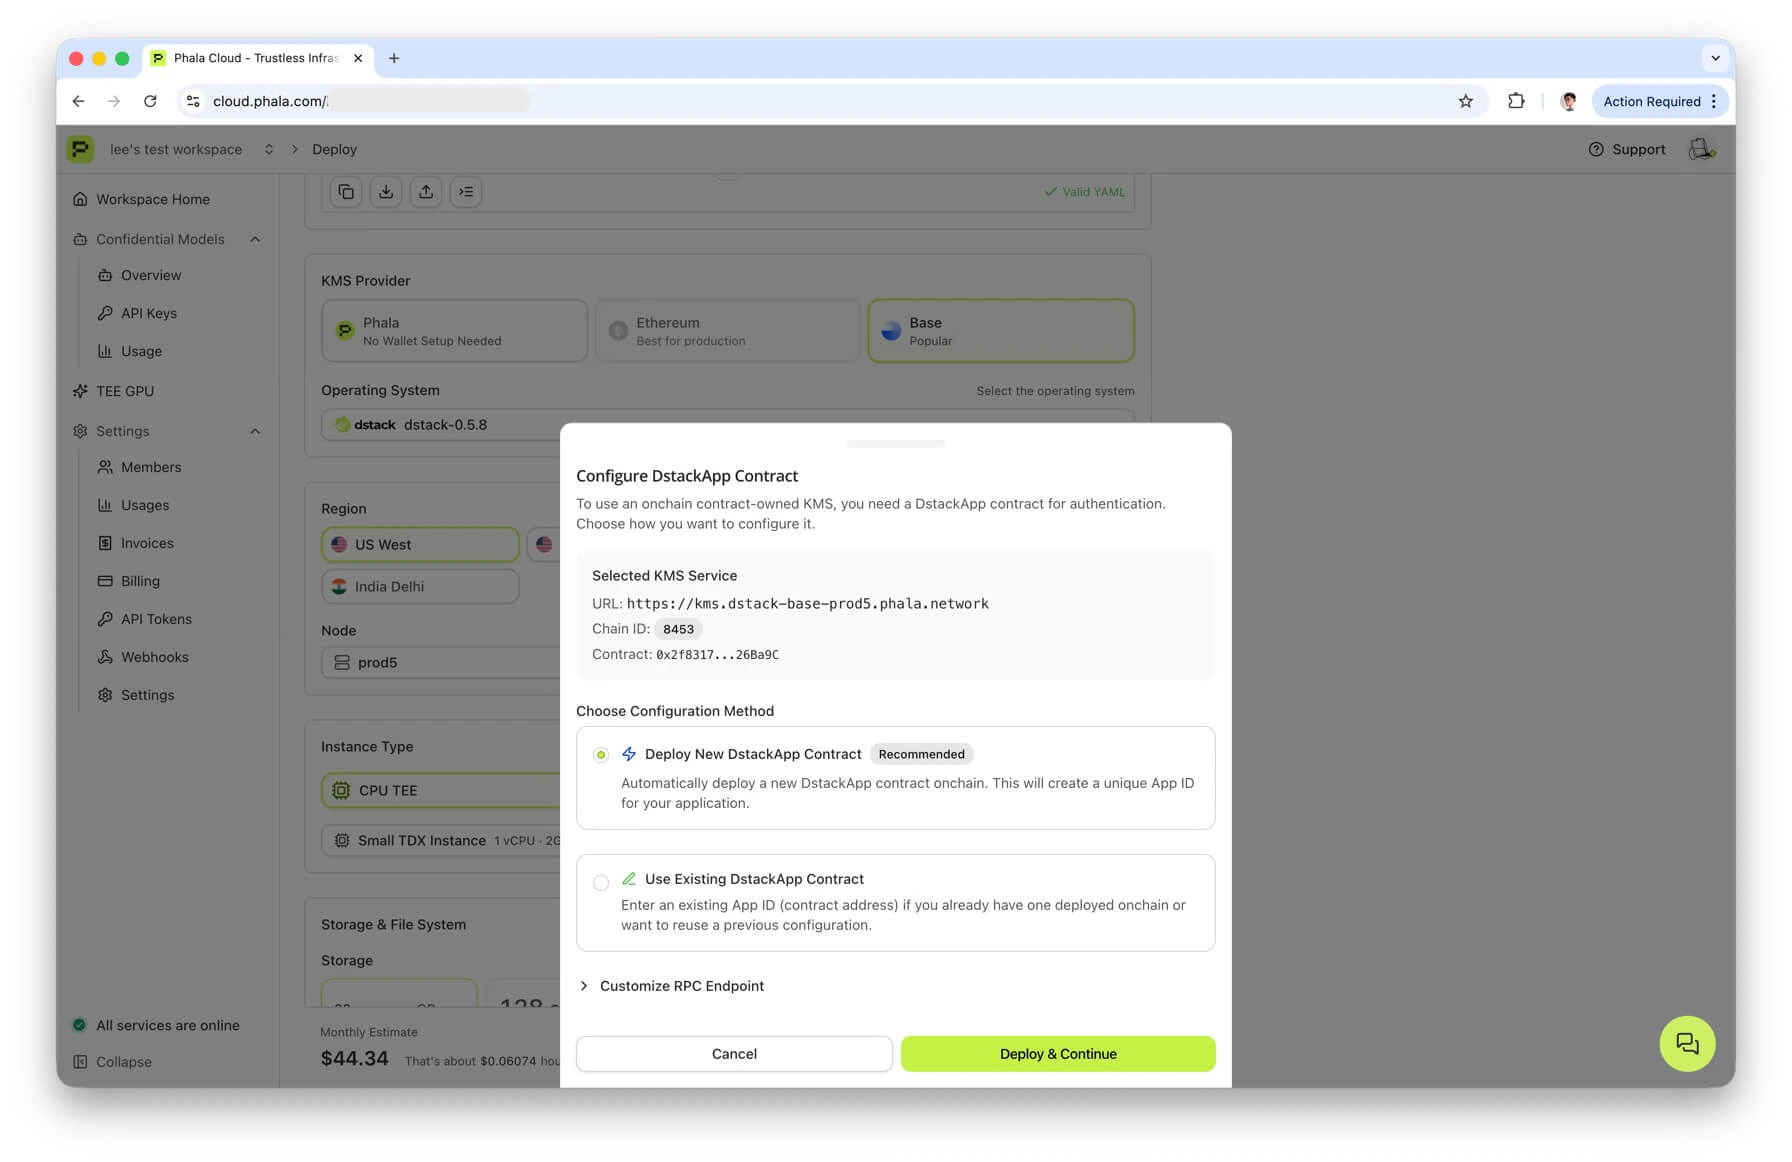 Click **Deploy and Continue**. Your connected browser wallet will pop up a transaction request. This is the on-chain deployment of a new DstackApp contract through the KmsAuth factory. The call is `KmsAuth.deployAndRegisterApp(deployer, disableUpgrades, allowAnyDevice, deviceId, composeHash)`. In a single transaction it both deploys the DstackApp contract and registers the initial compose hash and device ID — so after it confirms, both allowlists are already populated for the CVM that is about to start.
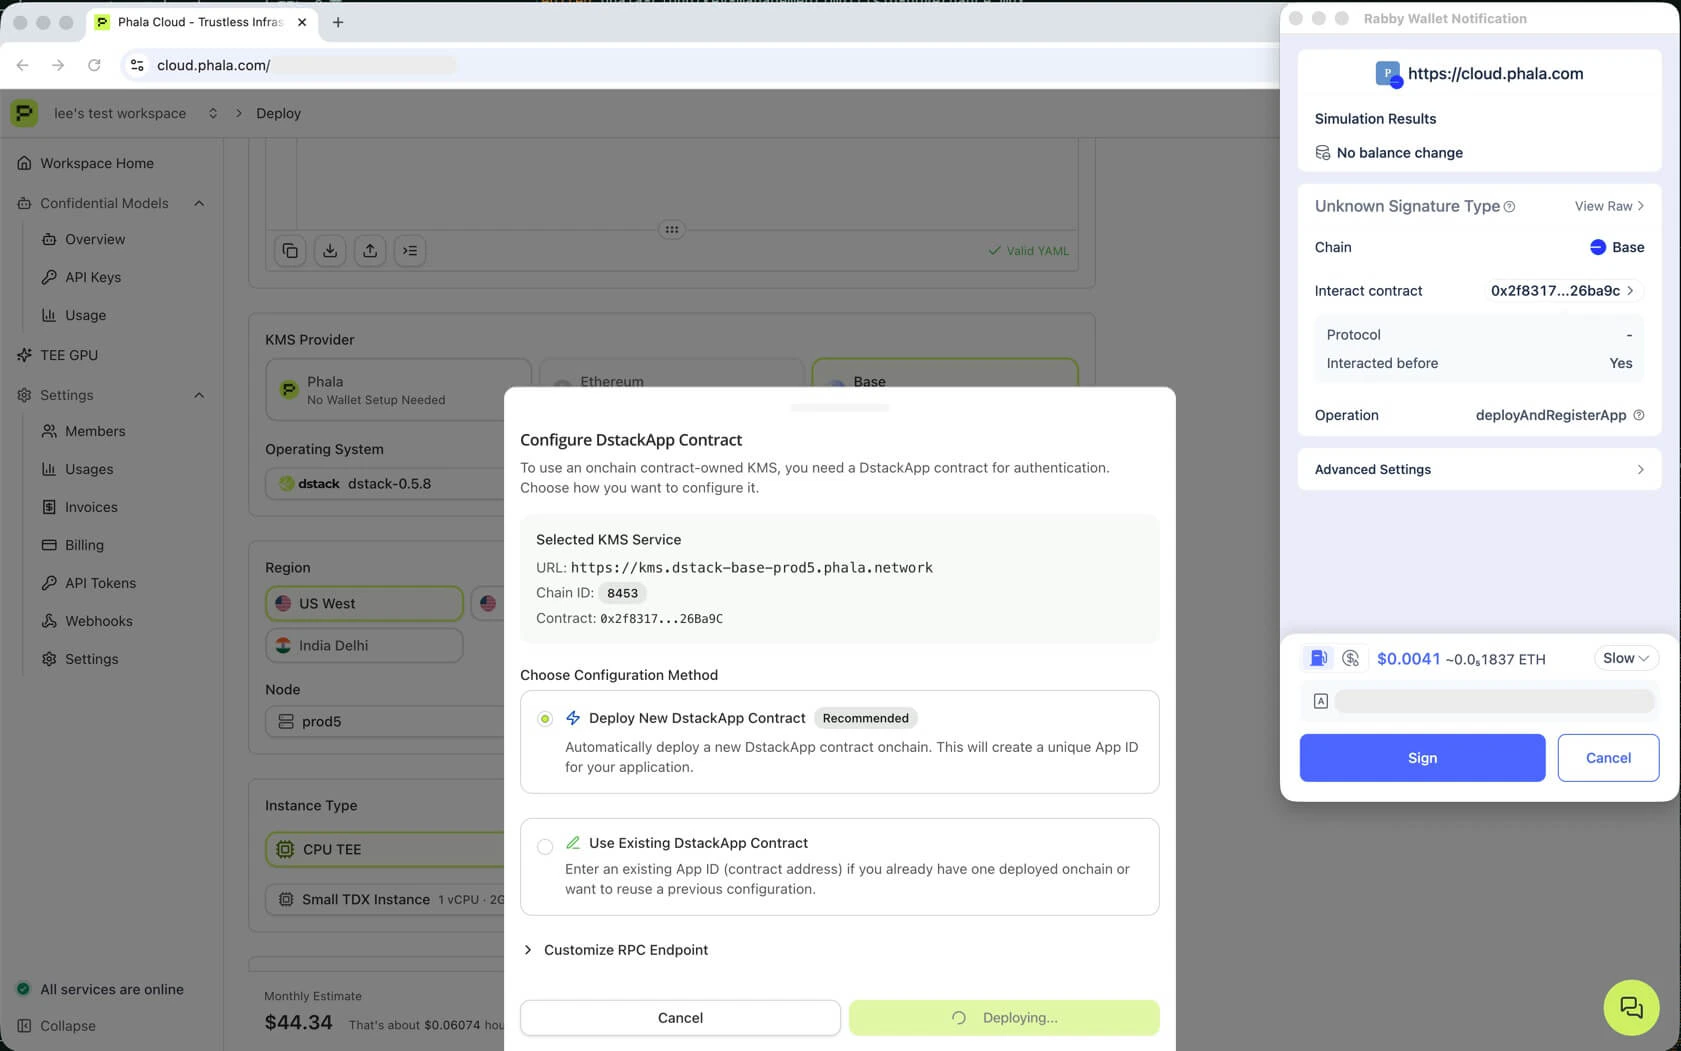 Approve it in your wallet. The dashboard watches for the `AppDeployedViaFactory` event and extracts the new `appId` (which equals the DstackApp contract address).
### Step 6: Backend commits the CVM
With the DstackApp address in hand, the dashboard calls the commit endpoint. The backend verifies the contract state on-chain, encrypts the env vars with the CVM's env-encryption key, and writes the CVM record. When this returns, you are redirected to the app overview page at `//apps/`.
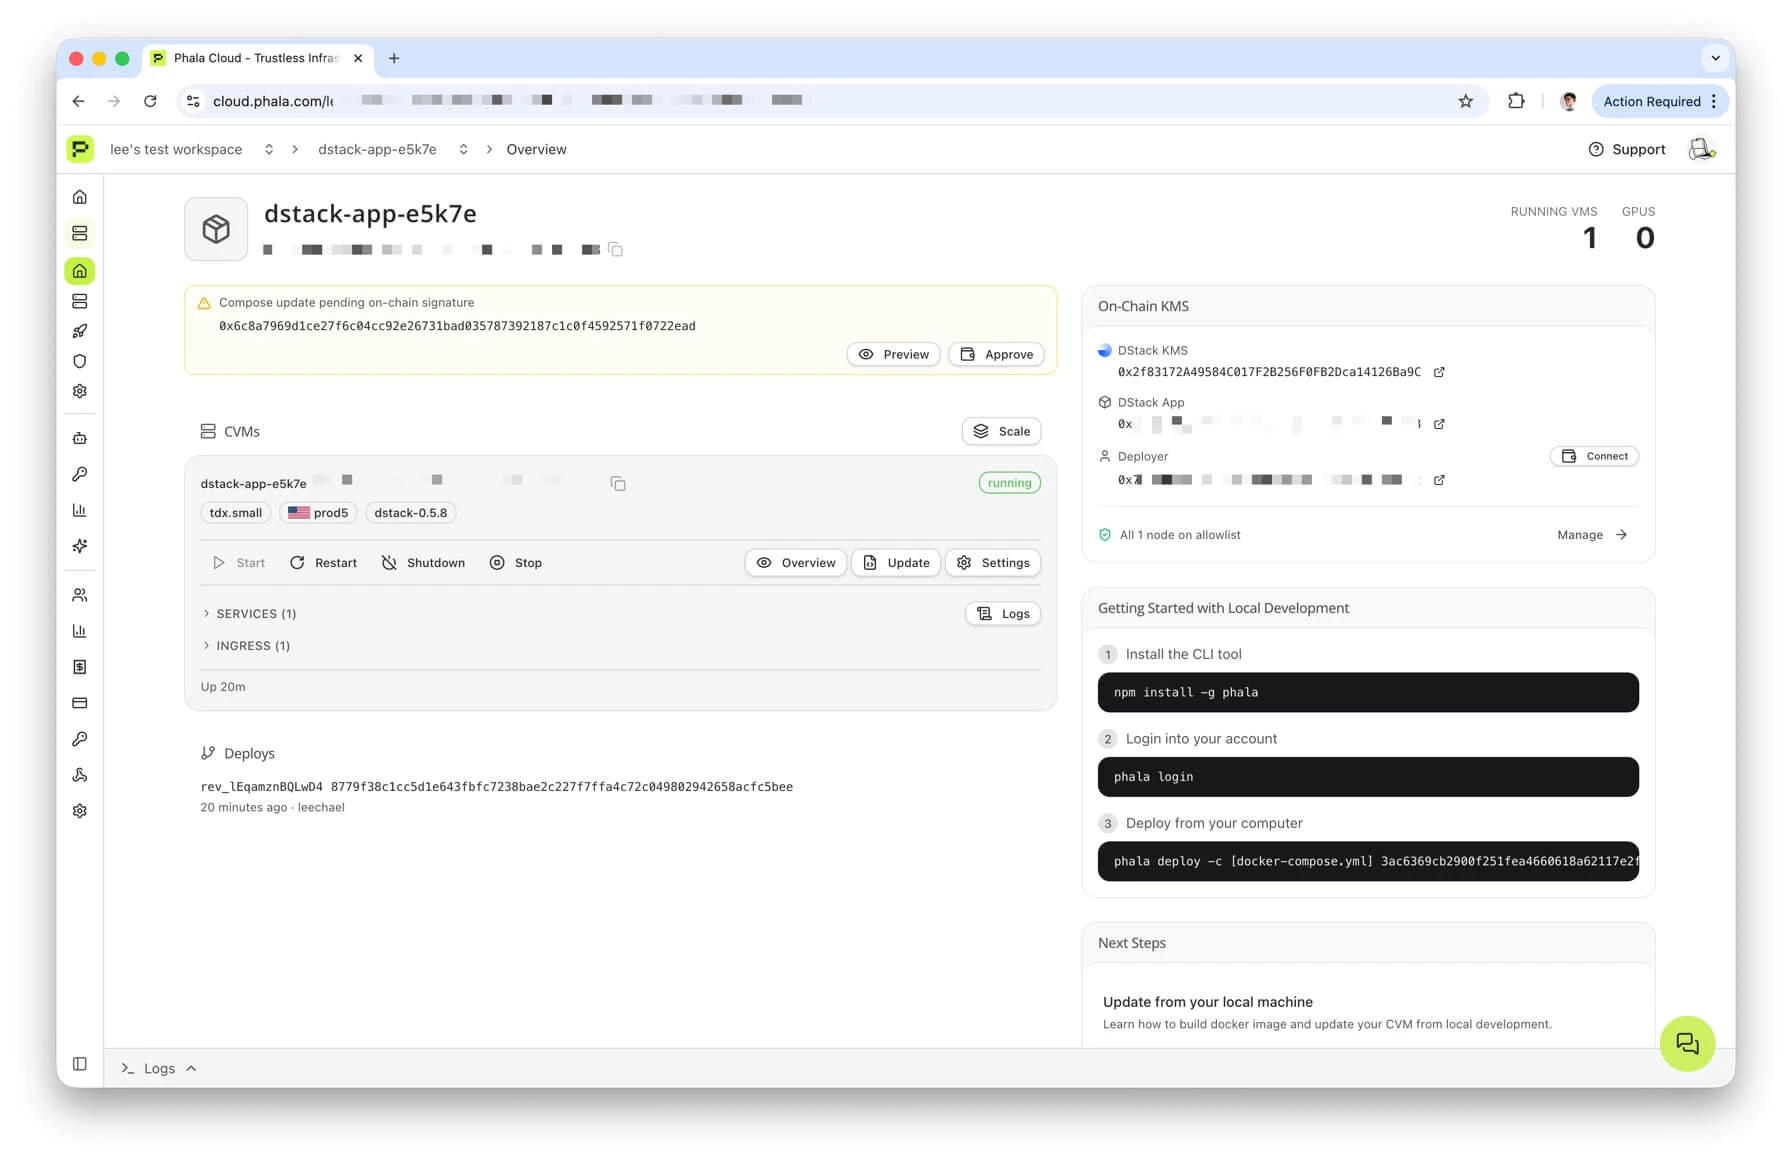
The first CVM boot then kicks off the attestation flow described in [Understanding Onchain KMS → Boot-Time Verification Flow](/phala-cloud/key-management/understanding-onchain-kms#boot-time-verification-flow). You can watch progress on the app overview page — under the **On-Chain KMS** sidebar you will see the DStack KMS address, the DStack App address, and the deployer address. All three link out to Basescan or Etherscan.
Approve it in your wallet. The dashboard watches for the `AppDeployedViaFactory` event and extracts the new `appId` (which equals the DstackApp contract address).
### Step 6: Backend commits the CVM
With the DstackApp address in hand, the dashboard calls the commit endpoint. The backend verifies the contract state on-chain, encrypts the env vars with the CVM's env-encryption key, and writes the CVM record. When this returns, you are redirected to the app overview page at `//apps/`.
The first CVM boot then kicks off the attestation flow described in [Understanding Onchain KMS → Boot-Time Verification Flow](/phala-cloud/key-management/understanding-onchain-kms#boot-time-verification-flow). You can watch progress on the app overview page — under the **On-Chain KMS** sidebar you will see the DStack KMS address, the DStack App address, and the deployer address. All three link out to Basescan or Etherscan.
 ### What to do if the wallet pop-up never appears
A few common misconfigurations stop the pop-up before you see it:
* **No wallet extension installed.** The dashboard uses the standard `window.ethereum` injection. Install MetaMask, Rabby, or a similar extension first.
* **Wallet is unlocked on a different chain.** Open the extension and switch to Base (chain ID 8453) or Ethereum mainnet (chain ID 1). The drawer's **Test RPC** button will tell you whether the selected RPC is reachable and on the expected chain.
* **Missing `device_id` or `compose_hash`.** This means the provisioning step did not return onchain-KMS metadata — usually because the selected node does not support Onchain KMS. Go back and pick a different node, or pick a different KMS provider card.
### Using an existing DstackApp instead of deploying a new one
If you already own a DstackApp from a previous deployment and you want to reuse it — for example, to run a second replica of the same application under the same identity — pick **Use Existing DstackApp Contract** in the drawer and paste the DstackApp address. The wizard will skip the `deployAndRegisterApp` transaction. You still need to make sure the new CVM's compose hash and device ID are allowlisted on that contract, either before starting or by running a follow-up `addComposeHash` / `addDevice` transaction.
## Deploying via the CLI
The CLI handles everything in a single command. This is the fastest way to deploy for developers who already have a wallet configured in their shell.
```bash theme={"system"}
export PRIVATE_KEY=0x...
phala deploy \
--kms base \
-c docker-compose.yml \
--private-key "$PRIVATE_KEY"
```
`--kms` accepts `phala` (default), `ethereum`, `eth`, or `base`. The `--private-key` flag falls back to the `PRIVATE_KEY` environment variable if you omit it. `--rpc-url` is optional — when omitted, the CLI uses viem's default public RPC for the selected chain. Pass `--rpc-url` (or set `ETH_RPC_URL`) if you want to use a paid provider for stability.
If the deployment succeeds, the CLI prints a summary to stdout:
```
CVM created successfully!
CVM ID: 01234567-89ab-cdef-0123-456789abcdef
Name: phala-cloud-gin-starter
App ID: app_ff22c67f5d3b4c8a9e1f0a2b3c4d5e6f7a8b9c0d1
Dashboard URL: https://cloud.phala.com/dashboard/cvms/01234567-89ab-cdef-0123-456789abcdef
```
Pass `--json` to get a machine-readable version instead:
```json theme={"system"}
{
"success": true,
"vm_uuid": "01234567-89ab-cdef-0123-456789abcdef",
"name": "phala-cloud-gin-starter",
"app_id": "ff22c67f5d3b4c8a9e1f0a2b3c4d5e6f7a8b9c0d1",
"dashboard_url": "https://cloud.phala.com/dashboard/cvms/01234567-89ab-cdef-0123-456789abcdef"
}
```
The `app_id` in these outputs is the DstackApp contract address. The CLI's human-readable view prepends `app_` for historical compatibility, and the JSON view strips the `0x` prefix — both forms refer to the same 20-byte Ethereum address. On Basescan, you will see it as `0xff22c67f5d3b4c8a9e1f0a2b3c4d5e6f7a8b9c0d1`.
The `dashboard_url` field in the CLI output currently points to `/dashboard/cvms/`, which is a redirect target. The canonical workspace-scoped URLs are:
* **App overview** — `https://cloud.phala.com//apps/`
* **CVM instance detail** — `https://cloud.phala.com//apps//instances/`
Both use your workspace slug (not `dashboard`) and require the app\_id or CVM uuid in the path. After landing through the redirect you will see one of these in the browser address bar.
### What happens under the hood
The CLI command maps to the following steps, in order:
1. **Read the compose file and encrypt env vars locally.** Size is capped at a few hundred kilobytes combined.
2. **Provision the CVM** via the Phala Cloud backend. The backend picks a node, computes the `compose_hash` and `device_id`, and returns them together with the KMS metadata (`chain_id`, `kms_contract_address`, RPC URL, `chain` object for viem). At this point nothing is on-chain yet.
3. **Deploy the DstackApp contract.** The CLI calls `KmsAuth.deployAndRegisterApp(deployer, disableUpgrades=false, allowAnyDevice=false, deviceId, composeHash)` from your `--private-key`. This is the single wallet-facing transaction. The resulting `appId` is read from the `AppDeployedViaFactory` event.
4. **Fetch the CVM's env-encryption public key.** The backend has one per app, derived inside the KMS. The CLI uses it to encrypt your env vars for the commit call.
5. **Commit the CVM provision.** The CLI sends the `app_id`, `compose_hash`, `contract_address`, and encrypted env to the backend, which then starts the CVM. The backend verifies on-chain that the DstackApp exists, the compose hash is registered, and the deployer address matches before flipping the CVM into the running state.
If any of those steps fail, the CLI prints a structured error with the step that failed and a suggested recovery. The most common failure is insufficient gas — the CLI enforces a minimum balance of 0.001 ETH before it sends the deploy transaction, and will abort with a clear message if your wallet is too empty.
### Using the CLI with Ethereum instead of Base
Same command, `--kms ethereum` instead of `--kms base`:
```bash theme={"system"}
phala deploy \
--kms ethereum \
-c docker-compose.yml \
--private-key "$PRIVATE_KEY" \
--rpc-url https://your-alchemy-endpoint
```
For Ethereum mainnet, using a paid RPC is strongly recommended — the default public endpoint may rate-limit during a deploy transaction, and rate limiting in the middle of a multi-step deploy is confusing to debug. Budget a few dollars of ETH for gas; the `deployAndRegisterApp` transaction is a contract deployment, so it is noticeably more expensive than a normal transfer.
`--kms eth` is accepted as an alias for `--kms ethereum` if you prefer it.
### Common CLI flag reference
The flags you will reach for most often on top of the basic `--kms base -c docker-compose.yml --private-key`:
| Flag | Purpose |
| ----------------------------------------- | ------------------------------------------------------------------------------------------------------------------------------------------------------------------------------ |
| `-e ` | Encrypt env vars for the CVM. Accepts a `.env` path or inline `KEY=VALUE`, repeatable. |
| `--wait` | Block until the CVM reaches `running` before returning. Without it, the command exits as soon as the backend commits the provision and the CVM may still be pulling its image. |
| `--instance-type tdx.medium` | Pick a specific size instead of letting the scheduler decide. Use when you care about exact vCPU / memory / disk. |
| `--no-public-logs`, `--no-public-sysinfo` | Opt out of public log and system-info endpoints at deploy time. Private by default for audit-sensitive workloads. |
| `--rpc-url ` | Override the default public RPC. Strongly recommended for production — pass an Alchemy, QuickNode, or equivalent endpoint. |
| `--kms ethereum` / `--kms eth` | Deploy against Ethereum mainnet instead of Base. Budget real ETH for gas. |
| `--json` | Emit machine-readable JSON instead of the human-readable summary. |
A production-shaped deploy using several of these:
```bash theme={"system"}
phala deploy \
--kms base \
--instance-type tdx.medium \
-c docker-compose.yml \
-e .env \
--no-public-logs --no-public-sysinfo \
--private-key "$PRIVATE_KEY" \
--rpc-url https://base-mainnet.g.alchemy.com/v2/ \
--wait
```
## Verifying Your Deployment
Once the CLI or dashboard has finished, three independent checks will confirm that the DstackApp contract is set up correctly.
### 1. Read the contract from a block explorer
Open the DstackApp contract on the appropriate explorer. The address is the `app_id` returned by the CLI (prepend `0x` to get the Basescan/Etherscan form), or the "DStack App" row in the dashboard's On-Chain KMS sidebar.
On Basescan or Etherscan, click **Contract** -> **Read Contract** and check:
* `owner()` — should return your wallet address. After transferring ownership to a Safe, this is where you confirm the new owner address.
* `allowedComposeHashes(0x)` — should return `true`. Copy the compose hash from the CLI output or the app overview page.
* `allowedDeviceIds(0x)` — should return `true` for the device your CVM was scheduled on. Alternatively, `allowAnyDevice()` may return `true` if you explicitly chose that mode (not recommended for production).
You can sanity-check which wallet deployed the contract by looking at the transaction log for `AppDeployedViaFactory(appId, deployer)` on the KmsAuth contract.
### 2. Check the CVM status in the dashboard
Navigate to the app overview page at `https://cloud.phala.com//apps/`. It has an **On-Chain KMS** sidebar that shows:
* The DStack KMS (KmsAuth) contract address with a link to the explorer
* The DStack App (DstackApp) contract address with a link to the explorer
* The deployer address — and a **Connect** button that, after connecting your wallet, tells you whether your connected address is the contract owner
If the sidebar does not appear, the CVM is not using Onchain KMS — double-check that you picked the Base or Ethereum KMS card during deployment.
To drill into a specific CVM — for logs, operations, compose content, or observability — use `https://cloud.phala.com//apps//instances/`.
### 3. Check the CVM status from the CLI
```bash theme={"system"}
phala cvms get
```
The CLI accepts any of: the CVM name (if unique in your workspace), the CVM UUID, or the app\_id. It prints Name, App ID, Status, vCPU, Memory, Disk Size, Dstack Image, and App URL. If the CVM reached `Status: running`, the KMS has already released the application keys, which means all three contract checks in step 1 passed at boot time.
Note that `phala cvms get` does not currently print KMS metadata (chain, DstackApp address, compose hash). For those, use the dashboard sidebar from step 2.
If the CVM is stuck in a pre-running state, check the logs:
```bash theme={"system"}
phala logs
```
In a healthy boot you should see lines indicating that the dstack guest reached the KMS and received keys. In a failed boot the logs will typically call out the specific check that failed (compose hash, device ID, or attestation).
### What a healthy deployment looks like
To summarize: after a successful first deploy, all of the following should be true.
* `phala cvms get ` reports `Status: running`.
* On the explorer, `DstackApp.owner()` returns your wallet address.
* On the explorer, `DstackApp.allowedComposeHashes(0x)` returns `true` for the hash the CLI or dashboard reported.
* On the explorer, `DstackApp.allowedDeviceIds(0x)` returns `true` for the device the scheduler picked, or `DstackApp.allowAnyDevice()` returns `true`.
* In the dashboard, the **On-Chain KMS** sidebar on the app overview page shows the three addresses and, after you connect your wallet, identifies you as the deployer.
If any of those is off, do not move on to production traffic until it is fixed.
## What's Next
Your CVM is running. From here:
* **To change the compose file.** See [Updating with Onchain KMS](/phala-cloud/key-management/updating-with-onchain-kms) for the single-command EOA path, or [Multisig and Governance](/phala-cloud/key-management/multisig-governance) if you plan to transfer ownership to a Safe or timelock.
* **To allowlist more nodes** for HA or migration. See [Device Management](/phala-cloud/key-management/device-management).
* **To transfer DstackApp ownership** to a Safe, timelock, or DAO. Read [Multisig and Governance](/phala-cloud/key-management/multisig-governance) **before** you transfer — an irreversible mistake leaves the CVM frozen on its current compose.
## Troubleshooting
The CLI enforces a minimum wallet balance of 0.001 ETH before it will send `deployAndRegisterApp`. Top up the wallet on the chain you are targeting and retry. On Base, the Base bridge or any mainstream exchange withdrawal works. On Ethereum mainnet, account for the L1 gas cost of a contract deployment — empty wallets will not do.
This usually means `--rpc-url` was not set and `ETH_RPC_URL` is not in your environment either. Set one of them and retry. You can verify with `echo $ETH_RPC_URL`.
Check the CVM logs first, from the dashboard or with `phala logs`. If the KMS rejected the attestation, the logs will say so. The most common root causes are:
* The compose hash computed on the node does not match what the contract stores. This normally only happens if something mutates the compose file after provisioning — unusual, but worth re-running the deploy if you see it.
* The device ID of the node the scheduler picked is not in `allowedDeviceIds`. On a fresh deploy this should not happen because `deployAndRegisterApp` registers the current device ID in the same transaction. If it does, cross-check the DstackApp on the explorer: `allowedDeviceIds()` should be `true`.
* The DstackApp `owner` is not who you think it is. If the contract was created by someone else's wallet, `owner()` on the explorer will reveal it.
Onchain KMS is not portable across chains — the DstackApp lives on one chain, and the KMS on that chain is the one that holds the keys. You cannot migrate a deployed CVM from Ethereum to Base (or vice versa) while keeping the same keys. The practical workflow is:
1. Deploy a fresh CVM on the new chain with `phala deploy --kms base` or `--kms ethereum`.
2. Point traffic and any persistent storage at the new CVM.
3. Delete the old CVM.
Plan the chain choice up front.
Your browser wallet is still on a different network. Open the wallet extension and switch to Base (chain ID 8453) or Ethereum Mainnet (chain ID 1), then click **Deploy and Continue** again. The dashboard will reject the transaction if the chain ID from your wallet does not match the KMS you selected.
## Next Steps
* [Updating with Onchain KMS](/phala-cloud/key-management/updating-with-onchain-kms) — roll a new compose file when you hold the DstackApp owner key as an EOA.
* [Multisig and Governance](/phala-cloud/key-management/multisig-governance) — the prepare-and-commit flow for compose updates when the DstackApp owner is a Safe, timelock, DAO, or any custom contract. Also covers webhook notifications for pending approvals.
* [Device Management](/phala-cloud/key-management/device-management) — how `device_id` is derived, how to allow new nodes, and how to recover when a node's device ID drifts after a hardware change.
* [Understanding Onchain KMS](/phala-cloud/key-management/understanding-onchain-kms) — the conceptual model if you want to revisit the contracts and boot-time flow.
* [Error Codes reference](/phala-cloud/references/error-codes) — the full catalog of `ERR-01-*` codes returned by the CVM API.
### What to do if the wallet pop-up never appears
A few common misconfigurations stop the pop-up before you see it:
* **No wallet extension installed.** The dashboard uses the standard `window.ethereum` injection. Install MetaMask, Rabby, or a similar extension first.
* **Wallet is unlocked on a different chain.** Open the extension and switch to Base (chain ID 8453) or Ethereum mainnet (chain ID 1). The drawer's **Test RPC** button will tell you whether the selected RPC is reachable and on the expected chain.
* **Missing `device_id` or `compose_hash`.** This means the provisioning step did not return onchain-KMS metadata — usually because the selected node does not support Onchain KMS. Go back and pick a different node, or pick a different KMS provider card.
### Using an existing DstackApp instead of deploying a new one
If you already own a DstackApp from a previous deployment and you want to reuse it — for example, to run a second replica of the same application under the same identity — pick **Use Existing DstackApp Contract** in the drawer and paste the DstackApp address. The wizard will skip the `deployAndRegisterApp` transaction. You still need to make sure the new CVM's compose hash and device ID are allowlisted on that contract, either before starting or by running a follow-up `addComposeHash` / `addDevice` transaction.
## Deploying via the CLI
The CLI handles everything in a single command. This is the fastest way to deploy for developers who already have a wallet configured in their shell.
```bash theme={"system"}
export PRIVATE_KEY=0x...
phala deploy \
--kms base \
-c docker-compose.yml \
--private-key "$PRIVATE_KEY"
```
`--kms` accepts `phala` (default), `ethereum`, `eth`, or `base`. The `--private-key` flag falls back to the `PRIVATE_KEY` environment variable if you omit it. `--rpc-url` is optional — when omitted, the CLI uses viem's default public RPC for the selected chain. Pass `--rpc-url` (or set `ETH_RPC_URL`) if you want to use a paid provider for stability.
If the deployment succeeds, the CLI prints a summary to stdout:
```
CVM created successfully!
CVM ID: 01234567-89ab-cdef-0123-456789abcdef
Name: phala-cloud-gin-starter
App ID: app_ff22c67f5d3b4c8a9e1f0a2b3c4d5e6f7a8b9c0d1
Dashboard URL: https://cloud.phala.com/dashboard/cvms/01234567-89ab-cdef-0123-456789abcdef
```
Pass `--json` to get a machine-readable version instead:
```json theme={"system"}
{
"success": true,
"vm_uuid": "01234567-89ab-cdef-0123-456789abcdef",
"name": "phala-cloud-gin-starter",
"app_id": "ff22c67f5d3b4c8a9e1f0a2b3c4d5e6f7a8b9c0d1",
"dashboard_url": "https://cloud.phala.com/dashboard/cvms/01234567-89ab-cdef-0123-456789abcdef"
}
```
The `app_id` in these outputs is the DstackApp contract address. The CLI's human-readable view prepends `app_` for historical compatibility, and the JSON view strips the `0x` prefix — both forms refer to the same 20-byte Ethereum address. On Basescan, you will see it as `0xff22c67f5d3b4c8a9e1f0a2b3c4d5e6f7a8b9c0d1`.
The `dashboard_url` field in the CLI output currently points to `/dashboard/cvms/`, which is a redirect target. The canonical workspace-scoped URLs are:
* **App overview** — `https://cloud.phala.com//apps/`
* **CVM instance detail** — `https://cloud.phala.com//apps//instances/`
Both use your workspace slug (not `dashboard`) and require the app\_id or CVM uuid in the path. After landing through the redirect you will see one of these in the browser address bar.
### What happens under the hood
The CLI command maps to the following steps, in order:
1. **Read the compose file and encrypt env vars locally.** Size is capped at a few hundred kilobytes combined.
2. **Provision the CVM** via the Phala Cloud backend. The backend picks a node, computes the `compose_hash` and `device_id`, and returns them together with the KMS metadata (`chain_id`, `kms_contract_address`, RPC URL, `chain` object for viem). At this point nothing is on-chain yet.
3. **Deploy the DstackApp contract.** The CLI calls `KmsAuth.deployAndRegisterApp(deployer, disableUpgrades=false, allowAnyDevice=false, deviceId, composeHash)` from your `--private-key`. This is the single wallet-facing transaction. The resulting `appId` is read from the `AppDeployedViaFactory` event.
4. **Fetch the CVM's env-encryption public key.** The backend has one per app, derived inside the KMS. The CLI uses it to encrypt your env vars for the commit call.
5. **Commit the CVM provision.** The CLI sends the `app_id`, `compose_hash`, `contract_address`, and encrypted env to the backend, which then starts the CVM. The backend verifies on-chain that the DstackApp exists, the compose hash is registered, and the deployer address matches before flipping the CVM into the running state.
If any of those steps fail, the CLI prints a structured error with the step that failed and a suggested recovery. The most common failure is insufficient gas — the CLI enforces a minimum balance of 0.001 ETH before it sends the deploy transaction, and will abort with a clear message if your wallet is too empty.
### Using the CLI with Ethereum instead of Base
Same command, `--kms ethereum` instead of `--kms base`:
```bash theme={"system"}
phala deploy \
--kms ethereum \
-c docker-compose.yml \
--private-key "$PRIVATE_KEY" \
--rpc-url https://your-alchemy-endpoint
```
For Ethereum mainnet, using a paid RPC is strongly recommended — the default public endpoint may rate-limit during a deploy transaction, and rate limiting in the middle of a multi-step deploy is confusing to debug. Budget a few dollars of ETH for gas; the `deployAndRegisterApp` transaction is a contract deployment, so it is noticeably more expensive than a normal transfer.
`--kms eth` is accepted as an alias for `--kms ethereum` if you prefer it.
### Common CLI flag reference
The flags you will reach for most often on top of the basic `--kms base -c docker-compose.yml --private-key`:
| Flag | Purpose |
| ----------------------------------------- | ------------------------------------------------------------------------------------------------------------------------------------------------------------------------------ |
| `-e ` | Encrypt env vars for the CVM. Accepts a `.env` path or inline `KEY=VALUE`, repeatable. |
| `--wait` | Block until the CVM reaches `running` before returning. Without it, the command exits as soon as the backend commits the provision and the CVM may still be pulling its image. |
| `--instance-type tdx.medium` | Pick a specific size instead of letting the scheduler decide. Use when you care about exact vCPU / memory / disk. |
| `--no-public-logs`, `--no-public-sysinfo` | Opt out of public log and system-info endpoints at deploy time. Private by default for audit-sensitive workloads. |
| `--rpc-url ` | Override the default public RPC. Strongly recommended for production — pass an Alchemy, QuickNode, or equivalent endpoint. |
| `--kms ethereum` / `--kms eth` | Deploy against Ethereum mainnet instead of Base. Budget real ETH for gas. |
| `--json` | Emit machine-readable JSON instead of the human-readable summary. |
A production-shaped deploy using several of these:
```bash theme={"system"}
phala deploy \
--kms base \
--instance-type tdx.medium \
-c docker-compose.yml \
-e .env \
--no-public-logs --no-public-sysinfo \
--private-key "$PRIVATE_KEY" \
--rpc-url https://base-mainnet.g.alchemy.com/v2/ \
--wait
```
## Verifying Your Deployment
Once the CLI or dashboard has finished, three independent checks will confirm that the DstackApp contract is set up correctly.
### 1. Read the contract from a block explorer
Open the DstackApp contract on the appropriate explorer. The address is the `app_id` returned by the CLI (prepend `0x` to get the Basescan/Etherscan form), or the "DStack App" row in the dashboard's On-Chain KMS sidebar.
On Basescan or Etherscan, click **Contract** -> **Read Contract** and check:
* `owner()` — should return your wallet address. After transferring ownership to a Safe, this is where you confirm the new owner address.
* `allowedComposeHashes(0x)` — should return `true`. Copy the compose hash from the CLI output or the app overview page.
* `allowedDeviceIds(0x)` — should return `true` for the device your CVM was scheduled on. Alternatively, `allowAnyDevice()` may return `true` if you explicitly chose that mode (not recommended for production).
You can sanity-check which wallet deployed the contract by looking at the transaction log for `AppDeployedViaFactory(appId, deployer)` on the KmsAuth contract.
### 2. Check the CVM status in the dashboard
Navigate to the app overview page at `https://cloud.phala.com//apps/`. It has an **On-Chain KMS** sidebar that shows:
* The DStack KMS (KmsAuth) contract address with a link to the explorer
* The DStack App (DstackApp) contract address with a link to the explorer
* The deployer address — and a **Connect** button that, after connecting your wallet, tells you whether your connected address is the contract owner
If the sidebar does not appear, the CVM is not using Onchain KMS — double-check that you picked the Base or Ethereum KMS card during deployment.
To drill into a specific CVM — for logs, operations, compose content, or observability — use `https://cloud.phala.com//apps//instances/`.
### 3. Check the CVM status from the CLI
```bash theme={"system"}
phala cvms get
```
The CLI accepts any of: the CVM name (if unique in your workspace), the CVM UUID, or the app\_id. It prints Name, App ID, Status, vCPU, Memory, Disk Size, Dstack Image, and App URL. If the CVM reached `Status: running`, the KMS has already released the application keys, which means all three contract checks in step 1 passed at boot time.
Note that `phala cvms get` does not currently print KMS metadata (chain, DstackApp address, compose hash). For those, use the dashboard sidebar from step 2.
If the CVM is stuck in a pre-running state, check the logs:
```bash theme={"system"}
phala logs
```
In a healthy boot you should see lines indicating that the dstack guest reached the KMS and received keys. In a failed boot the logs will typically call out the specific check that failed (compose hash, device ID, or attestation).
### What a healthy deployment looks like
To summarize: after a successful first deploy, all of the following should be true.
* `phala cvms get ` reports `Status: running`.
* On the explorer, `DstackApp.owner()` returns your wallet address.
* On the explorer, `DstackApp.allowedComposeHashes(0x)` returns `true` for the hash the CLI or dashboard reported.
* On the explorer, `DstackApp.allowedDeviceIds(0x)` returns `true` for the device the scheduler picked, or `DstackApp.allowAnyDevice()` returns `true`.
* In the dashboard, the **On-Chain KMS** sidebar on the app overview page shows the three addresses and, after you connect your wallet, identifies you as the deployer.
If any of those is off, do not move on to production traffic until it is fixed.
## What's Next
Your CVM is running. From here:
* **To change the compose file.** See [Updating with Onchain KMS](/phala-cloud/key-management/updating-with-onchain-kms) for the single-command EOA path, or [Multisig and Governance](/phala-cloud/key-management/multisig-governance) if you plan to transfer ownership to a Safe or timelock.
* **To allowlist more nodes** for HA or migration. See [Device Management](/phala-cloud/key-management/device-management).
* **To transfer DstackApp ownership** to a Safe, timelock, or DAO. Read [Multisig and Governance](/phala-cloud/key-management/multisig-governance) **before** you transfer — an irreversible mistake leaves the CVM frozen on its current compose.
## Troubleshooting
The CLI enforces a minimum wallet balance of 0.001 ETH before it will send `deployAndRegisterApp`. Top up the wallet on the chain you are targeting and retry. On Base, the Base bridge or any mainstream exchange withdrawal works. On Ethereum mainnet, account for the L1 gas cost of a contract deployment — empty wallets will not do.
This usually means `--rpc-url` was not set and `ETH_RPC_URL` is not in your environment either. Set one of them and retry. You can verify with `echo $ETH_RPC_URL`.
Check the CVM logs first, from the dashboard or with `phala logs`. If the KMS rejected the attestation, the logs will say so. The most common root causes are:
* The compose hash computed on the node does not match what the contract stores. This normally only happens if something mutates the compose file after provisioning — unusual, but worth re-running the deploy if you see it.
* The device ID of the node the scheduler picked is not in `allowedDeviceIds`. On a fresh deploy this should not happen because `deployAndRegisterApp` registers the current device ID in the same transaction. If it does, cross-check the DstackApp on the explorer: `allowedDeviceIds()` should be `true`.
* The DstackApp `owner` is not who you think it is. If the contract was created by someone else's wallet, `owner()` on the explorer will reveal it.
Onchain KMS is not portable across chains — the DstackApp lives on one chain, and the KMS on that chain is the one that holds the keys. You cannot migrate a deployed CVM from Ethereum to Base (or vice versa) while keeping the same keys. The practical workflow is:
1. Deploy a fresh CVM on the new chain with `phala deploy --kms base` or `--kms ethereum`.
2. Point traffic and any persistent storage at the new CVM.
3. Delete the old CVM.
Plan the chain choice up front.
Your browser wallet is still on a different network. Open the wallet extension and switch to Base (chain ID 8453) or Ethereum Mainnet (chain ID 1), then click **Deploy and Continue** again. The dashboard will reject the transaction if the chain ID from your wallet does not match the KMS you selected.
## Next Steps
* [Updating with Onchain KMS](/phala-cloud/key-management/updating-with-onchain-kms) — roll a new compose file when you hold the DstackApp owner key as an EOA.
* [Multisig and Governance](/phala-cloud/key-management/multisig-governance) — the prepare-and-commit flow for compose updates when the DstackApp owner is a Safe, timelock, DAO, or any custom contract. Also covers webhook notifications for pending approvals.
* [Device Management](/phala-cloud/key-management/device-management) — how `device_id` is derived, how to allow new nodes, and how to recover when a node's device ID drifts after a hardware change.
* [Understanding Onchain KMS](/phala-cloud/key-management/understanding-onchain-kms) — the conceptual model if you want to revisit the contracts and boot-time flow.
* [Error Codes reference](/phala-cloud/references/error-codes) — the full catalog of `ERR-01-*` codes returned by the CVM API.