> ## Documentation Index
> Fetch the complete documentation index at: https://docs.phala.com/llms.txt
> Use this file to discover all available pages before exploring further.
> Deploy your first TEE application on Phala Cloud using the web UI.
# CVM Deployment
Make sure you have [created your Phala Cloud account](/phala-cloud/getting-started/sign-up-for-cloud-account) before continuing.
In this tutorial, you deploy a Jupyter Notebook inside a Confidential VM (CVM) on Phala Cloud and verify its TEE proof. By the end, you'll have a running application with a public HTTPS endpoint secured by hardware-level encryption.
## Prerequisites
* A [Phala Cloud account](/phala-cloud/getting-started/sign-up-for-cloud-account)
* Basic familiarity with Docker Compose
## Step 1 — Open the Deploy Page
Navigate to your workspace and click the **Deploy** button in the top-right corner of the CVMs page.
## Step 2 — Configure Your CVM
On the Deploy page, fill in the following:
1. **Name**: Enter a name for your CVM (e.g., `my-first-cvm`).
2. **docker-compose.yml**: Replace the default content with the Jupyter Notebook configuration below:
```yaml theme={"system"}
services:
jupyter:
image: quay.io/jupyter/base-notebook
ports:
- 8080:8888
volumes:
- /var/run/dstack.sock:/var/run/dstack.sock
environment:
- GRANT_SUDO=yes
user: root
command: "start-notebook.sh --NotebookApp.token=${TOKEN}"
```
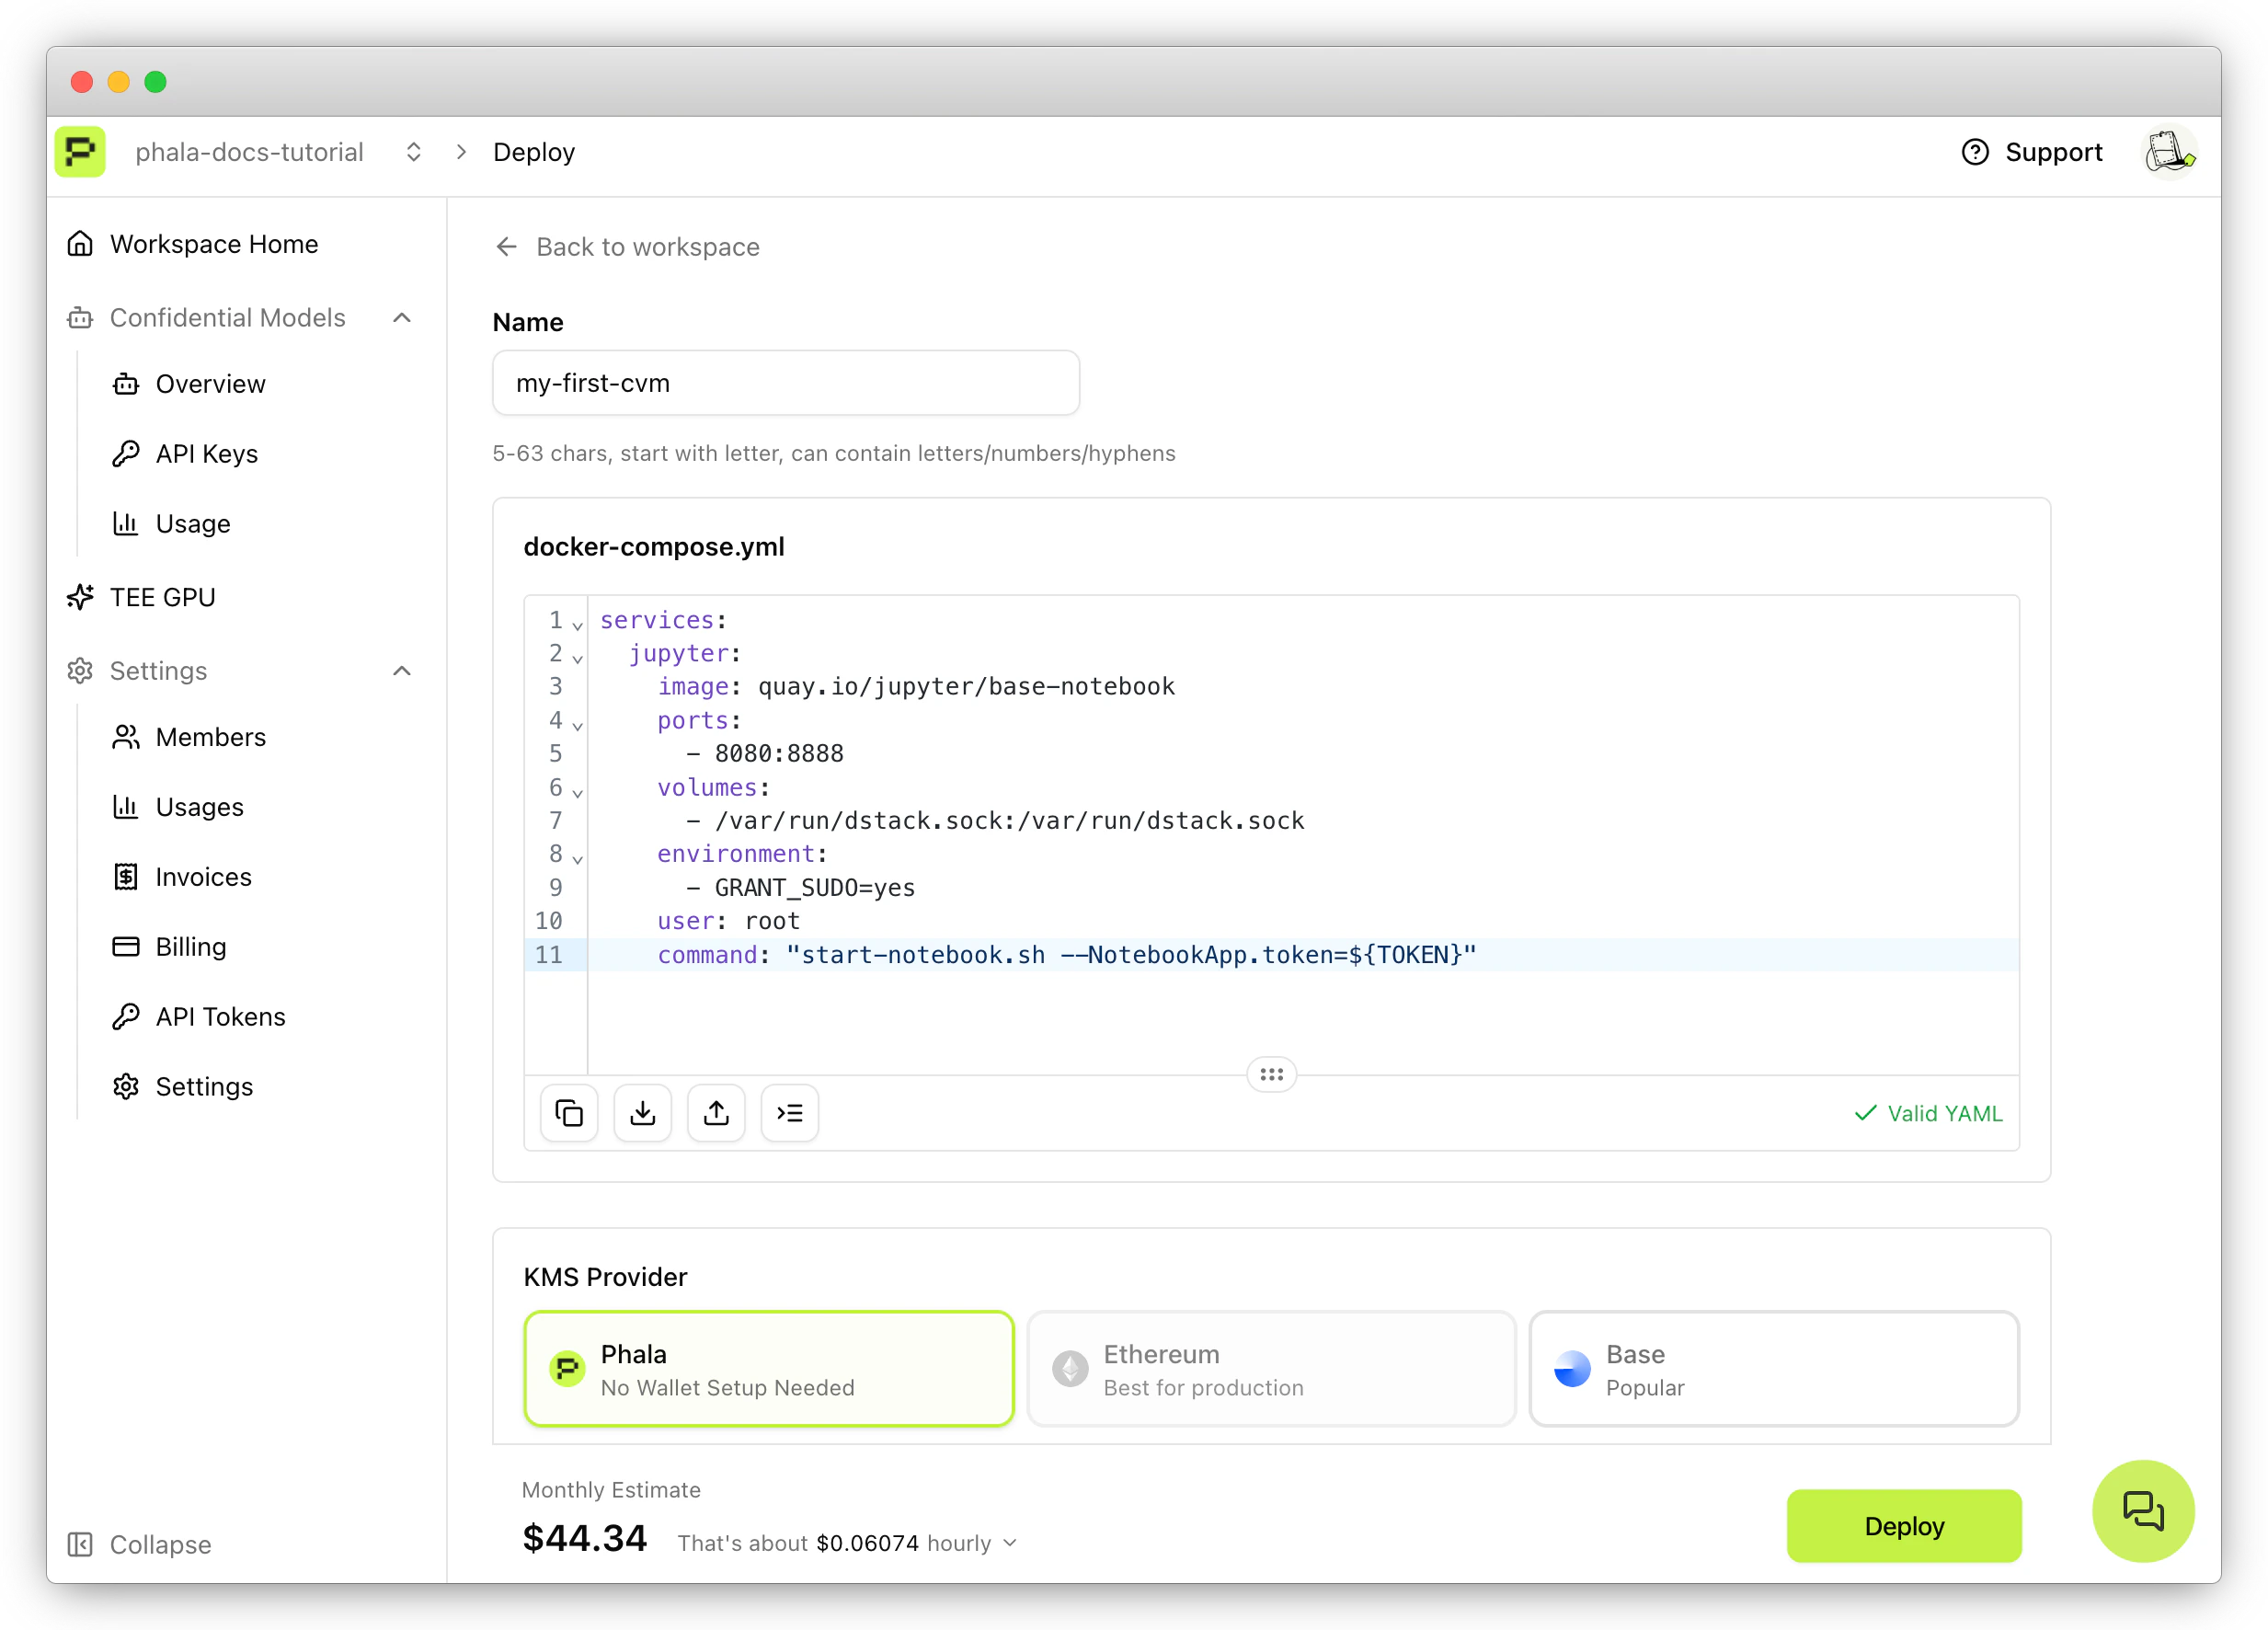 3. **KMS Provider**: Select **Phala** (no wallet setup needed for testing).
4. **Region**: Choose a region closest to you (e.g., **US West**).
5. **Instance Type**: Keep the default **CPU TEE** with **Small TDX Instance** (1 vCPU, 2GB RAM).
## Step 3 — Set Encrypted Secrets
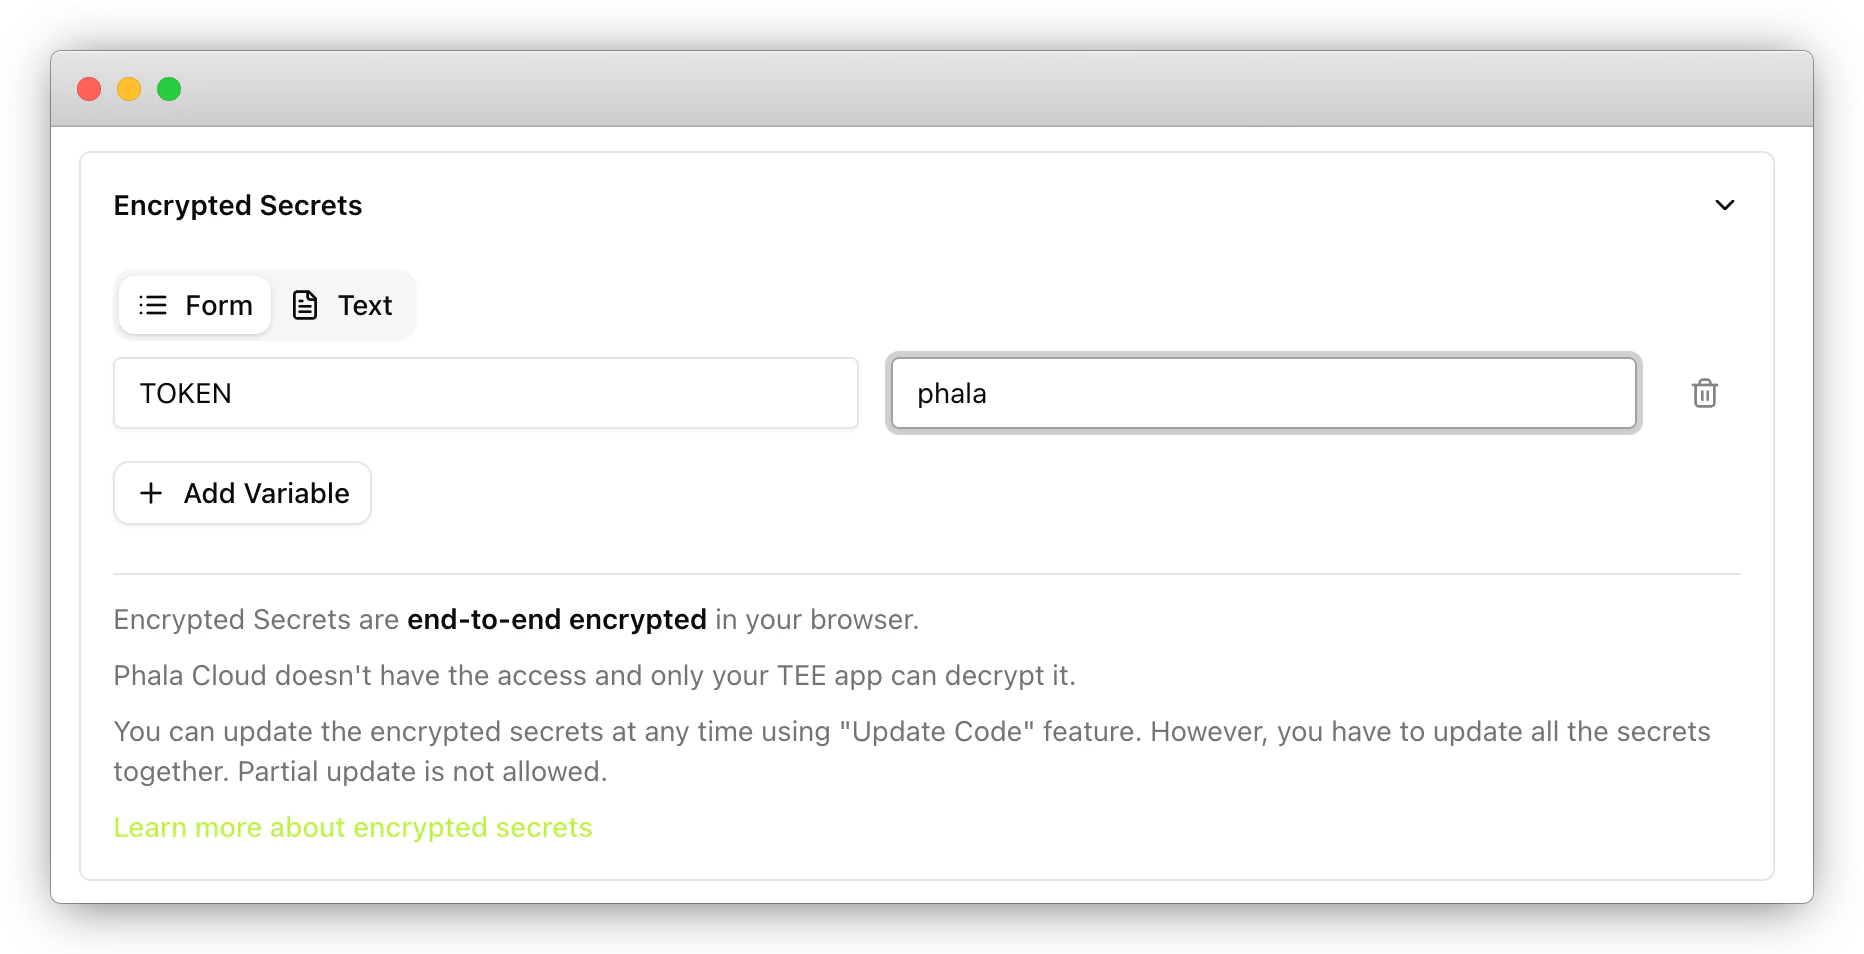
Scroll down and expand the **Encrypted Secrets** section. Add the following key-value pair:
| Key | Value |
| ------- | ------- |
| `TOKEN` | `phala` |
This sets the Jupyter Notebook login token. The `TOKEN` variable is referenced in the `command` field of the compose file as `${TOKEN}`. Encrypted Secrets are end-to-end encrypted between you and your CVM.
3. **KMS Provider**: Select **Phala** (no wallet setup needed for testing).
4. **Region**: Choose a region closest to you (e.g., **US West**).
5. **Instance Type**: Keep the default **CPU TEE** with **Small TDX Instance** (1 vCPU, 2GB RAM).
## Step 3 — Set Encrypted Secrets
Scroll down and expand the **Encrypted Secrets** section. Add the following key-value pair:
| Key | Value |
| ------- | ------- |
| `TOKEN` | `phala` |
This sets the Jupyter Notebook login token. The `TOKEN` variable is referenced in the `command` field of the compose file as `${TOKEN}`. Encrypted Secrets are end-to-end encrypted between you and your CVM.
 ## Step 4 — Deploy
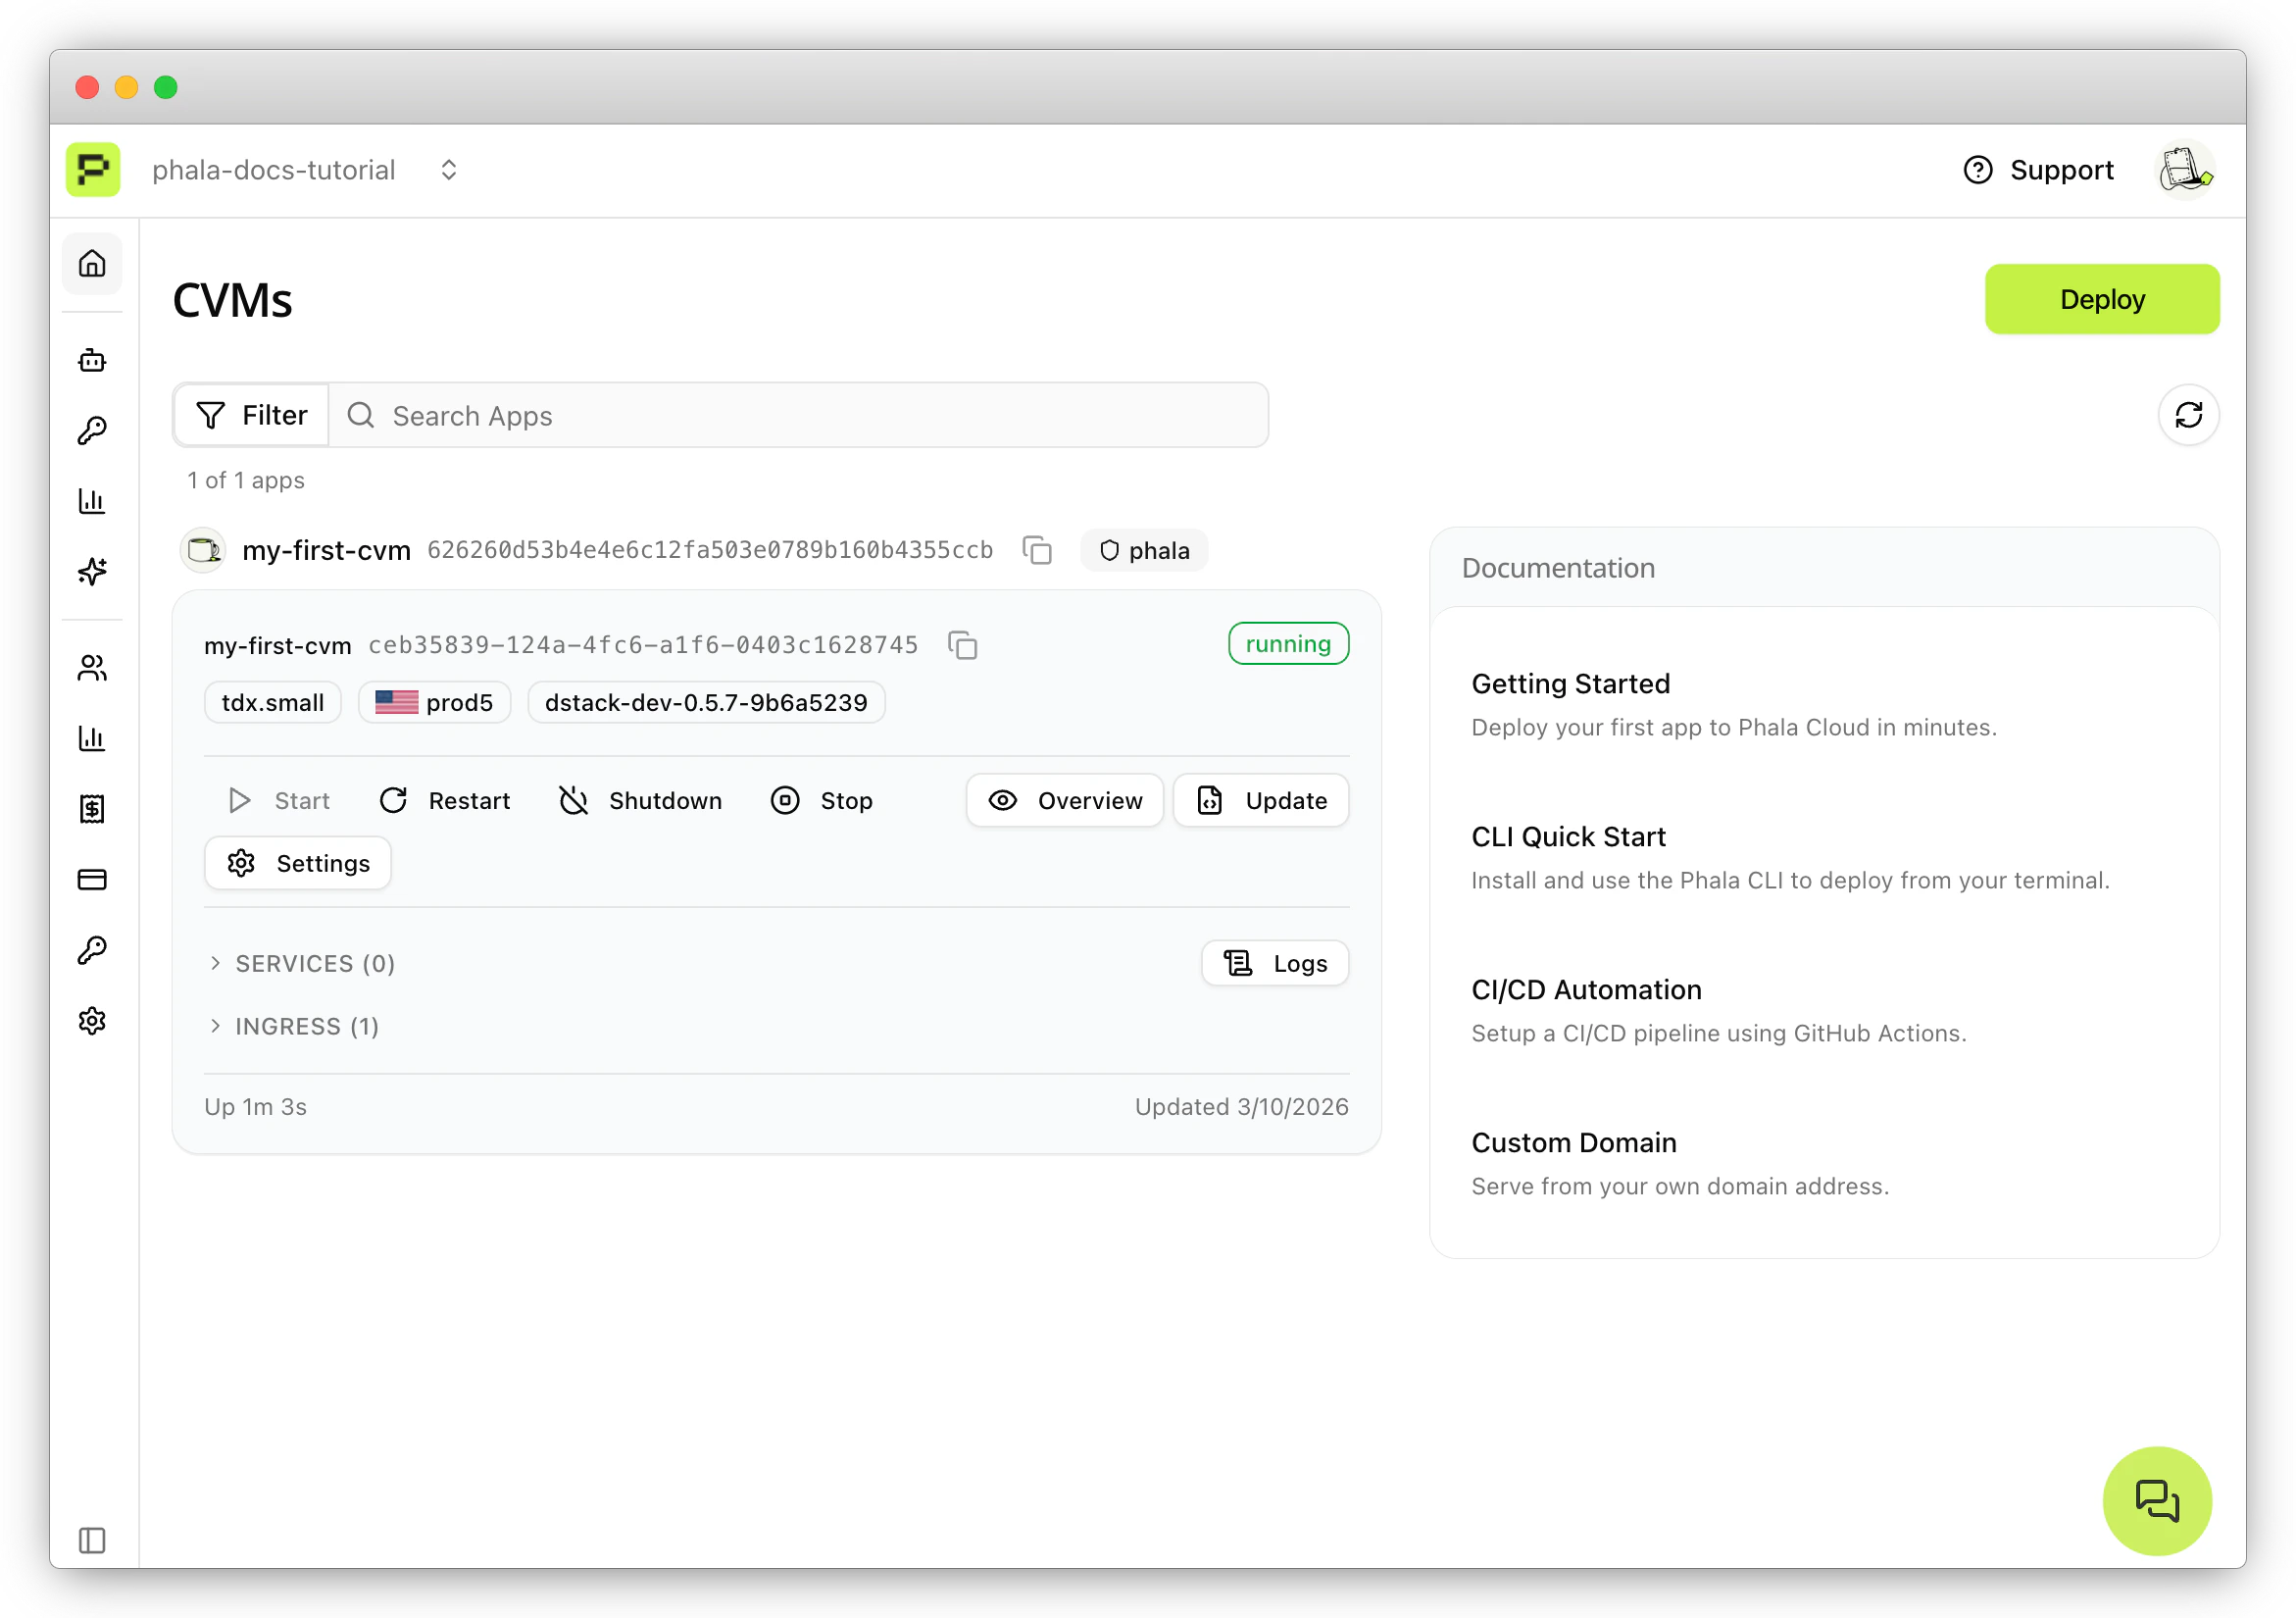
Click the **Deploy** button. You'll be redirected to the CVMs page where your CVM will show a **starting** status. This typically takes 1–2 minutes. Once ready, the status changes to **running**.
## Step 4 — Deploy
Click the **Deploy** button. You'll be redirected to the CVMs page where your CVM will show a **starting** status. This typically takes 1–2 minutes. Once ready, the status changes to **running**.
 ## Step 5 — Access Your Application
Click **Overview** on the CVM card, then click **Home** in the sidebar. Expand the **INGRESS** section to find your application's public endpoint URL.
## Step 5 — Access Your Application
Click **Overview** on the CVM card, then click **Home** in the sidebar. Expand the **INGRESS** section to find your application's public endpoint URL.
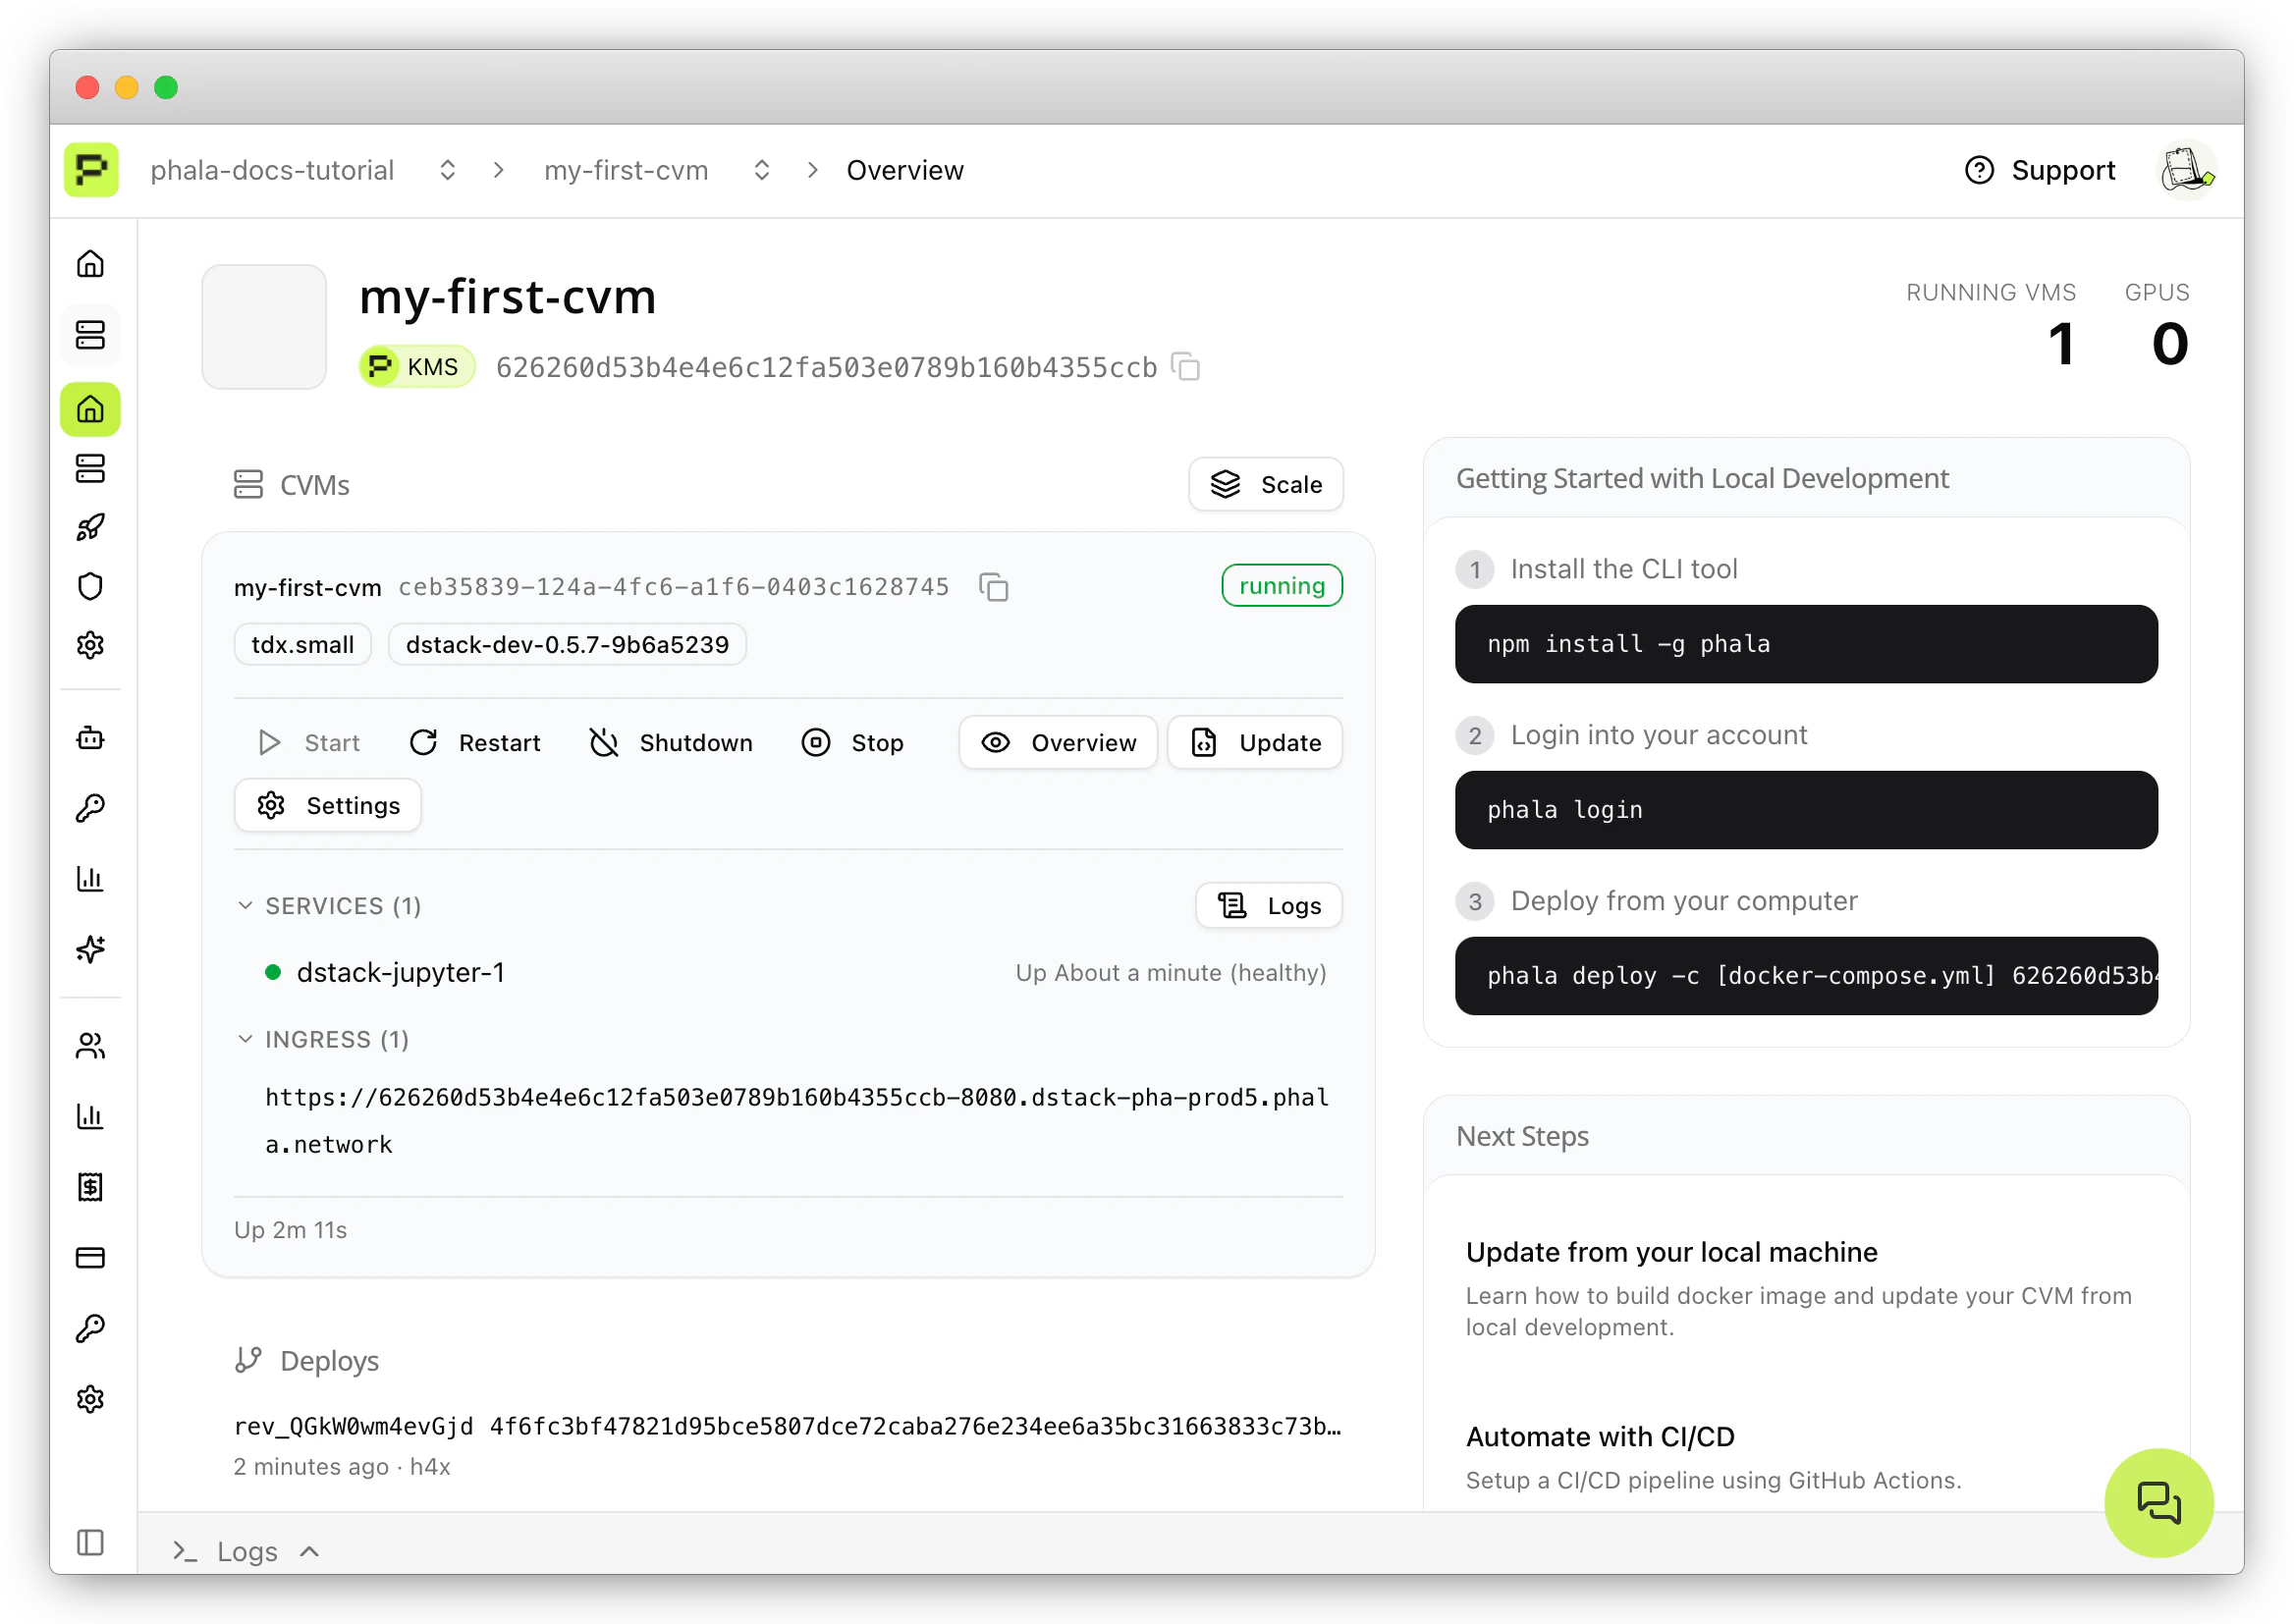 The endpoint URL follows this pattern:
```
https://-.dstack-pha-.phala.network
```
* **App ID**: Your CVM's unique identifier
* **Port**: The external port mapped in your compose file (`8080` in this example)
* **Node**: The infrastructure node running your CVM
Open the endpoint URL in your browser. You'll see the Jupyter Notebook login page. Enter the token `phala` (the value you set in Encrypted Secrets) to access the notebook.
## Step 6 — Verify TEE Proof
Navigate to **Attestations** in the sidebar to view the Remote Attestation report for your CVM. This report proves your application is running inside a genuine TEE.
Click **Check Attestation** to open the [TEE Attestation Explorer](https://proof.t16z.com/), where you can verify the attestation quote. You can share this proof with anyone to demonstrate that your application runs in a secure, confidential environment.
For more details on attestation, see [Get Attestation and Verify](/phala-cloud/getting-started/attestation).
Attestation reports may take a few minutes to become available after deployment.
## Next Steps
Now that you've deployed your first CVM, explore further:
* [Create CVMs with Docker Compose](/phala-cloud/cvm/create-with-docker-compose) — advanced configuration options
* [Deploy from CLI](/phala-cloud/phala-cloud-cli/start-from-cloud-cli) — deploy and manage CVMs from your terminal
* [Explore Templates](/phala-cloud/getting-started/explore-templates/overview) — pre-built setups for common frameworks
* [Security Architecture](/phala-cloud/security-and-privacy/security-architecture) — understand how Phala Cloud protects your data
The endpoint URL follows this pattern:
```
https://-.dstack-pha-.phala.network
```
* **App ID**: Your CVM's unique identifier
* **Port**: The external port mapped in your compose file (`8080` in this example)
* **Node**: The infrastructure node running your CVM
Open the endpoint URL in your browser. You'll see the Jupyter Notebook login page. Enter the token `phala` (the value you set in Encrypted Secrets) to access the notebook.
## Step 6 — Verify TEE Proof
Navigate to **Attestations** in the sidebar to view the Remote Attestation report for your CVM. This report proves your application is running inside a genuine TEE.
Click **Check Attestation** to open the [TEE Attestation Explorer](https://proof.t16z.com/), where you can verify the attestation quote. You can share this proof with anyone to demonstrate that your application runs in a secure, confidential environment.
For more details on attestation, see [Get Attestation and Verify](/phala-cloud/getting-started/attestation).
Attestation reports may take a few minutes to become available after deployment.
## Next Steps
Now that you've deployed your first CVM, explore further:
* [Create CVMs with Docker Compose](/phala-cloud/cvm/create-with-docker-compose) — advanced configuration options
* [Deploy from CLI](/phala-cloud/phala-cloud-cli/start-from-cloud-cli) — deploy and manage CVMs from your terminal
* [Explore Templates](/phala-cloud/getting-started/explore-templates/overview) — pre-built setups for common frameworks
* [Security Architecture](/phala-cloud/security-and-privacy/security-architecture) — understand how Phala Cloud protects your data