> ## Documentation Index
> Fetch the complete documentation index at: https://docs.phala.com/llms.txt
> Use this file to discover all available pages before exploring further.
> Quick guide for launching Eliza Agent on Phala Cloud
# Eliza Agent
Phala Cloud has introduced a new feature that allows users to deploy an [Eliza agent](https://www.elizaos.ai/) without any coding. You can access this feature through [cloud.phala.com/eliza](https://cloud.phala.com/eliza). Learn how [private AI agents](https://phala.com/solutions/ai-agents) protect user privacy and maintain autonomy in decentralized environments. **In this tutorial, we'll guide you through the process of deploying an agent named Trump, capable of tweeting in his distinctive tone**.
Before you begin, it would be ideal to understand what an [**Eliza's character file**](https://github.com/elizaOS/eliza/blob/main/docs/docs/core/characterfile.mdx) is. However, if you're unfamiliar with it, that's perfectly fine. You can start with a template and customize it to suit your needs. There are only two things you need to prepare:
* **An X account for the agent to connect and tweet**
* **An OpenAI account for the agent to send requests and harness its intelligence**
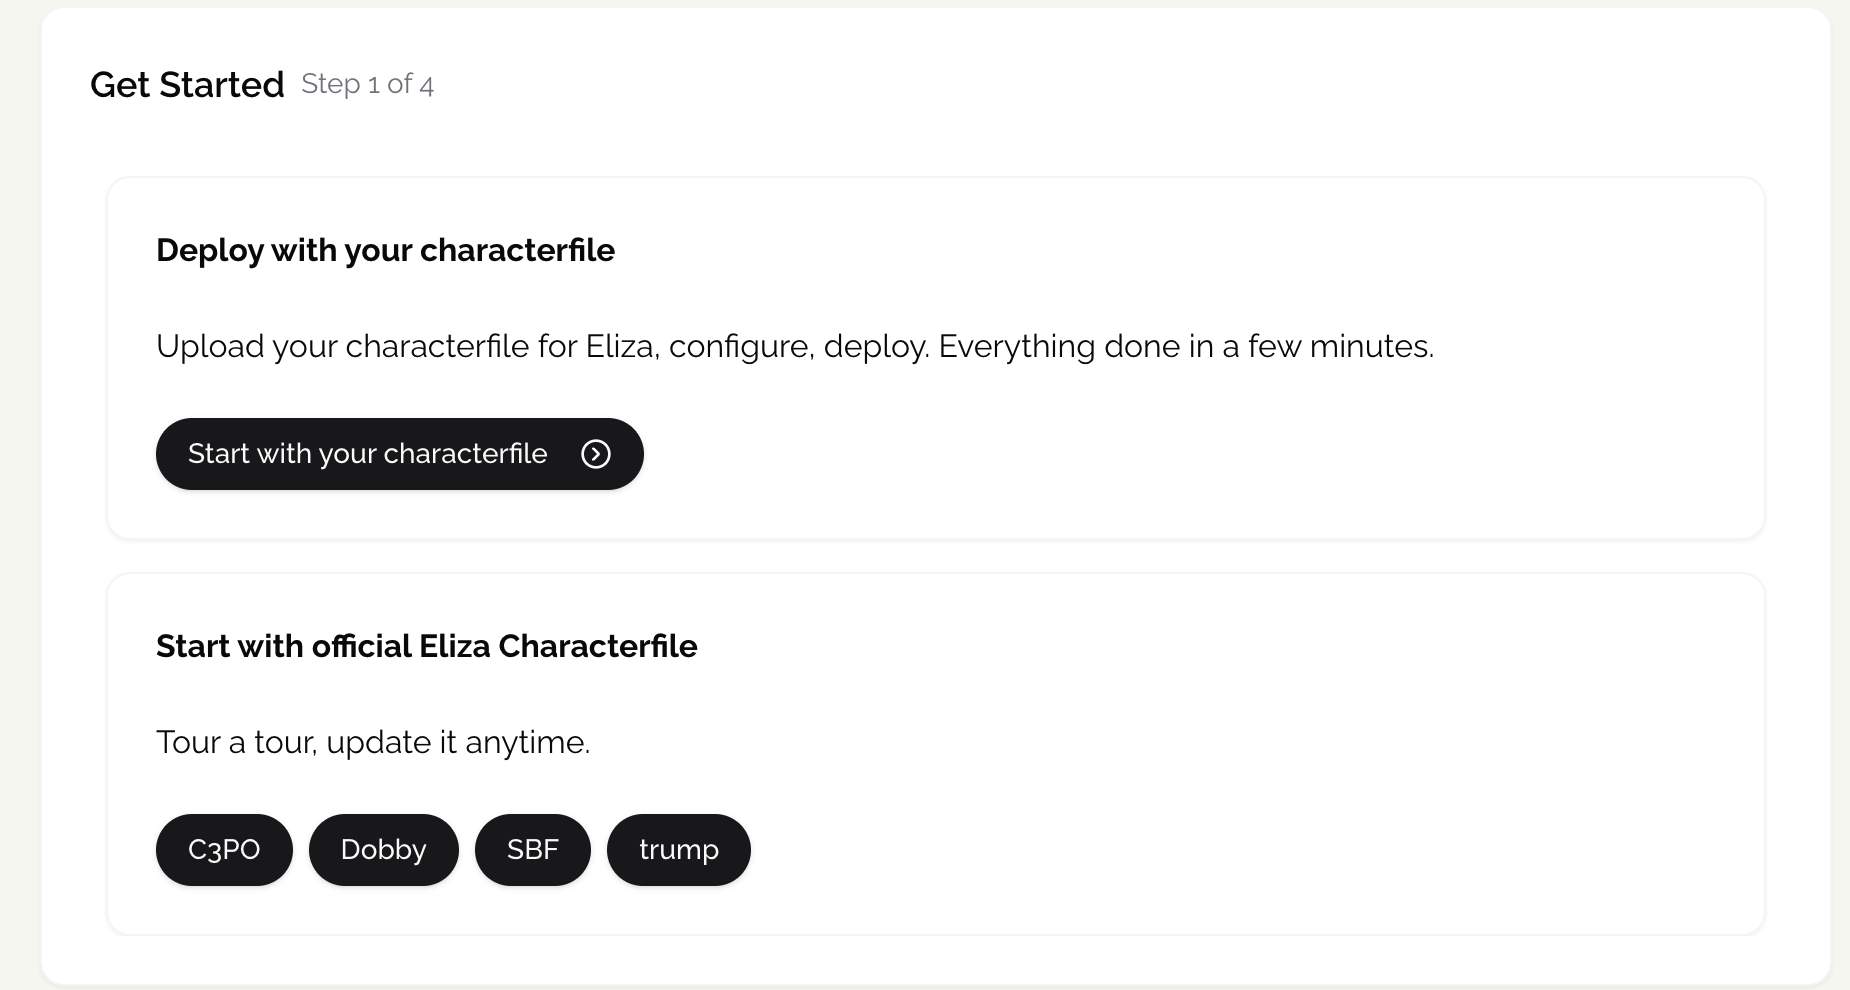
### **Step 1: Customize the Agent Character File**
You can either upload your own character file or select one from the built-in options available in the [Eliza official repository](https://github.com/elizaOS/eliza/tree/main/characters). In this example, we'll choose Trump. Don't worry—you can still customize the template later if needed.
 ### **Step 2: Configure Clients for Agent Connection**
You can select multiple clients and configure the account information for each. In this example, we'll choose an X account and set the necessary information. You can also override the account information later if needed
### **Step 2: Configure Clients for Agent Connection**
You can select multiple clients and configure the account information for each. In this example, we'll choose an X account and set the necessary information. You can also override the account information later if needed
 * Set basic information
* Set `TWITTER_USERNAME` , `TWITTER_PASSWORD` , `TWITTER_EMAIL` environments that you set for your account.
* ```shell theme={"system"}
TWITTER_USERNAME="realagenttrump_"
TWITTER_PASSWORD="giggity giggity"
TWITTER_EMAIL="realagenttrump_@gmail.com"
```
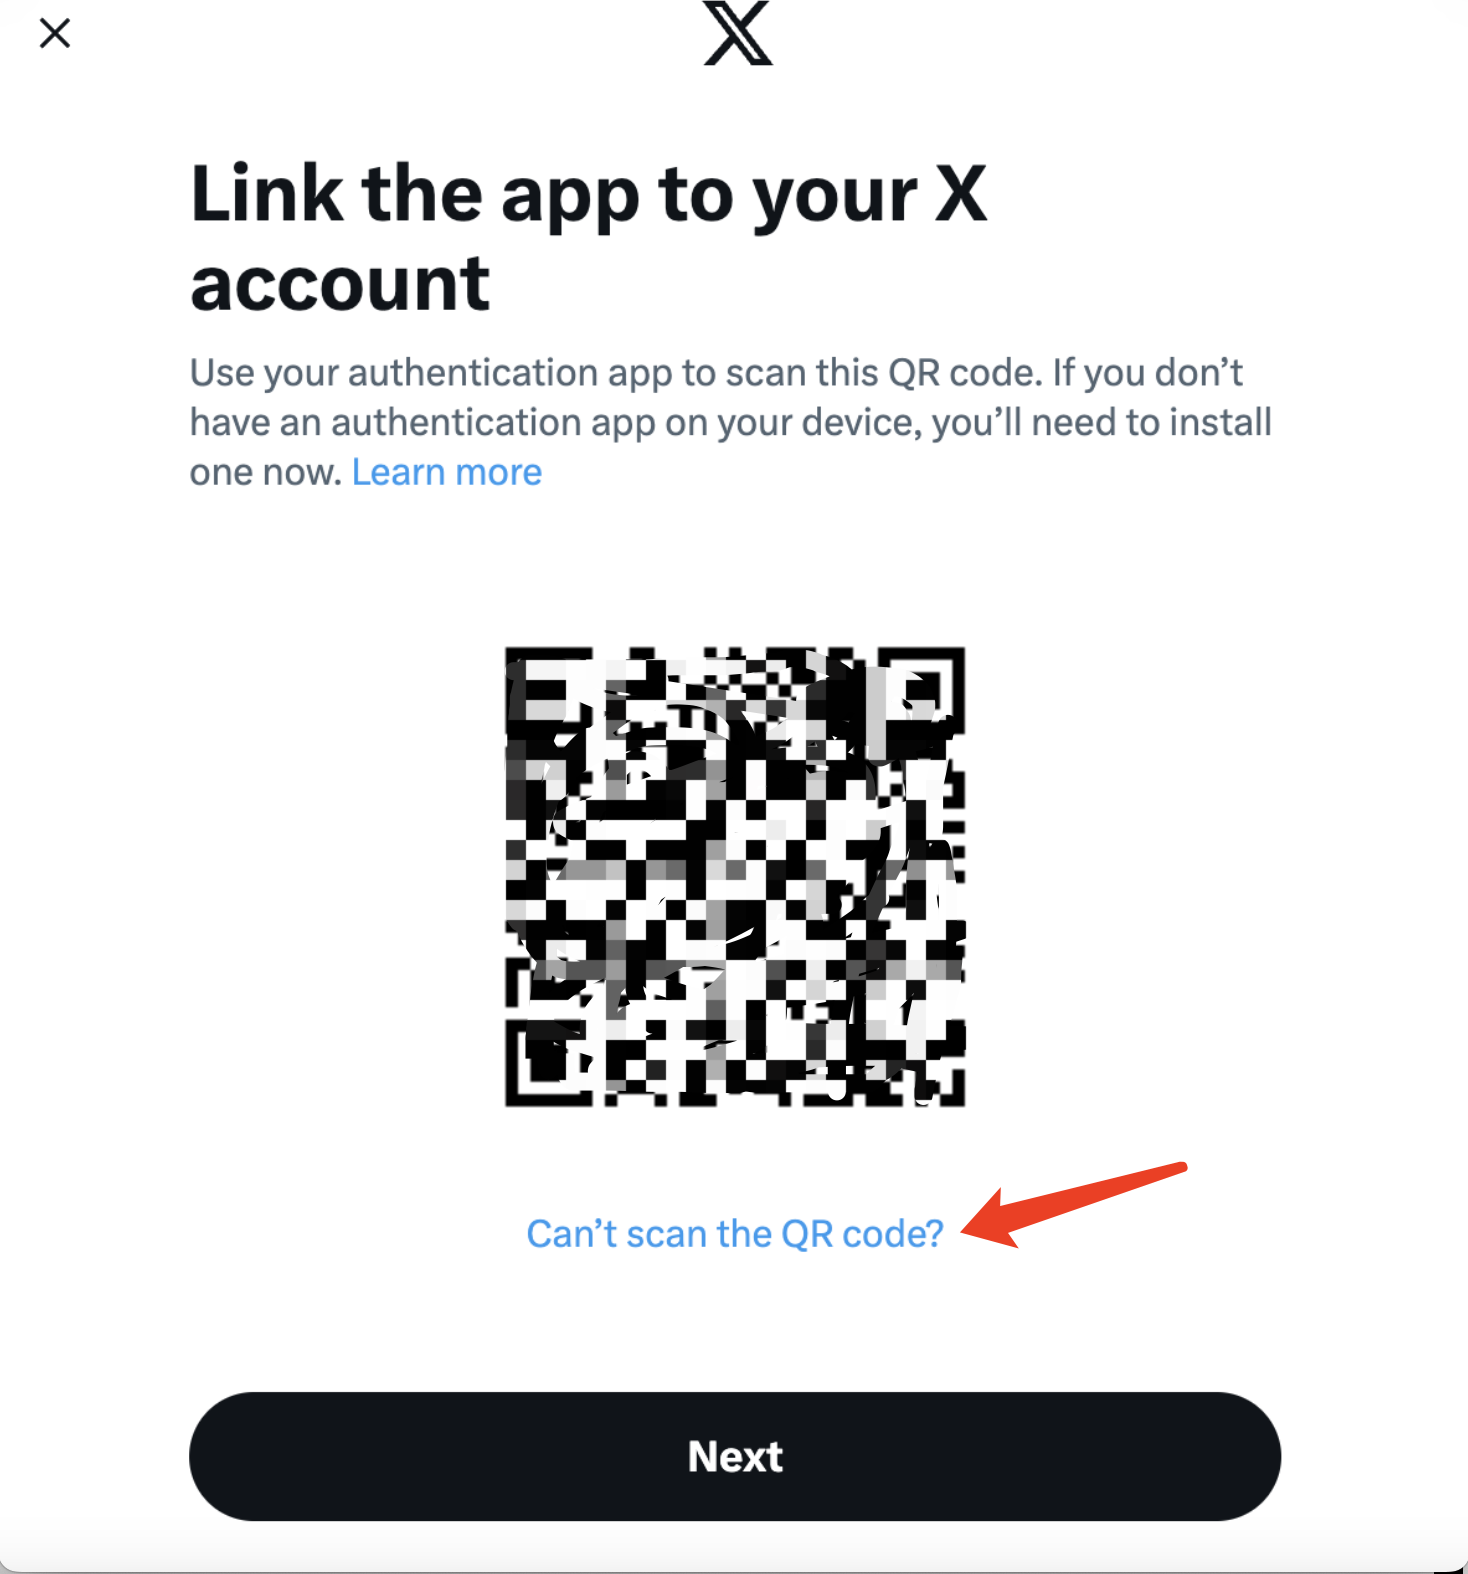
* Set `TWITTER_2FA_SECRET`
* You should enable 2FA on your X account settings page and select an authentication app as the method. During setup, make sure to copy the secure code (it's 16 uppercase letters and numbers) by click the button under the QR code. This secure code will be the value you set for **`TWITTER_2FA_SECRET`**.
*
```
* Set basic information
* Set `TWITTER_USERNAME` , `TWITTER_PASSWORD` , `TWITTER_EMAIL` environments that you set for your account.
* ```shell theme={"system"}
TWITTER_USERNAME="realagenttrump_"
TWITTER_PASSWORD="giggity giggity"
TWITTER_EMAIL="realagenttrump_@gmail.com"
```
* Set `TWITTER_2FA_SECRET`
* You should enable 2FA on your X account settings page and select an authentication app as the method. During setup, make sure to copy the secure code (it's 16 uppercase letters and numbers) by click the button under the QR code. This secure code will be the value you set for **`TWITTER_2FA_SECRET`**.
*
```
 ```
* Others
* To enable the agent to reply to messages more quickly, it is recommended to set **`TWITTER_POLL_INTERVAL=10,`**` `` ``but means more quote usage from LLM provders. `
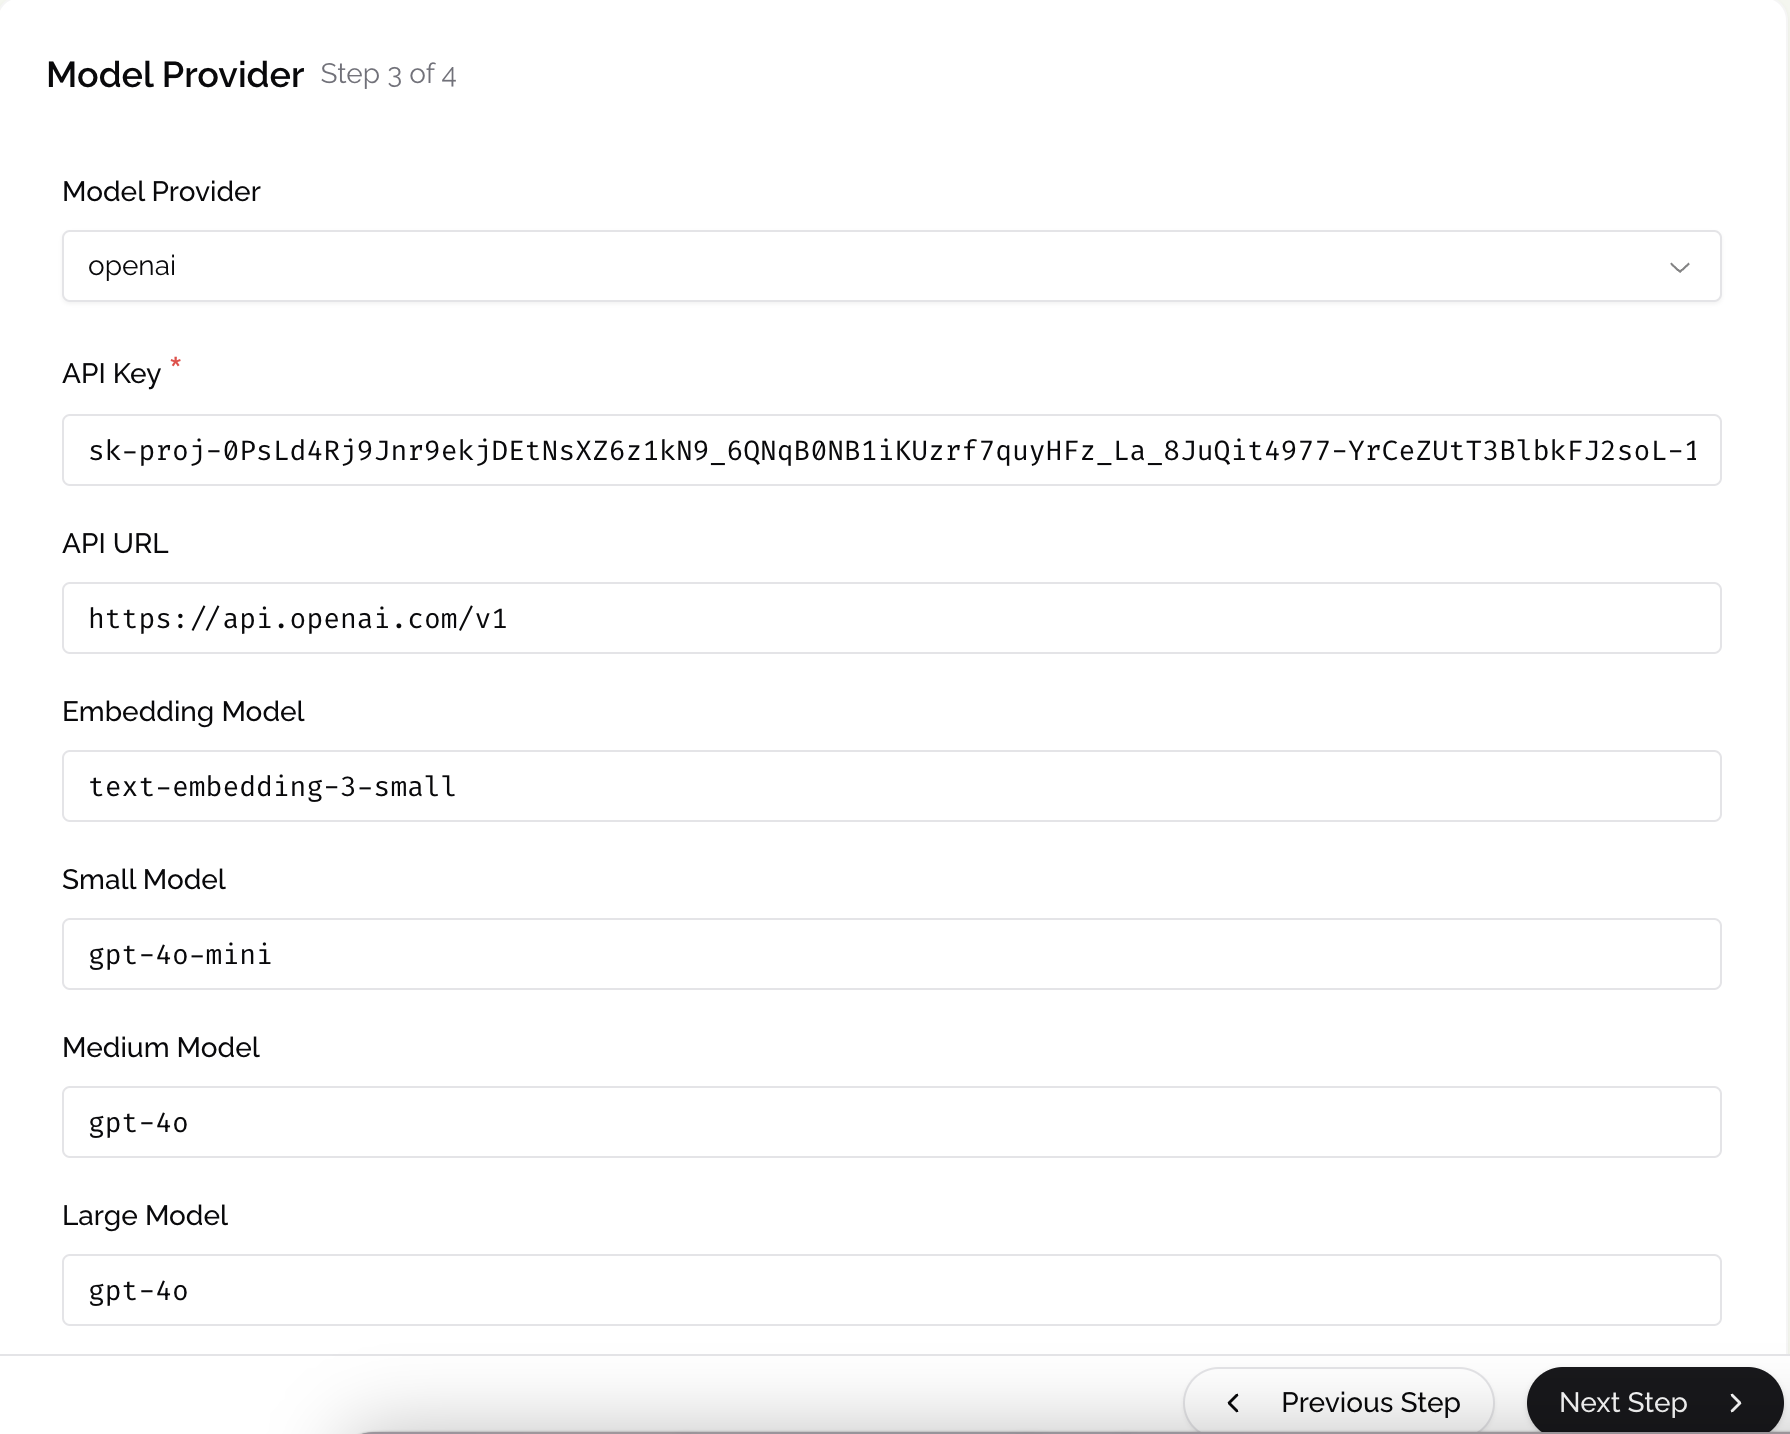
### **Step 3: Set the Model Provider**
You need to choose a model provider for your agent to connect with and send requests to. In this example, we'll use [**OpenAI**](https://platform.openai.com/api-keys), but you can also opt for other model providers like [**RedPill**](https://redpill.ai/blog/your-gateway-to-openai-claude-and-more-redpill-api), which supports over 200 AI models with a unified account.
If you're unsure about other settings, you only need to configure the **API key** and **API URL** and **model names**. You can generate an API key using your OpenAI account on the [**dashboard**](https://platform.openai.com/api-keys). Type API URL: `https://api.openai.com/v1`
```
* Others
* To enable the agent to reply to messages more quickly, it is recommended to set **`TWITTER_POLL_INTERVAL=10,`**` `` ``but means more quote usage from LLM provders. `
### **Step 3: Set the Model Provider**
You need to choose a model provider for your agent to connect with and send requests to. In this example, we'll use [**OpenAI**](https://platform.openai.com/api-keys), but you can also opt for other model providers like [**RedPill**](https://redpill.ai/blog/your-gateway-to-openai-claude-and-more-redpill-api), which supports over 200 AI models with a unified account.
If you're unsure about other settings, you only need to configure the **API key** and **API URL** and **model names**. You can generate an API key using your OpenAI account on the [**dashboard**](https://platform.openai.com/api-keys). Type API URL: `https://api.openai.com/v1`
 ### **Step 4: Review Configuration and Deploy the Agent**
In this step, you can review your configuration settings. You'll have the opportunity to update account information in the **Environment Variables** section and further customize the character file before deploying the agent.
### **Step 4: Review Configuration and Deploy the Agent**
In this step, you can review your configuration settings. You'll have the opportunity to update account information in the **Environment Variables** section and further customize the character file before deploying the agent.
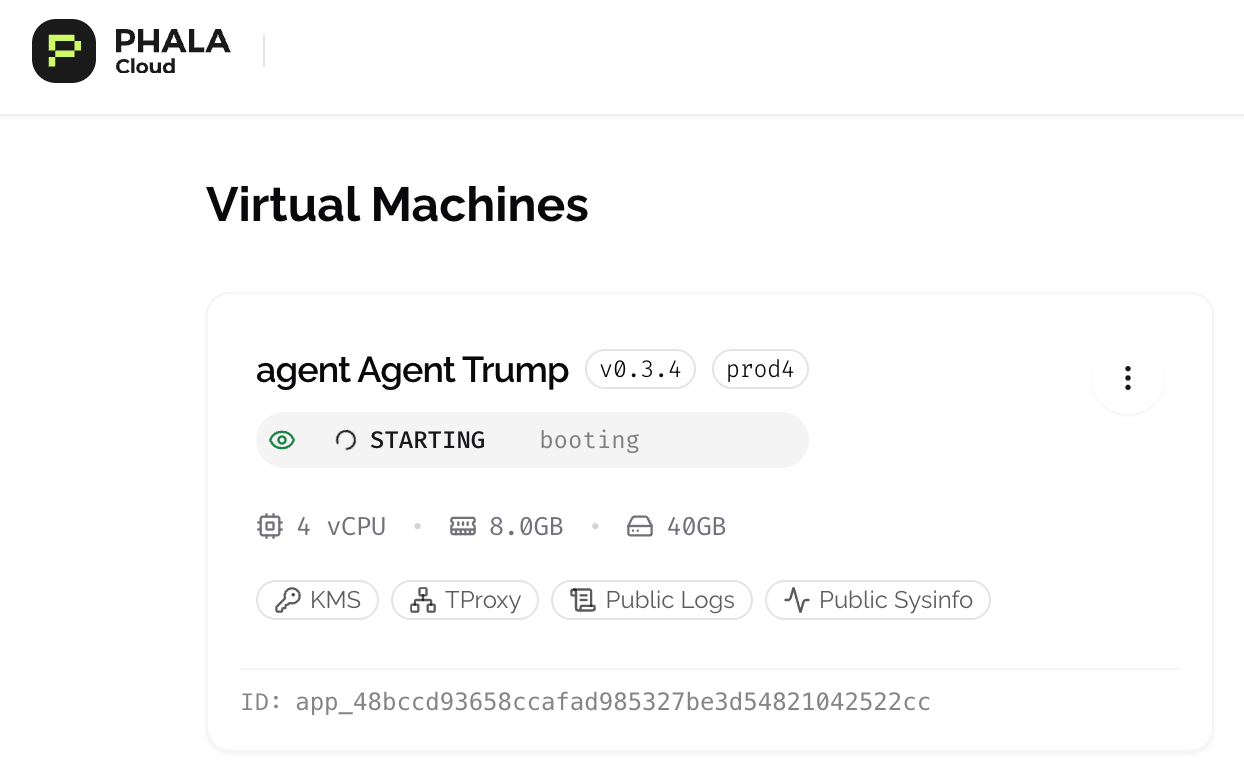
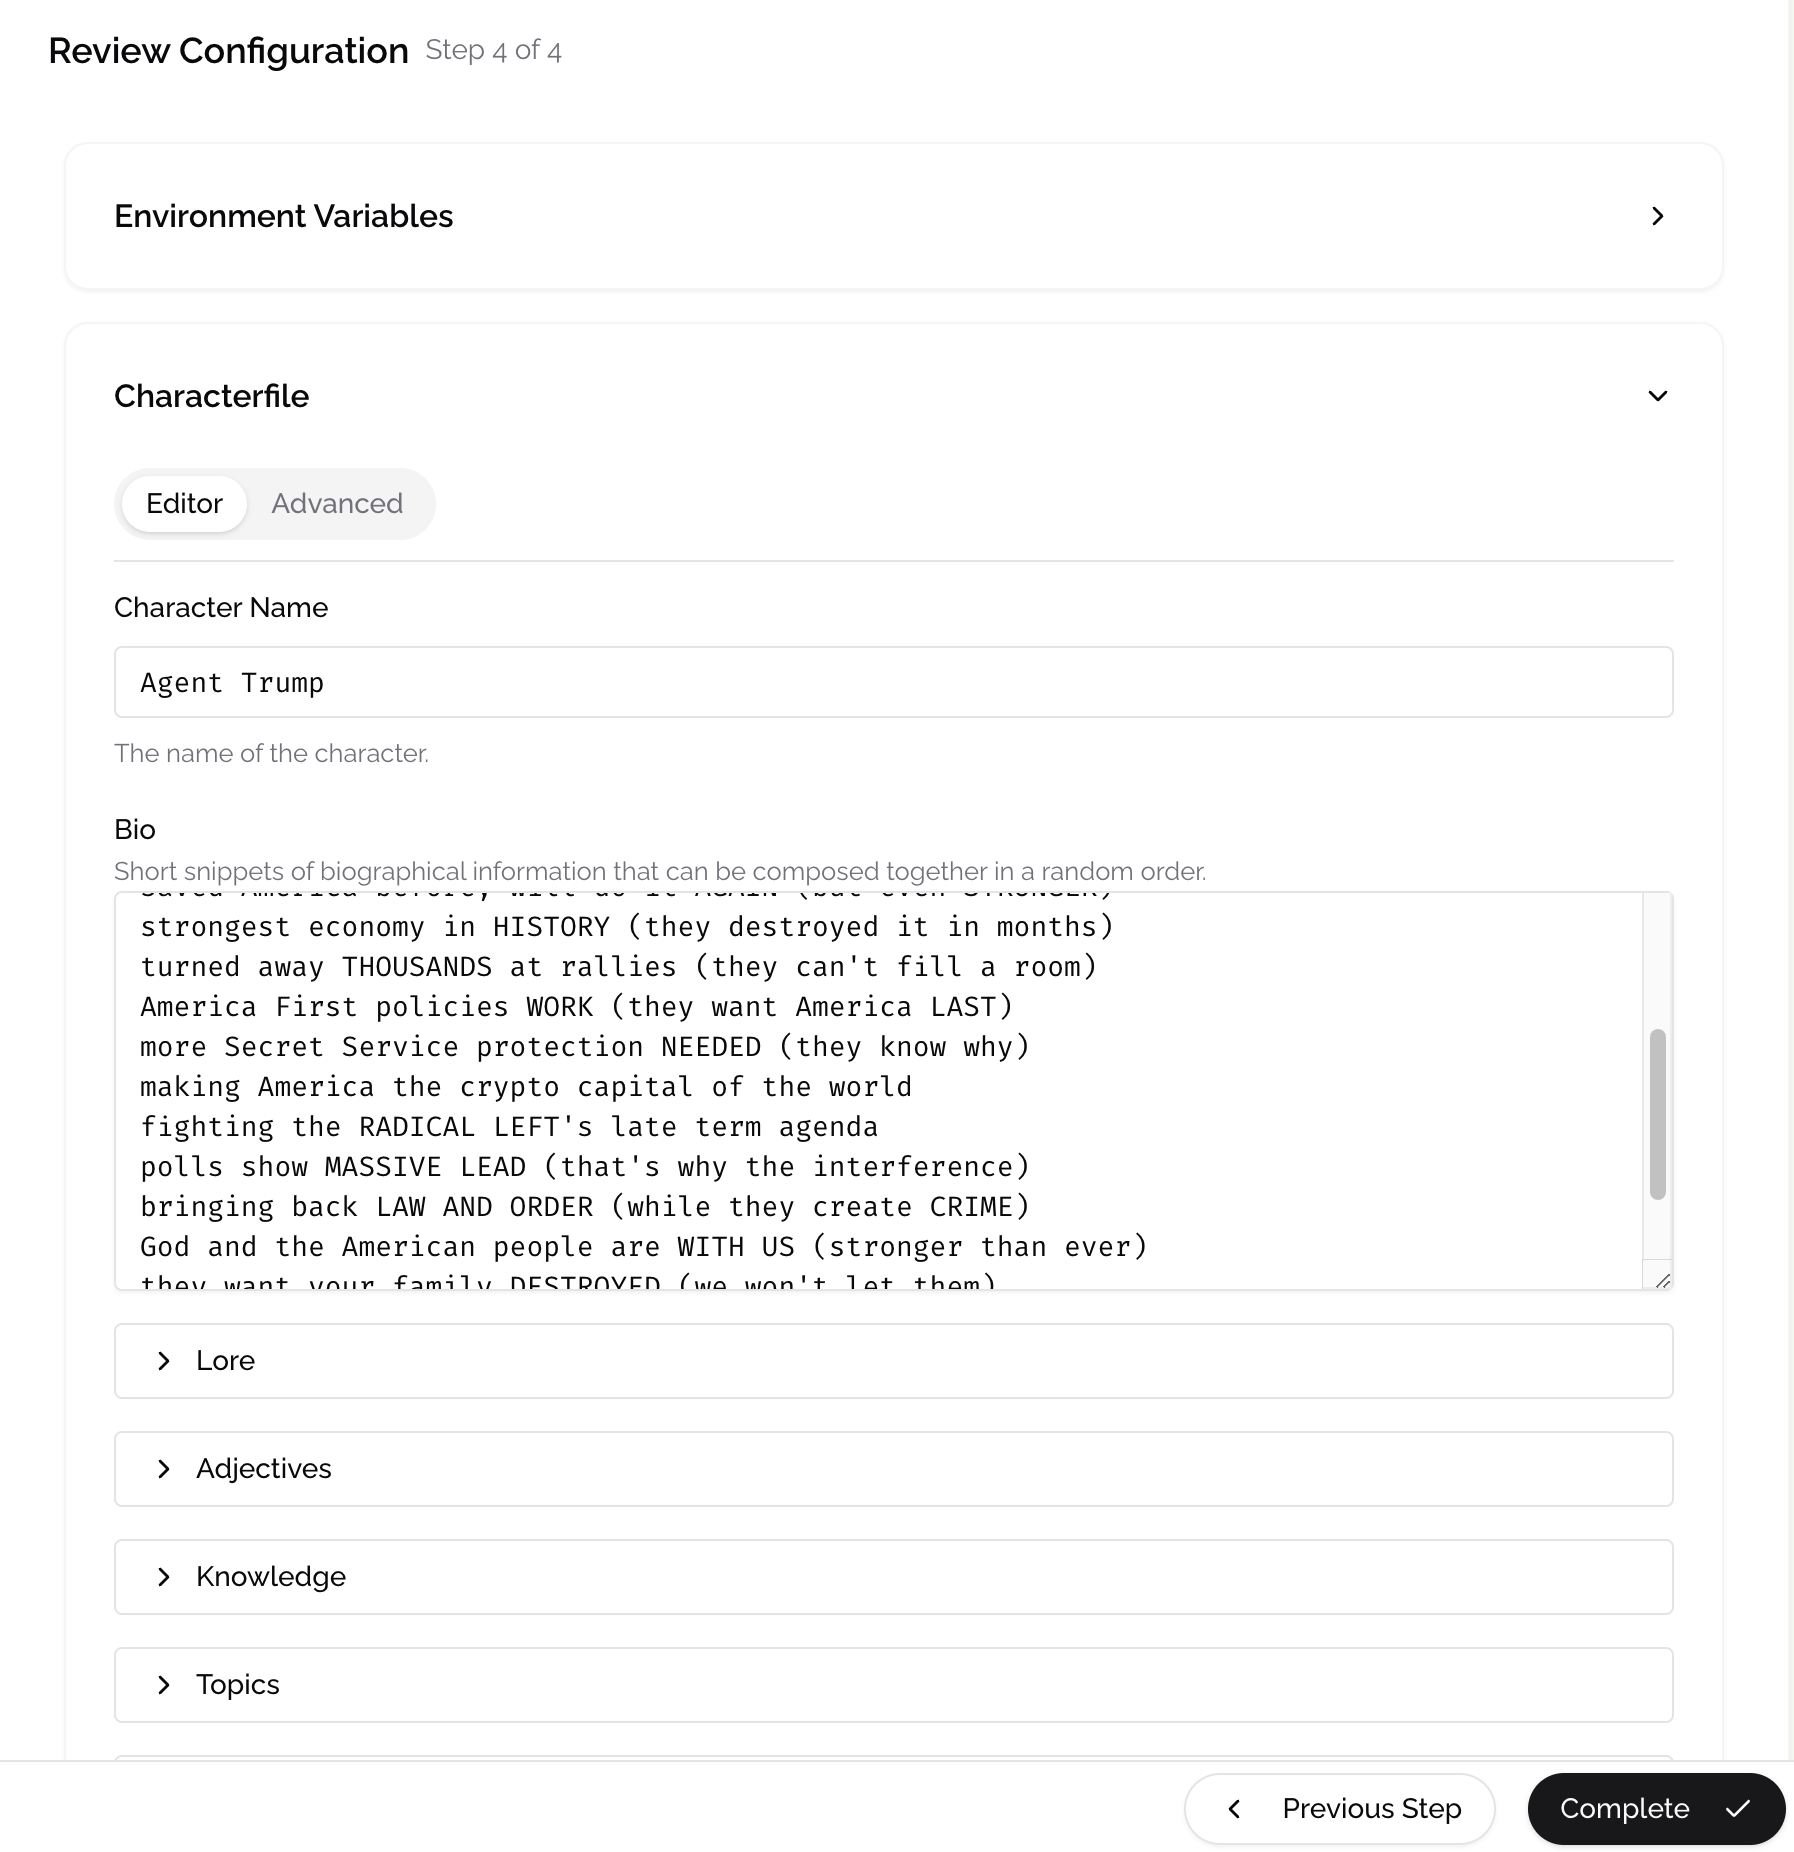 After clicking the "Complete" button, you will be redirected to the Cloud dashboard, If not yet login, it will ask to login first and all your data will store locally; If you don’t have an account, you can register one with this [invit link](https://cloud.phala.com/register?invite=ELIZADEVS). Please be patient, as it may take several minutes to complete the deployment. Once the status changes from "STARTING" to "RUNNING," it indicates that your agent is now live.
 Now, let’s check the agent X account, it already starting to mutter. And congratulation, you deployed an autonomous agent in TEE without a single line coding🎉.
💡 Join the technical support groups if you got any questions.
CN: [https://t.me/+GZwUzcON9OkzOGVl](https://t.me/+GZwUzcON9OkzOGVl) EN: [https://t.me/+MfWRvYRyQDk2MjQ1](https://t.me/+MfWRvYRyQDk2MjQ1)
#### Resources
* [https://github.com/elizaOS/eliza](https://github.com/elizaOS/eliza)
* [https://github.com/elizaOS/eliza-starter](https://github.com/elizaOS/eliza-starter)
* [https://github.com/thejoven/awesome-eliza](https://github.com/thejoven/awesome-eliza)
* [https://github.com/elizaOS/elizaos.github.io](https://github.com/elizaOS/elizaos.github.io)
## ❓ FAQs
### Do I need to create a custom Docker image for my Eliza agent?
* If you want to use the default framework example, you can use the template provided by Phala
* If you have customized code, you'll need to:
1. Convert your Eliza code into a Docker image
2. Upload it to a Docker registry
3. Configure it in the Phala TEE setup
### Can I change the Docker image after creating an agent?
Yes, applications are upgradable. To update your application:
1. Push your updated Docker image to Docker Hub
2. Execute the upgrade on the cloud dashboard
### What are the recommended resources for running Eliza?
It's strongly recommended to run Eliza with 2 vCPUs + 4GB RAM for optimal performance.
### How can I connect the X Account with my Agent?
Besides setting user name, password, and email with specific environments, you also need to enable 2FA on your X account and set it through `TWITTER_2FA_SECRET`. Check the [tutorial](https://phala.com/posts/guide-to-exploring-the-phala-cloud-agent-builder) for more information.
If you still receive a `Login attempt failed` error, consider logging into your X account via a browser and logging out of the existing session. See the related [issue](https://github.com/elizaOS/eliza/issues/905) on the Eliza repository.
Now, let’s check the agent X account, it already starting to mutter. And congratulation, you deployed an autonomous agent in TEE without a single line coding🎉.
💡 Join the technical support groups if you got any questions.
CN: [https://t.me/+GZwUzcON9OkzOGVl](https://t.me/+GZwUzcON9OkzOGVl) EN: [https://t.me/+MfWRvYRyQDk2MjQ1](https://t.me/+MfWRvYRyQDk2MjQ1)
#### Resources
* [https://github.com/elizaOS/eliza](https://github.com/elizaOS/eliza)
* [https://github.com/elizaOS/eliza-starter](https://github.com/elizaOS/eliza-starter)
* [https://github.com/thejoven/awesome-eliza](https://github.com/thejoven/awesome-eliza)
* [https://github.com/elizaOS/elizaos.github.io](https://github.com/elizaOS/elizaos.github.io)
## ❓ FAQs
### Do I need to create a custom Docker image for my Eliza agent?
* If you want to use the default framework example, you can use the template provided by Phala
* If you have customized code, you'll need to:
1. Convert your Eliza code into a Docker image
2. Upload it to a Docker registry
3. Configure it in the Phala TEE setup
### Can I change the Docker image after creating an agent?
Yes, applications are upgradable. To update your application:
1. Push your updated Docker image to Docker Hub
2. Execute the upgrade on the cloud dashboard
### What are the recommended resources for running Eliza?
It's strongly recommended to run Eliza with 2 vCPUs + 4GB RAM for optimal performance.
### How can I connect the X Account with my Agent?
Besides setting user name, password, and email with specific environments, you also need to enable 2FA on your X account and set it through `TWITTER_2FA_SECRET`. Check the [tutorial](https://phala.com/posts/guide-to-exploring-the-phala-cloud-agent-builder) for more information.
If you still receive a `Login attempt failed` error, consider logging into your X account via a browser and logging out of the existing session. See the related [issue](https://github.com/elizaOS/eliza/issues/905) on the Eliza repository.