> ## Documentation Index
> Fetch the complete documentation index at: https://docs.phala.com/llms.txt
> Use this file to discover all available pages before exploring further.
# Deploy and Verify GPU TEE
> Deploy or fine-tune AI models with hardware-level security using TEE-protected GPUs and verify they run in genuine TEE hardware
GPU TEE gives you dedicated H100, H200, or B200 GPUs running inside trusted execution environments for custom AI workloads. You get full control over your environment with Docker container support, and you can verify hardware authenticity using NVIDIA's local verification tools.
This option works when you need to train, fine-tune, or run inference on proprietary datasets with custom code. For standard LLM inference, the [Confidential AI API](/phala-cloud/confidential-ai/confidential-model/confidential-ai-api) or [Model Template](/phala-cloud/confidential-ai/confidential-gpu/model-template) are simpler alternatives.
Each instance includes NVIDIA Driver `570.133.20` and CUDA `12.8`. You can scale from 1 to 8 GPUs per instance.
## Prerequisites
* Phala Cloud account with sufficient credits
* Basic understanding of Jupyter notebooks
* Familiarity with command-line tools
## Step 1: Deploy GPU TEE instance
### Launch the deployment wizard
Sign in to [cloud.phala.com](https://cloud.phala.com), click **GPU TEE** in the navigation bar, then click **Start Building** to open the Launch GPU Instance wizard.
Check your credit balance in the upper right corner. GPU instances incur hourly charges, so confirm your balance before launching.
### Choose GPU hardware
Select your GPU type based on your compute needs.
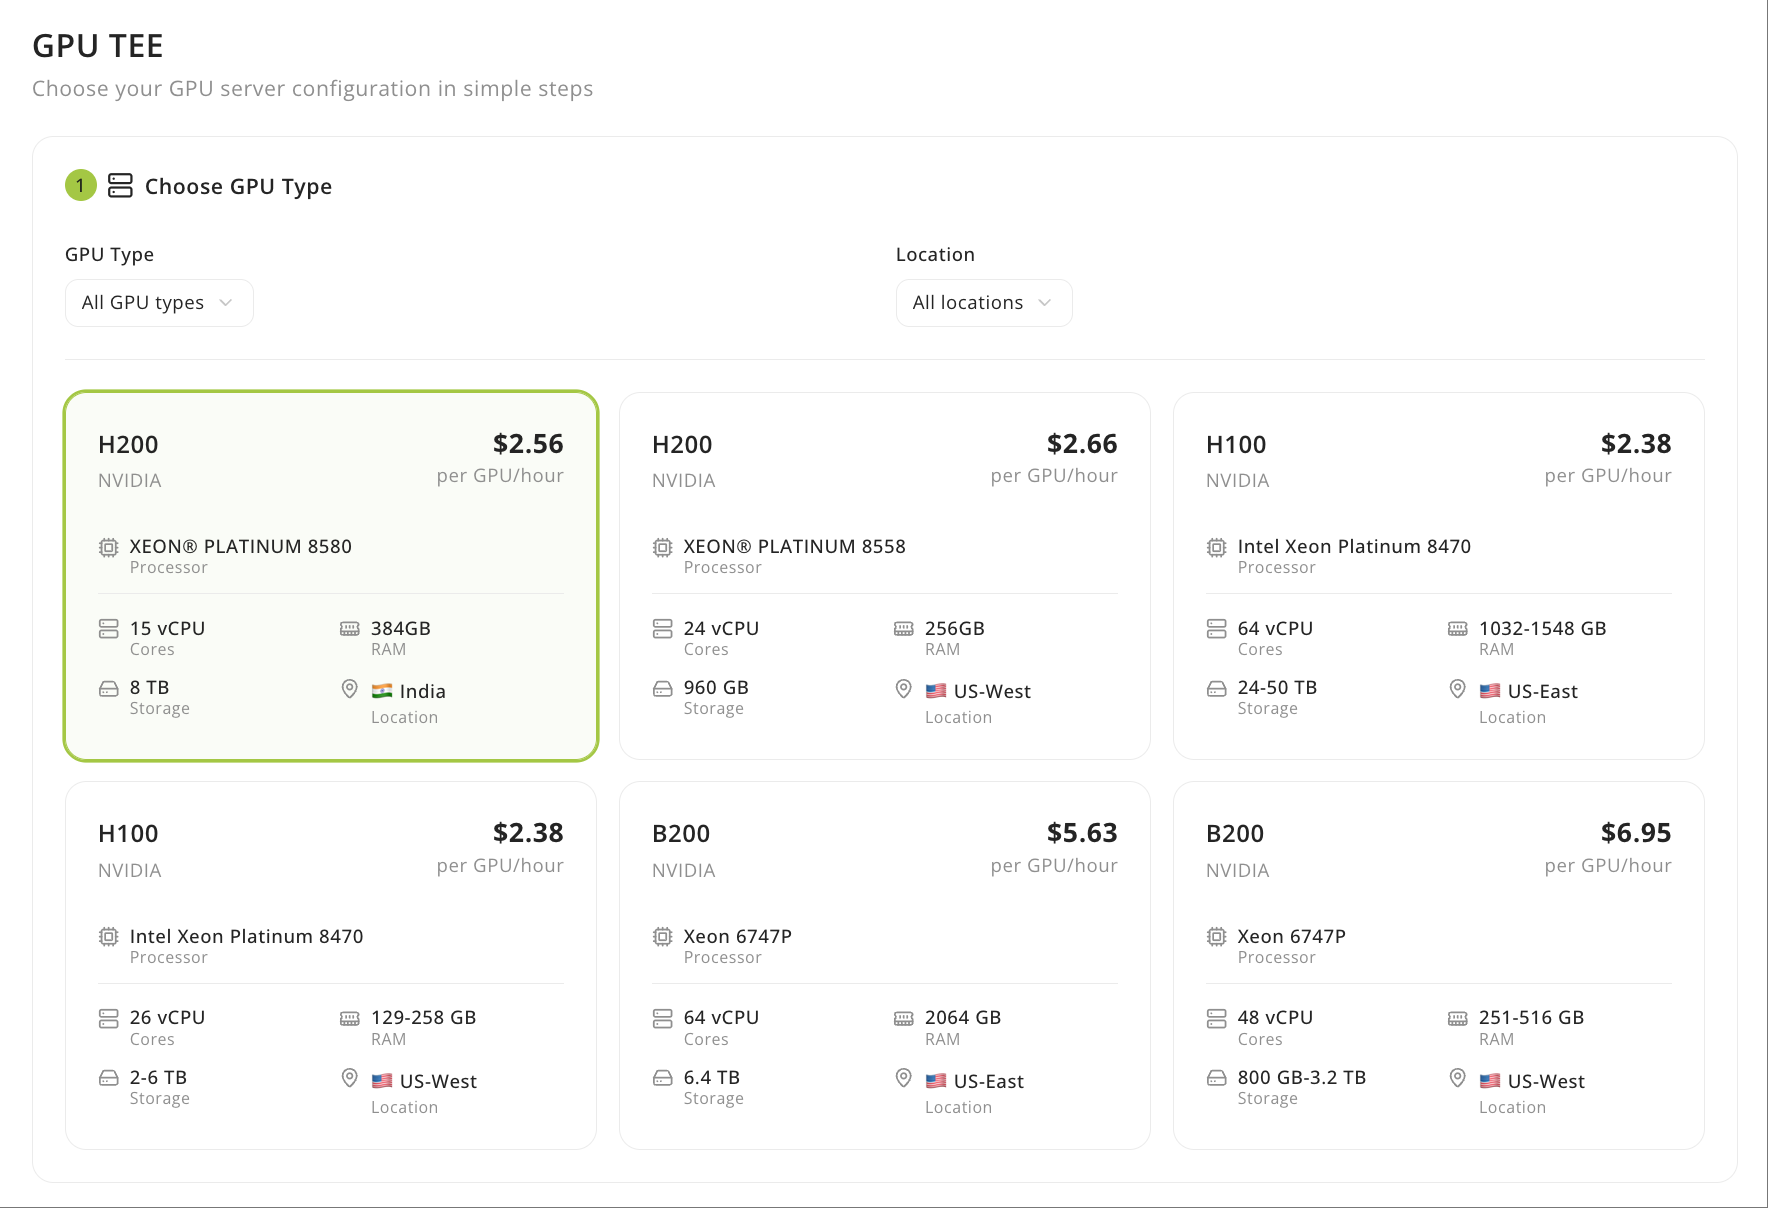 Available options include:
| GPU type | Region | vCPU cores | VRAM | RAM | Storage | Price\* |
| -------- | ------ | ---------- | ------ | ------ | ------- | --------------- |
| H200 | US | 24 | 141 GB | 256 GB | 200 GB | \$2.56/GPU/hour |
| H200 | India | 15 | 141 GB | 384 GB | 200 GB | \$2.30/GPU/hour |
| B200 | US | 12 | 180 GB | 192 GB | 200 GB | \$3.80/GPU/hour |
\*Pricing may vary. Check the dashboard for current rates.
Click your preferred GPU card to highlight it in green.
### Configure GPU count
Choose the number of GPUs for your instance. You can scale from **1 to 8 GPUs** per instance. The UI updates resource totals dynamically:
| GPU count | Example: B200 | Total vCPU | Total VRAM | Total RAM | Total storage |
| --------- | ------------- | ---------- | ---------- | --------- | ------------- |
| 1 GPU | Single | 12 cores | 180 GB | 192 GB | 200 GB |
| 8 GPUs | Multi | 96 cores | 1 TB | 1 TB | 1 TB |
### Configure deployment
Give your deployment a name or use the auto-generated name like `gpu-tee-1p1qp`. For the template, choose **Jupyter Notebook (PyTorch)** to get a GPU-accelerated JupyterLab environment with PyTorch and CUDA pre-installed. This template works well for running verification scripts and custom experiments.
You can also choose vLLM for an inference server or Custom Configuration to provide your own Docker Compose file. For this tutorial, we'll use Jupyter Notebook because it gives us terminal access to run verification commands.
You can always deploy different containers later. Your initial template choice isn't permanent.
### Select pricing plan
Choose a commitment period:
| Plan | Rate | Notes |
| ------------------ | --------------------------- | ------------------------------------------ |
| 6-month commitment | \~\$2.88/GPU/hour | Includes storage, saves \~18% vs on-demand |
| 1-month commitment | \~\$3.20/GPU/hour | Includes storage, short-term commitment |
| On-Demand | \~\$3.50/GPU/hour + storage | Pay-as-you-go, no commitment |
Review the **Pricing Summary** showing estimated costs per hour, day, and month.
### Launch instance
Before launching, review the **Instance Summary** to confirm your GPU model and count, VRAM, RAM, and storage allocations, plus your total estimated costs.
Available options include:
| GPU type | Region | vCPU cores | VRAM | RAM | Storage | Price\* |
| -------- | ------ | ---------- | ------ | ------ | ------- | --------------- |
| H200 | US | 24 | 141 GB | 256 GB | 200 GB | \$2.56/GPU/hour |
| H200 | India | 15 | 141 GB | 384 GB | 200 GB | \$2.30/GPU/hour |
| B200 | US | 12 | 180 GB | 192 GB | 200 GB | \$3.80/GPU/hour |
\*Pricing may vary. Check the dashboard for current rates.
Click your preferred GPU card to highlight it in green.
### Configure GPU count
Choose the number of GPUs for your instance. You can scale from **1 to 8 GPUs** per instance. The UI updates resource totals dynamically:
| GPU count | Example: B200 | Total vCPU | Total VRAM | Total RAM | Total storage |
| --------- | ------------- | ---------- | ---------- | --------- | ------------- |
| 1 GPU | Single | 12 cores | 180 GB | 192 GB | 200 GB |
| 8 GPUs | Multi | 96 cores | 1 TB | 1 TB | 1 TB |
### Configure deployment
Give your deployment a name or use the auto-generated name like `gpu-tee-1p1qp`. For the template, choose **Jupyter Notebook (PyTorch)** to get a GPU-accelerated JupyterLab environment with PyTorch and CUDA pre-installed. This template works well for running verification scripts and custom experiments.
You can also choose vLLM for an inference server or Custom Configuration to provide your own Docker Compose file. For this tutorial, we'll use Jupyter Notebook because it gives us terminal access to run verification commands.
You can always deploy different containers later. Your initial template choice isn't permanent.
### Select pricing plan
Choose a commitment period:
| Plan | Rate | Notes |
| ------------------ | --------------------------- | ------------------------------------------ |
| 6-month commitment | \~\$2.88/GPU/hour | Includes storage, saves \~18% vs on-demand |
| 1-month commitment | \~\$3.20/GPU/hour | Includes storage, short-term commitment |
| On-Demand | \~\$3.50/GPU/hour + storage | Pay-as-you-go, no commitment |
Review the **Pricing Summary** showing estimated costs per hour, day, and month.
### Launch instance
Before launching, review the **Instance Summary** to confirm your GPU model and count, VRAM, RAM, and storage allocations, plus your total estimated costs.
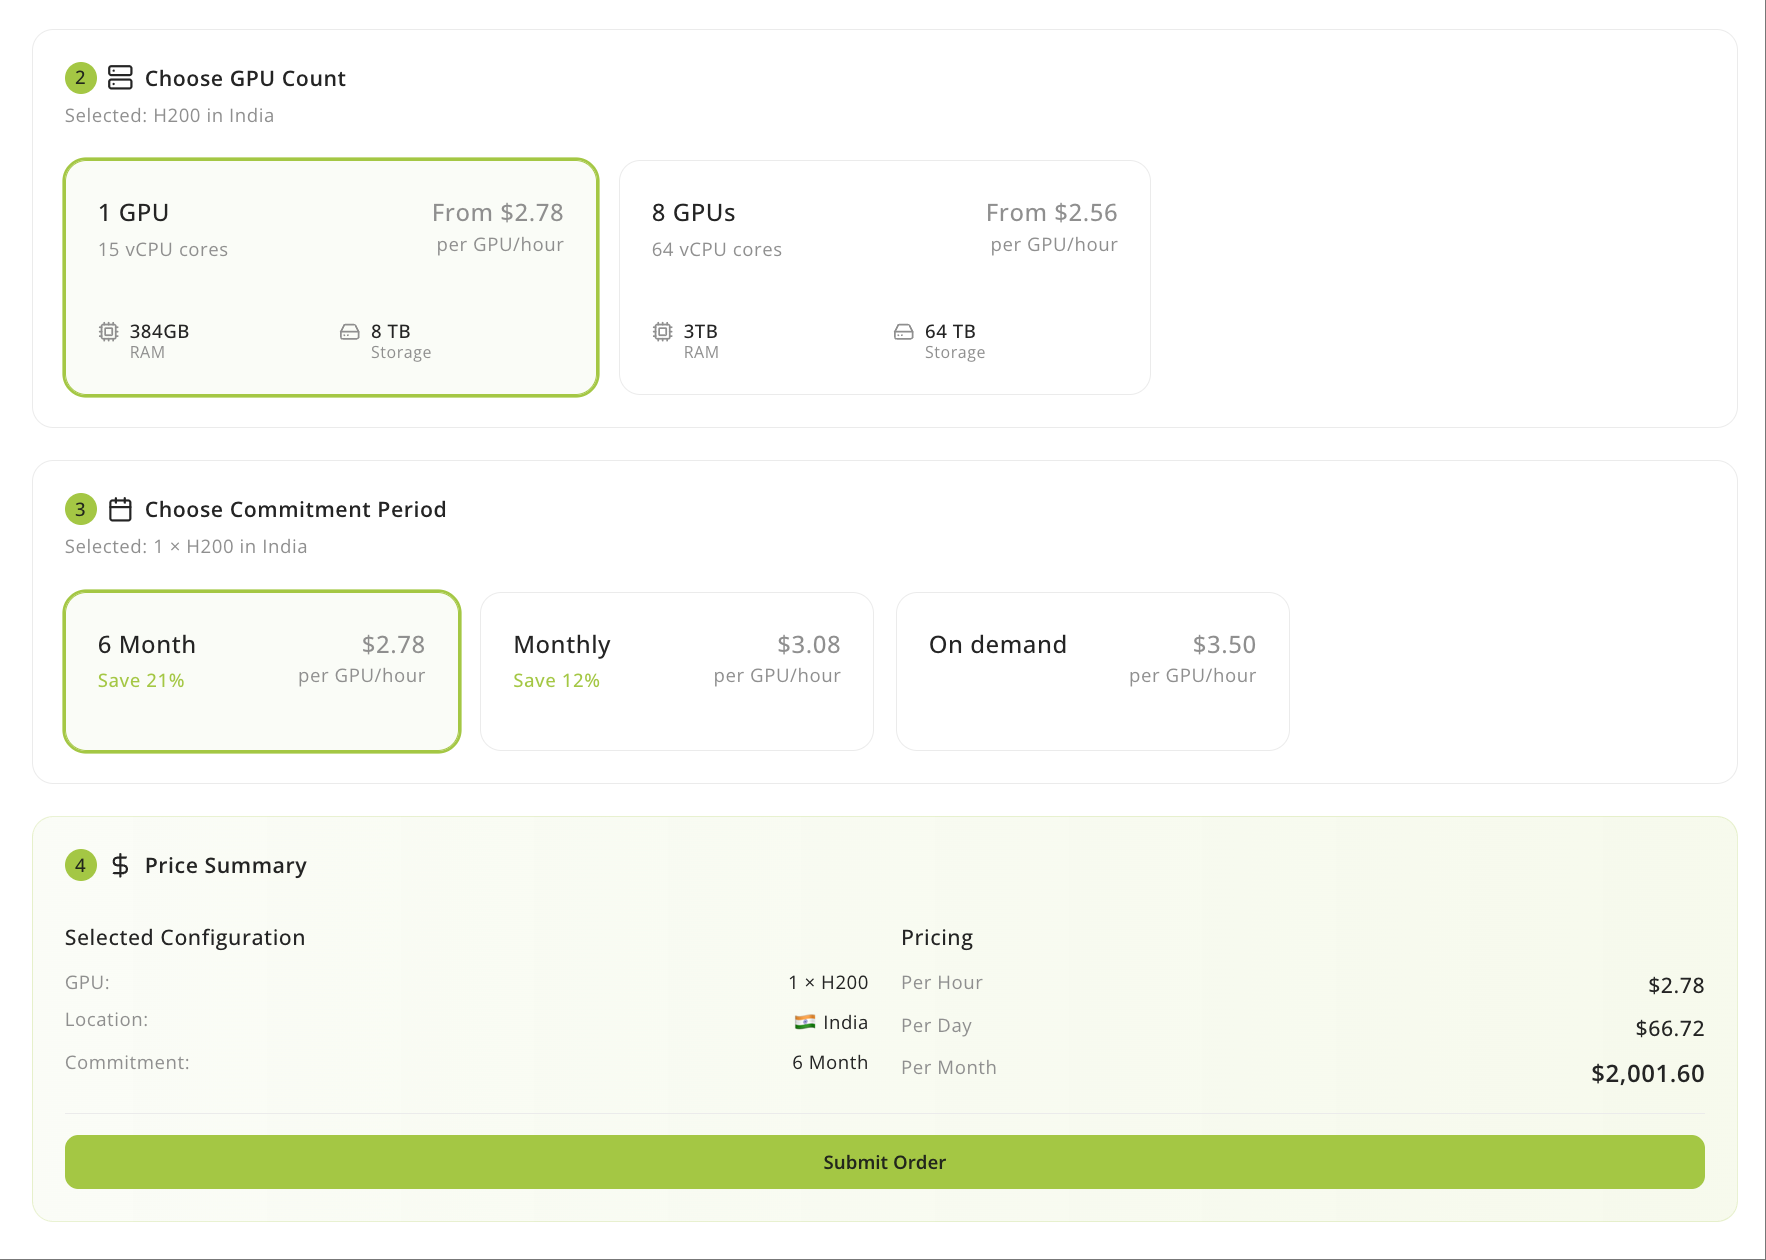 Click **Launch Instance** when you're ready to proceed.
Launching creates hourly charges. Confirm your configuration and budget before proceeding. Provisioning takes approximately 1 day.
## Step 2: Access your GPU TEE instance
After provisioning completes, your instance appears under the **GPU TEE** tab with connection details including the JupyterLab URL.
Navigate to the **GPU TEE** tab in your dashboard and find your instance in the GPU Instances list. Click **View Details** to see the JupyterLab URL, then open that URL in your browser to access your instance.
Monitor provisioning status in the GPU Instances list. Instances progress from **Preparing** → **Starting** → **Running**.
## Step 3: Verify GPU TEE attestation
Open a terminal in JupyterLab (**File** → **New** → **Terminal**) to verify your instance runs on genuine TEE hardware.
### Check GPU and TEE status
First, confirm your GPU is detected and confidential compute mode is active. Run `nvidia-smi` to check GPU status:
```bash theme={"system"}
nvidia-smi
```
Look for your GPU model (H100/H200/B200), driver version 570.133.20, and CUDA version 12.8. Then check confidential compute status:
```bash theme={"system"}
nvidia-smi conf-compute -q
```
Expected output:
```
# nvidia-smi conf-compute -q
==============NVSMI CONF-COMPUTE LOG==============
CC State : ON
Multi-GPU Mode : None
CPU CC Capabilities : INTEL TDX
GPU CC Capabilities : CC Capable
CC GPUs Ready State : Ready
```
The key indicators are `CC State: ON` and `CPU CC Capabilities: INTEL TDX`, confirming your instance runs in TEE mode.
### Run attestation verification
Install NVIDIA's attestation verification tools:
```bash theme={"system"}
pip install nv-local-gpu-verifier nv_attestation_sdk
```
Run the verifier to get cryptographic proof of hardware authenticity:
```bash theme={"system"}
python -m verifier.cc_admin
```
The verifier confirms your GPUs are genuine NVIDIA devices, checks confidential compute mode is enabled, verifies driver and firmware versions, and generates cryptographic evidence of your TEE status. Successful verification means your GPU hardware is authentic, confidential compute mode is active, and the driver version matches the expected TEE-enabled version.
If verification fails, do not use the instance for confidential workloads. Contact [Phala Support](/phala-cloud/support) with the error details.
## Step 4: Confirm GPU functionality
Verify GPU functionality with PyTorch. Open a new notebook in JupyterLab (**File** → **New** → **Notebook**) and run:
```python theme={"system"}
import torch
print(f"CUDA available: {torch.cuda.is_available()}")
print(f"GPU: {torch.cuda.get_device_name(0)}")
```
This confirms PyTorch can detect and access the GPU.
## Next steps
You've deployed and verified a GPU TEE instance! Now you can:
Learn how to fetch and verify attestations programmatically
Understand how GPU and CPU attestations create a complete trust chain
Make your GPU TEE workloads accessible over HTTPS
Click **Launch Instance** when you're ready to proceed.
Launching creates hourly charges. Confirm your configuration and budget before proceeding. Provisioning takes approximately 1 day.
## Step 2: Access your GPU TEE instance
After provisioning completes, your instance appears under the **GPU TEE** tab with connection details including the JupyterLab URL.
Navigate to the **GPU TEE** tab in your dashboard and find your instance in the GPU Instances list. Click **View Details** to see the JupyterLab URL, then open that URL in your browser to access your instance.
Monitor provisioning status in the GPU Instances list. Instances progress from **Preparing** → **Starting** → **Running**.
## Step 3: Verify GPU TEE attestation
Open a terminal in JupyterLab (**File** → **New** → **Terminal**) to verify your instance runs on genuine TEE hardware.
### Check GPU and TEE status
First, confirm your GPU is detected and confidential compute mode is active. Run `nvidia-smi` to check GPU status:
```bash theme={"system"}
nvidia-smi
```
Look for your GPU model (H100/H200/B200), driver version 570.133.20, and CUDA version 12.8. Then check confidential compute status:
```bash theme={"system"}
nvidia-smi conf-compute -q
```
Expected output:
```
# nvidia-smi conf-compute -q
==============NVSMI CONF-COMPUTE LOG==============
CC State : ON
Multi-GPU Mode : None
CPU CC Capabilities : INTEL TDX
GPU CC Capabilities : CC Capable
CC GPUs Ready State : Ready
```
The key indicators are `CC State: ON` and `CPU CC Capabilities: INTEL TDX`, confirming your instance runs in TEE mode.
### Run attestation verification
Install NVIDIA's attestation verification tools:
```bash theme={"system"}
pip install nv-local-gpu-verifier nv_attestation_sdk
```
Run the verifier to get cryptographic proof of hardware authenticity:
```bash theme={"system"}
python -m verifier.cc_admin
```
The verifier confirms your GPUs are genuine NVIDIA devices, checks confidential compute mode is enabled, verifies driver and firmware versions, and generates cryptographic evidence of your TEE status. Successful verification means your GPU hardware is authentic, confidential compute mode is active, and the driver version matches the expected TEE-enabled version.
If verification fails, do not use the instance for confidential workloads. Contact [Phala Support](/phala-cloud/support) with the error details.
## Step 4: Confirm GPU functionality
Verify GPU functionality with PyTorch. Open a new notebook in JupyterLab (**File** → **New** → **Notebook**) and run:
```python theme={"system"}
import torch
print(f"CUDA available: {torch.cuda.is_available()}")
print(f"GPU: {torch.cuda.get_device_name(0)}")
```
This confirms PyTorch can detect and access the GPU.
## Next steps
You've deployed and verified a GPU TEE instance! Now you can:
Learn how to fetch and verify attestations programmatically
Understand how GPU and CPU attestations create a complete trust chain
Make your GPU TEE workloads accessible over HTTPS